background image

Buzzaround XL_Owner’s Manual                                                                                                                  RevE_102414 
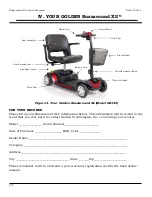
                             VII. DISASSEMBLY


Remove the Tiller Basket 

5. Remove the tiller basket by pulling up. 

 
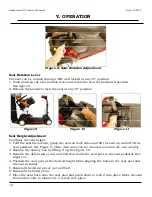
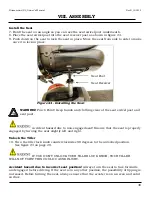
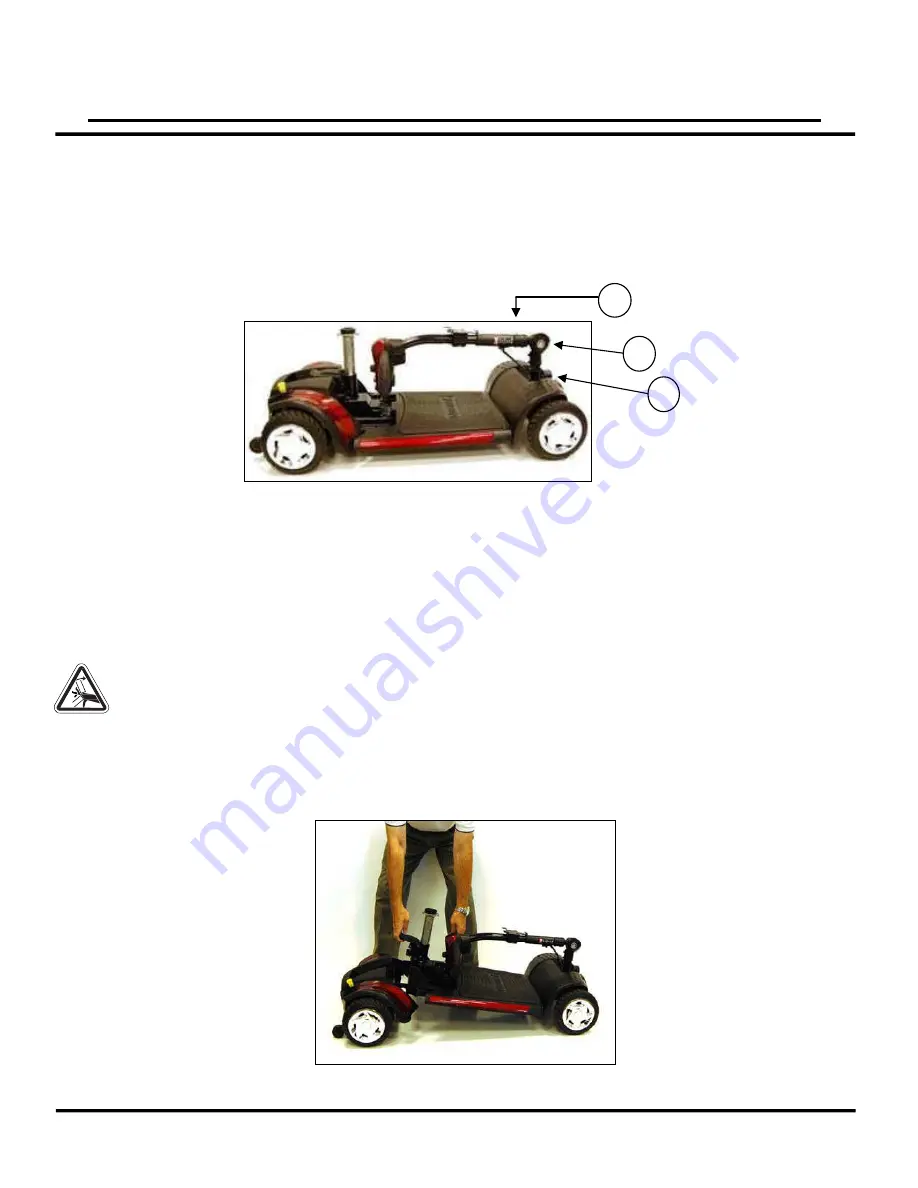
Fold Down and Lock the Tiller 

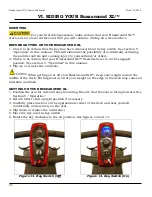
6. Push in and turn the tiller lock clockwise 90 degrees. See #1 on figure 17.  
This will lock the front wheel to keep it from turning side to side to help control while 
carrying.


                               Figure 17. Lowered Tiller 


6. Loosen tiller adjustment knob and fold the tiller down flat. See #2 on Figure 17. Then 
tighten the adjustment knob to secure the tiller in its new position. Once the tiller is 
lowered and locked, you may use it as a handle for easy transportation. Grab it by the 
plastic on the tiller. See #3 on Figure 17. 

 
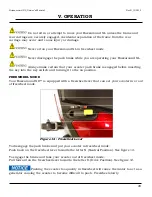
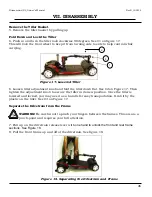
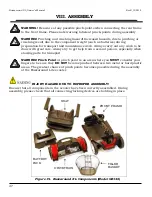
Separate the Drivetrain from the Frame 


          WARNING!


Be careful not to pinch your fingers between the frames. This area is a  

           pinch-point and requires your full attention. 
  
7.


Pull up on the drivetrain release lever with

 one hand to unlock the front and rear frame 

sections. See Figure 18.   

8. Pull the front frame up and off of the drivetrain. See figure 18. 


                                Figure 18. Separating the Drivetrain and Frame 


                                                                                                                                       26            

1


2


3

Summary of Contents for Buzz around XL GB116

Page 1: ...Owner s Manual MODELS GB116 GB146 Y O U R L I F E I N M O T I O N GB146 GB116...

Page 2: ...Control Options 17 Seating 18 19 Freewheel Mode 20 VI RIDING YOUR Buzzaround XL Scooter 21 Mounting 21 Basic Driving 22 Steering in Tight Spots 23 24 VII DISASSEMBLY 25 26 VIII ASSEMBLY 27 30 IX TRANS...

Page 3: ...to the left or right for easy transfers or to sit more comfortably at a table or desk Adjustable Armrests Your Buzzaround XL scooter features width and angle adjustable armrests to find the most comfo...

Page 4: ...ch if not avoided could result in death or serious injury This icon is represented as a black symbol on a yellow triangle with a black border MANDATORY Failure to perform mandatory actions can cause p...

Page 5: ...reewheel lever is in the engaged position See section V Operation in this manual Flip up the armrests When getting on or off your Buzzaround XL keep your weight toward the middle of the deck Putting m...

Page 6: ...do come to a stop restart and accelerate slowly and carefully Do not try to descend or climb a slope whose gradient is greater than recommended Buzzaround XL maximum recommended incline is 6 Figure 2...

Page 7: ...dure 2 Emergency No Power 1 Set the key switch to the Off position See section V Operation 2 Dismount your Buzzaround XL 3 Set the freewheel lever to Disengaged 4 While standing alongside the scooter...

Page 8: ...Read completely and understand this owner s manual before assembling operating transporting or disassembling your Golden Buzzaround XL Always operate your Golden Buzzaround XL with thought care and sa...

Page 9: ...down a step or curb that is higher than the ground clearance listed on the specifications chart see pages 14 15 Never back up or down a step or curb Do not drive your Buzzaround XL in icy or salted co...

Page 10: ...The higher the level of resistance the greater the degree of protection from EMI RFI measured in volts per meter V m The FDA has also determined that current technology is capable of providing 20 V m...

Page 11: ...Body Color_______________ Dealer Name___________________________________________________________________ Company______________________________________________________________________ Address_________...

Page 12: ...Dynamic R Series 50 Amp Dynamic R Series Length 40 5 in 42 in Width 21 5 in 21 5 in Height ground to top seat back 33 35 in 33 35 in Ground to top of Seat 20 22 in 20 22 in Ground to top of Deck 4 0 i...

Page 13: ...yl Black Vinyl Warranty Frame Lifetime Warranty Lifetime Warranty Drive Train 2 Year Warranty 2 Year Warranty Electronics 2 2 Year Warranty 2 Year Warranty Notes 1 Battery range will vary due to rider...

Page 14: ...n control of your Buzzaround XL Key Switch This switch turns the power on and off to your Buzzaround XL See figure 5 Insert the key into the key switch Turn the key 90 degrees clockwise to turn on you...

Page 15: ...or from reverse to forward To drive in reverse use either of the following Use your left hand fingers to pull back on the left side of the throttle control lever Use your right thumb to push the right...

Page 16: ...e desired width 3 Tighten the adjustment knobs Be sure adjustments knobs are securely tightened against the inserted armrest tube Do not overextend the armrest Flip up Armrests Pull up on the end of e...

Page 17: ...rasp the seat on both sides and lift the seat up and off of the seat pedestal See Figure 9 Note Seat arms can be removed to reduce the seat weight 2 Remove the battery box by lifting it up See figure...

Page 18: ...y into the key switch and turning it to the on position FREEWHEEL MODE Your Buzzaround XL is equipped with a freewheel lever that can set your scooter in or out of freewheel mode Figure 12 Freewheel L...

Page 19: ...e engaged position See section V Operation in this manual 3 Flip up or remove the armrests When getting on or off your Buzzaround XL keep your weight toward the middle of the deck Putting most or all...

Page 20: ...lever to gently your Buzzaround XL 7 Release the throttle control lever to allow your Buzzaround XL to come gently to a full stop 8 Practice these two basic functions until you feel that you have con...

Page 21: ...nd XL requires attention to what you are doing Use extreme caution when operating your scooter in reverse Plan your route to avoid getting into a difficult situation Make sure your proposed route is c...

Page 22: ...your Buzzaround XL while driving up a ramp Starting up again simply requires that you apply gentle and steady forward power pressure to the throttle control lever Accelerate gently after stopping on a...

Page 23: ...disassemble your Buzzaround XL 2 Optional Loosen the armrest adjustment knobs and remove the arms from the seat This will reduce the weight of the seat making it easier to lift Never pull on the arms...

Page 24: ...gure 17 Then tighten the adjustment knob to secure the tiller in its new position Once the tiller is lowered and locked you may use it as a handle for easy transportation Grab it by the plastic on the...

Page 25: ...Always try to get help from a second person especially when stowing parts for transport WARNING Pinch Point A pinch point is an area where you MUST consider your fingers to be sure they DO NOT become...

Page 26: ...BE CAREFUL NOT TO PINCH YOUR FINGERS 2 Lower the frame onto the drivetrain until the drivetrain release lever engages You should hear an audible click See figure 21 Install the Battery Pack 3 Gently...

Page 27: ...Tighten the tiller adjustment knob at the desired position Figure 23 Tiller Raised MAKE SURE YOU TIGHTEN YOUR TILLER KNOB TO BE SURE IT IS SECURED IN THE DESIRED POSITION Install the Tiller Basket 6 P...

Page 28: ...post Accident hazard due to non engaged seat Ensure that the seat is properly engaged by turning the seat slightly left and right Unlock the Tiller 10 Turn the tiller lock knob counterclockwise 90 de...

Page 29: ...padding may be used to protect your Buzzaround XL during transportation Do not lift your Buzzaround XL by its plastic body parts or dash Breakage of these parts is not covered by the warranty Do not u...

Page 30: ...around XL comes standard with two sets of quick snap color shrouds in Red and Blue Colors can be changed by gently snapping off the pieces See figure 26 Figure 26 Quick Snap Shrouds Removed Do not use...

Page 31: ...ver use an automotive or wet type charger Avoid deep discharges and never drain the batteries completely Do not leave batteries in a low state of charge for extended periods Charge a discharged batter...

Page 32: ...ving up a long steep hill Driving over a curb Run down batteries Exceeding the maximum weight capacity of the scooter As you operate your Buzzaround XL battery voltages go down and battery current mus...

Page 33: ...condition or fault Beep Codes 1 Beep Indicates that the battery voltage with the throttle control lever in the neutral position is below the required operating voltage of the scooter The batteries ne...

Page 34: ...tion See page 18 The brake or the brake wiring may be damaged For safety reasons your scooter was designed to cease operation until the problem is corrected Remedy Make certain that the freewheel leve...

Page 35: ...r 8 Beeps Indicates a motor voltage problem Your scooter will not operate until the problem is corrected Remedy Contact your authorized Golden Technologies Inc dealer 9 Beeps Indicates other internal...

Page 36: ...defective by an authorized Golden Technologies representative Steel Frame Frame Welds Tiller Frame Front Fork Seat Post Two Year Warranty For the period of two years from the date of purchase in the...

Page 37: ...storage Commercial use or use other than normal Repairs and or modifications made to any part without the specific consent of Golden Technologies Exceeding the specified weight capacity of the unit Ac...

Reviews: