background image

19

 HOW TO FOLD THE TREADMILL

Before folding the treadmill, adjust the incline to 

the lowest position. If you do not do this, you may 

damage the treadmill when you fold it. Remove the 

key and unplug the power cord. CAUTION: You must 

be able to safely lift 45 lbs. (20 kg) to raise, lower, 

or move the treadmill. 

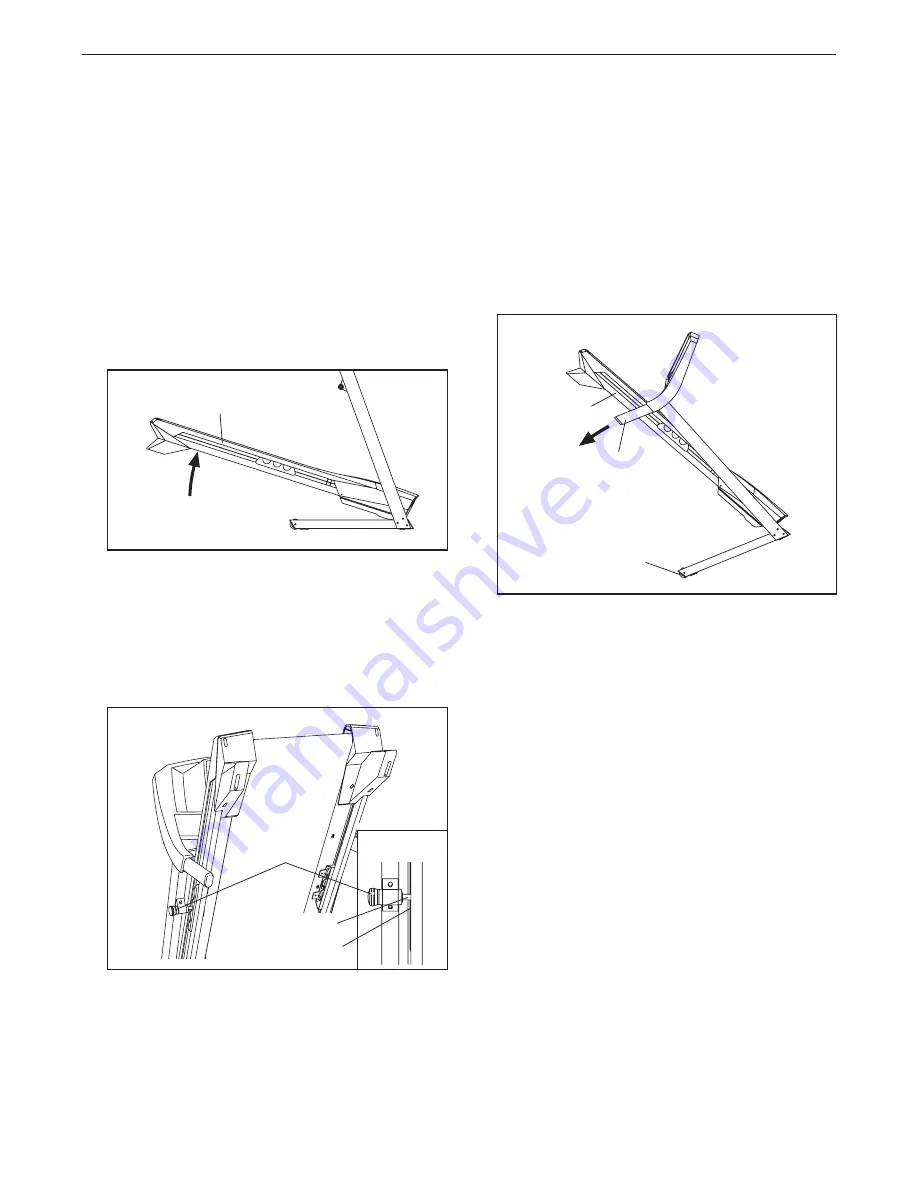
1.    Hold the metal frame firmly in the location shown 

by the arrow below. CAUTION: Do not hold the 

frame by the plastic foot rails. Bend your legs 

and keep your back straight.

2.   Hold  the  frame firmly with your right hand. Pull the 

latch knob to the left and hold it. Raise the frame 

until the hole in the platform cushion is aligned with 

the latch pin. Then, slowly release the latch knob; 

make sure that the latch pin is fully inserted 

into the platform cushion. 


To protect the floor or carpet, place a mat under the 

treadmill. Keep the treadmill out of direct sunlight. 

Do not leave the treadmill in the storage position in 

temperatures above 85° F (30° C).

HOW TO MOVE THE TREADMILL 

 Before moving the treadmill, fold it as described at the 

left. CAUTION: Make sure that the latch pin is fully 

inserted into the platform cushion. Remove the 

dumbbells. Moving the treadmill may require two 

people.

1.    Hold the frame and one of the handrails, and place 

one foot against a wheel. 

2.      Pull back on the handrail until the treadmill will roll 

on the wheels, and carefully move it to the desired 

location. CAUTION: Do not move the treadmill 

without tipping it back, do not pull on the frame, 

and do not move the treadmill over an uneven 

surface.

3.    Place one foot against a wheel, and carefully lower 

the treadmill.

HOW TO LOWER THE TREADMILL FOR USE

1.  

See drawing 2. Hold the upper end of the treadmill 

with your right hand. Pull the latch knob to the left 

and hold it. Next, lower the frame until it is past 

the latch pin. Make sure that the pin does not hit 

against the foot rail. Then, release the latch knob.

2.   See drawing 1 at the left. Hold the metal frame 

firmly with both hands, and lower it to the floor. 

CAUTION: Do not hold the frame by the plastic 

foot rails, and do not drop the frame. Bend your 

legs and keep your back straight. 

 HOW TO FOLD AND MOVE THE TREADMILL 

Frame

1

1

Handrail

Frame

Wheel

2

Latch

Knob

  Engaged

Platform Cushion

Latch Pin

Summary of Contents for Stride Trainer 410

Page 1: ...for reference QUESTIONS If you have questions or if parts are damaged or missing DO NOT CONTACT THE STORE please contact Customer Care IMPORTANT Please register this product see the limited warranty o...

Page 2: ...num ber on the front cover of this manual and request a free replacement decal Apply the decal in the location shown Note The decals may not be shown at actual size TABLE OF CONTENTS WARNING DECAL PLA...

Page 3: ...ell phone chargers into the surge suppressor or into an outlet on the same circuit 12 Use only a surge suppressor that meets all of the specifications described on page 13 To purchase a surge suppress...

Page 4: ...23 Never insert any object into any opening on the treadmill 24 Inspect and properly tighten all parts of the treadmill regularly 25 DANGER Always unplug the power cord immediately after use before cl...

Page 5: ...this manual To help us assist you note the product model number and serial number before contacting us The model number and the location of the serial number decal are shown on the front cover of thi...

Page 6: ...PART LIST near the end of this manual The number following the key number is the quantity used for assembly Note If a part is not in the hardware kit check to see if it is preat tached Extra hardware...

Page 7: ...ricant After shipping there may be some lubricant on top of the walking belt or on the shipping carton This is normal If there is lubricant on top of the walking belt wipe it off with a soft cloth and...

Page 8: ...Right Upright 74 76 63 76 Wire Tie Wire Tie 3 63 4 Hold the Right Upright 76 against the Base 74 Be careful not to pinch the Upright Wire 63 Insert a 3 8 x 3 1 4 Screw 2 with a 3 8 Star Washer 3 into...

Page 9: ...r Washer 6 into the Right Upright 76 and the Right Handrail 64 Then partially tighten a 5 16 x 3 Screw 7 with a 5 16 Star Washer 6 into the Right Handrail and the Right Upright Do not fully tighten th...

Page 10: ...Uprights 66 76 with four 10 x 3 4 Screws 8 and four 10 Star Washers 23 Start all four Screws and then tighten them Firmly tighten the two 5 16 x 3 4 Screws 5 and two 5 16 x 3 Screws 7 7 Remove the fou...

Page 11: ...63 10 10 Insert the wires into the Right Handrail 64 through the indicated hole as you set the con sole assembly on the Left and Right Uprights 66 76 Make sure that no wires are pinched See the inset...

Page 12: ...pin 12 12 Move the treadmill to the desired location for use if you have not already done so see HOW TO FOLD AND MOVE THE TREADMILL on page 19 Place the Dumbbells 65 in the dumbbell tray CAUTION Do no...

Page 13: ...into a surge suppressor and plug the surge suppressor into an appropriate outlet that is properly installed and grounded in accordance with all local codes and ordinances The outlet must be on a nomi...

Page 14: ...ual In addition the console offers four preset performance workouts Each workout controls the speed and incline of the treadmill as it guides you through an effective exercise session To turn on the p...

Page 15: ...sole adjust the position of the clip HOW TO USE THE MANUAL MODE 1 Insert the key into the console See HOW TO TURN ON THE POWER at the left 2 Select the manual mode When the key is in serted the manual...

Page 16: ...play can show the elapsed time the distance that you have walked or run the approximate number of calories you have burned or the speed of the walking belt Press the Priority Display button repeatedly...

Page 17: ...t the speed and or incline setting will flash in the display to alert you The treadmill will then automatically adjust to the speed and incline settings for the next segment When you use a weight loss...

Page 18: ...display demo mode designed to be used if the treadmill is displayed in a store While the demo mode is turned on the console will function normally when you plug in the power cord press the power switc...

Page 19: ...it as described at the left CAUTION Make sure that the latch pin is fully inserted into the platform cushion Remove the dumbbells Moving the treadmill may require two people 1 Hold the frame and one o...

Page 20: ...ch see the drawing above If the switch has tripped wait for five minutes and then press the switch back in b Make sure that the power cord is plugged in If the power cord is plugged in unplug it wait...

Page 21: ...the incline is calibrated remove the key from the console SYMPTOM The walking belt slows when walked on a Use only a single outlet surge suppressor that meets all of the specifications described on pa...

Page 22: ...plug in the power cord insert the key and run the treadmill for a few minutes Repeat until the walking belt is centered b If the walking belt slips when walked on first re move the key and UNPLUG THE...

Page 23: ...c Exercise If your goal is to strengthen your cardiovascular system you must perform aerobic exercise which is activity that requires large amounts of oxygen for prolonged periods of time For aerobic...

Page 24: ...ler 43 1 Left Rear Foot 44 1 Hex Key 45 1 5 32 Hex Key 46 1 Right Rear Foot 47 0 Not Used 48 1 Motor Hood 49 1 Incline Motor 50 2 Lift Frame Bushing 51 1 Lift Frame 52 1 Belly Pan 53 1 Power Cord Grom...

Page 25: ...3 14 30 29 31 41 18 19 19 45 20 44 27 28 14 34 37 1 20 36 14 28 14 14 14 14 11 14 14 14 43 46 11 42 17 35 77 77 25 25 19 19 4 38 24 24 22 20 20 79 79 14 1 1 1 82 14 14 14 14 14 14 14 14 84 84 84 84 84...

Page 26: ...26 EXPLODED DRAWING B 52 4 4 54 53 48 13 51 80 15 16 16 1 49 4 55 4 4 4 26 10 26 50 50 13 13 4 4 10 4 4 Model No GGTL39610 0 R0512A...

Page 27: ...69 10 9 9 75 72 78 72 78 78 71 78 71 69 10 75 70 70 8 67 70 2 3 2 3 3 2 62 4 8 8 61 59 5 6 4 4 4 4 7 6 4 58 63 63 73 4 57 64 60 60 65 1 7 6 4 4 56 4 4 4 4 4 4 4 4 23 23 5 6 65 70 12 12 4 21 81 76 1 83...

Page 28: ...extend to freight damage to the product This warranty will automatically be voided if the product is used as a store display model if the product is purchased or transported outside the USA if all in...

Reviews: