background image

8

12"

12"

Installation Instructions

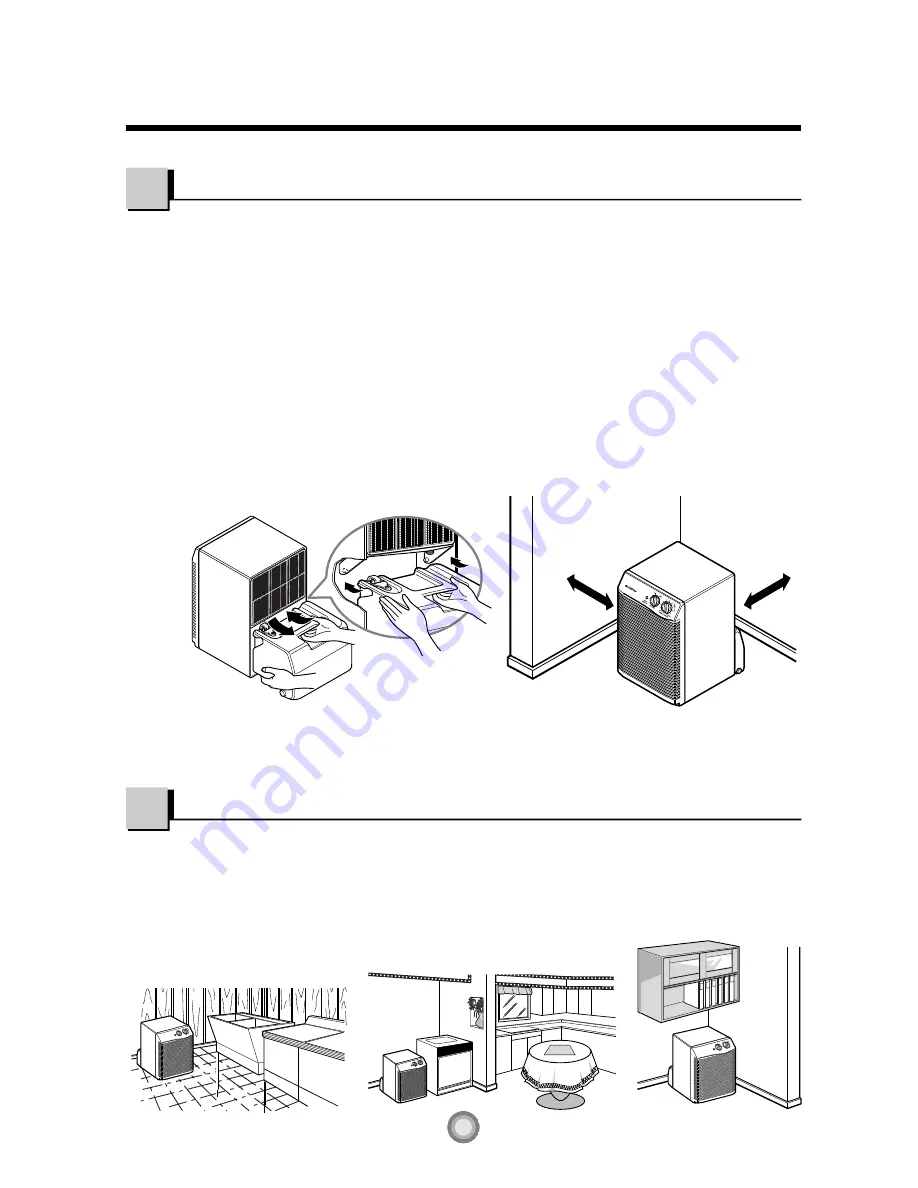
Installing it properly

1.

Allow at least 12 inches of space on all sides of the unit for good air circulation.

2.

Install your dehumidifier on a floor, table, or shelf. When installing the dehumidifier on a table

or shelf, make sure the table or shelf is strong enough to support the weight of the dehumidifier
with a full bucket. Do not sit or stand on the dehumidifier.

NOTE: The height of a table or shelf might provide a better position from which to handle the bucket

and help prevent icing of the coils due to colder air near the floor (such as in a basement).

3.

The bucket must be properly positioned on the hangers of the drain pan in order for the

automatic shut-off to operate correctly.

4.

Rollers let you move the dehumidifier easily. 

Choosing the proper location for your dehumidifier

• Use the dehumidifier in a

basement to help prevent
moisture damage.

• Use the dehumidifier in

cooking, laundry, bathing, and
dishwashing areas which have
excessive moisture.

• Use the dehumidifier to

prevent moisture damage
anywhere books or valuables
are stored.

Summary of Contents for , DH4010B

Page 1: ...S MANUAL http www LGEservice com http www LGEservice com techsup html Please read the operating instructions and safety precautions carefully and thoroughly before operating your dehumidifier MODEL DH3010A DH4010B DH5010B ...

Page 2: ...N Safety precautions 3 Operating Instructions 5 Installation Instructions 8 Care and Maintenance 9 Troubleshooting Tips 10 Warranty Back cover Customer assistance numbers Back cover FOR YOUR RECORDS Write the model and serial numbers here Model Serial You can find them on a label on the back of the dehumidifier behind the bucket Dealer s Name Date Purchased Contact an Authorized Service Center for...

Page 3: ...to do Be sure to follow the instruction Complete all grounding and installation requirements as described on page 5 Otherwise it could cause electrical shock or fire Disconnect power cord from receptacle before servicing or cleaning It could cause electrical shock or fire Do not use flammable fluids solvents abrasive cleaners or strong detergents to clean dehumidifier It could cause fire or produc...

Page 4: ...ause electrical shock Install the dehumidifier properly on a floor table or shelf that is level and strong enough to support it with a full bucket of water Do not install dehumidifier in an area where temperatures will fall below 65 F 18 C Low temperatures could cause coils to frost and unit may not start Use only for the intended purpose Do not use this dehumidifier to preserve devices food and c...

Page 5: ...d and properly grounded electrical supply is required A time delay fuse or time delay circuit breaker is recommended Use a dedicated circuit serving only this appliance Do not use an extension cord Recommended grounding method For your personal safety this appliance must be grounded This appliance has a power supply cord with a 3 prong grounding plug To minimize possible shock hazard the cord must...

Page 6: ...tween Off and Max for normal operation If you need more dehumidification turn the Humidity Control toward Max If you need less dehumidification turn the Humidity Control toward Off 3 Turn the Humidity Control to Off to stop the unit manually 4 If you want to control the speed of air flow turn the Fan Speed toward Low or High De icer control The Defrost Control senses frost build up on the evaporat...

Page 7: ...bucket is full remove and empty it into a large sink or tub When finished replace it properly NOTE The bucket must be positioned properly making sure slots on the back of bucket are positioned correctly 2 Place the dehumidifier directly over drain The bucket has a threaded hose connection which can be left open Drill a 1 4 6 4mm to 1 2 13mm hole in the center of the hose connection Once opened the...

Page 8: ...ight provide a better position from which to handle the bucket and help prevent icing of the coils due to colder air near the floor such as in a basement 3 The bucket must be properly positioned on the hangers of the drain pan in order for the automatic shut off to operate correctly 4 Rollers let you move the dehumidifier easily Choosing the proper location for your dehumidifier Use the dehumidifi...

Page 9: ...leach or abrasives Air filter 1 1 First flex the filter at the lower right corner Second slide the upper right side to the left Then release all of the tabs and remove the filter 1 2 Wash air filter with warm water and a mild detergent Rinse and dry it The assembly order is the opposite of disassembly Cleaning the coil 2 1 Remove air filter from the cabinet regarding to the above order 2 2 Brush t...

Page 10: ...to wall outlet Check the house fuse circuit breaker box and replace fuse or reset the breaker Dehumidifier automatically shuts off when the selected amount of moisture has been removed from the air If you want to remove more moisture turn the humidity Control to Max After the dehumidifier starts reset the control to the desired setting Dehumidifier automatically shuts off when the bucket is full E...

Page 11: ...emperature is too low The higher the moisture in the room air the longer it takes for the room air to become dry Make sure there are no curtains blinds or furniture blocking the front or back of the dehumidifier Turn the knob to a higher number Check that all doors windows and other openings are securely close Install the dehumidifier away from the dryer Dryer should be vented to the outside The u...

Page 12: ... on how long an implied warranty lasts so these limitations or exclusions may not apply to you This warranty gives you specific legal rights and you may also have other rights which vary from state to state or province to province THE ABOVE WARRANTY DOES NOT APPLY To damages or problems which result from delivery or improper installation To damages or problems which result from misuse abuse accide...

Reviews: