106
105
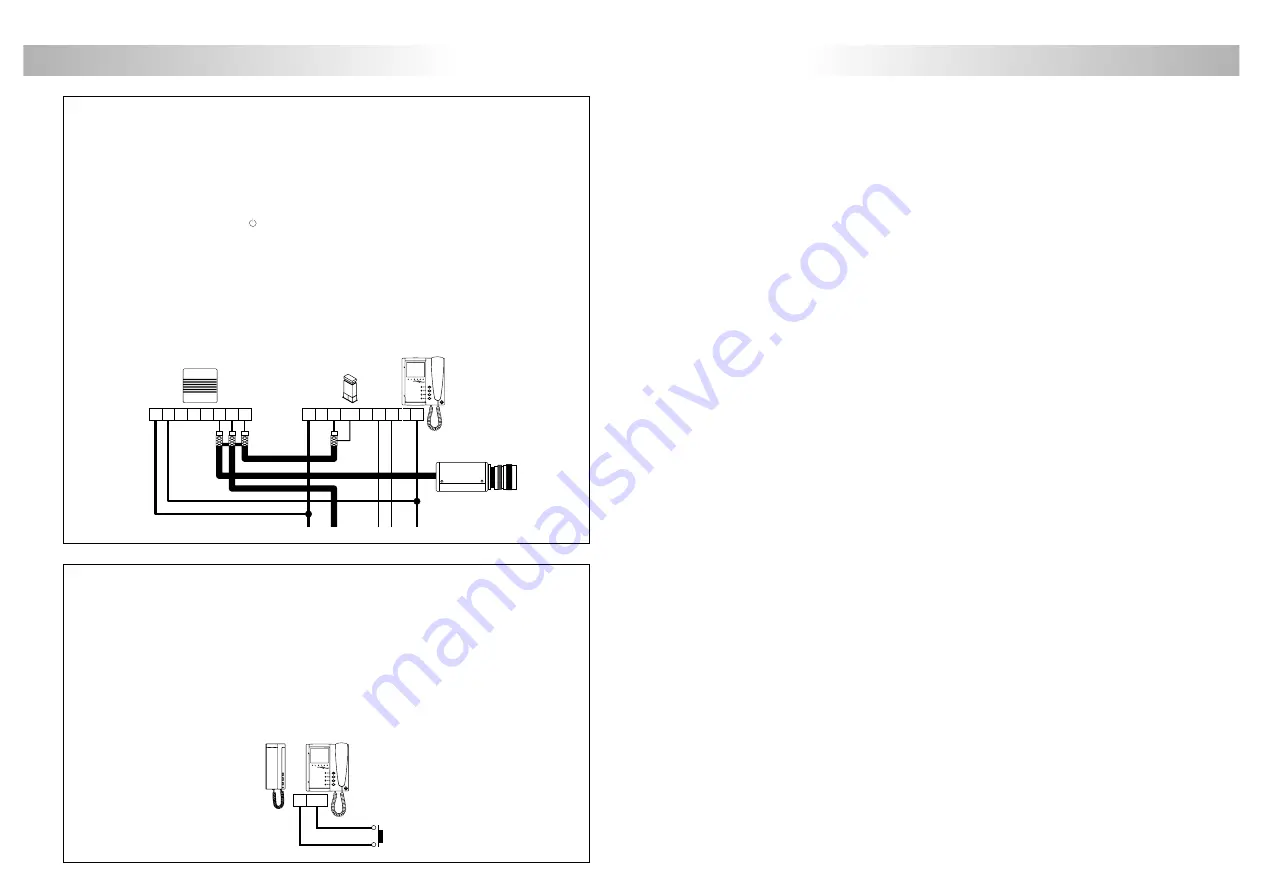
OPTIONAL CONNECTIONS
TROUBLESHOOTING HINTS
HZ-
-
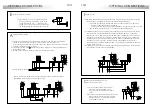
oor bell push button connection.
D
The Platea Plus monitor and the T-940 Plus telephone can be used to receive the calls made
from the apartment door, saving the use of a bell. Wire the push button of the apartment
door to the 'HZ ' and ' ' monitor or telephone terminals.
The reproduced acoustic tones are different depending on their provenance, that allows the
user to distinguish where the call is made from. If during a conversation a call is made from
the apartment door, acoustic tones will be reproduced on the hanset to advise that someone
is calling.
–
–
ctivation of a second camera.
A
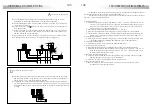
The use of a SAR-90 relay will be required to activate a second camera and an internal
modification on the monitor shall be done, as it's described on page 88.
This facility disables the intercom function. If both functions are required, use A1 terminal to
activate the second camera.
To activate this function, press monitor push button at any moment with no dependence of
the handset position.
If this device is shared for all the monitors, link their 2C terminal and use just one relay unit.
In case that each monitor has its own camera use a SAR-90 relay unit for each monitor
and don't link the 2C monitor terminals.
This push button can be used to activate other auxiliary devices, as the A1 terminal is used.
Usual applications are the surveillance of the elevator entrance, reception hall, ...
An easy way to check that the system is working properly is to disconnect the wiring from the door
panel and to check the monitor directly connected to the EL500 circuit.
No shortcircuit will damage the connected units, with the exception of a shortcircuit between
CTO and ' ' monitor or distributor terminals.
O
Nothing operates.
w
Check the output power supply voltage between ' ' and '+' terminals: it should have 17,5 to
18,5Vd.c. If not, disconnect the power supply from the installation and measure again. If
it's correct now, it means there is a short circuit in the installation: disconnect the power
supply from mains and check the installation.
w
Check that 'D' terminal is not shortcircuited with ' ' or '+' terminals.
w
Check that 'D' terminal hasn't been changed by 'A' terminal somewhere in the installation.
w
If these tests don't solve the problem, check the voltage between 'B' and 'CP' terminals of the
EL500 circuit; if the measured voltage is different to 12Vd.c. change the EL500 circuit.
O
Inappropriate audio level.
w
Adjust the level volumes as shown on page 85. In case of feedback, reduce the audio levels
until feedback fade out. If feedback don't dissapears refer to the following hint.
O
Continuous audio feedback.
w
Check that 'A' terminal is not shortcircuited with other terminals.
O
Door open function no operates.
w
Remember that this function is only available during call and communication progresses.
w
Disconnect the lock release from the EL500 circuit and short-circuit terminals ' ' and 'CV ': at
that moment the output voltage between terminals 'CV+' y 'CV ' should be 12Vd.c. If it's
so check the lock release and its wiring.
O
The system cannot be programmed.
w
Check that the switch number 2 of the configuration dip switch is set to ON (see page 84)
and that the programming steps are correctly followed.
w
Check that 'D' terminal is not shortcircuited with other terminals.
O
Some units don't receive calls.
w
Remember that each apartment must have a master unit only. Check that the units are
switched on and correctly programmed.
–
–
–
–
–
–
SA
+
T
T
R
R
M
M
SAR-90
A
_
+
D
2C
Malla
V
in
V
out
CN4


