background image

12

USB devices connection

Connect USB device(s) to the USB server when the USB 
server has been connected to a LAN. The supported USB 
devices of this USB server are USB printers, USB multi-
function printers, USB scanners, USB hard drives, USB 

+,'GHYLFHVLHNH\ERDUGVDQGPLFH86%FDPHUDV86%
$XGLR9LGHRSURGXFWVDQGHWF

Note:

,QVWDOOWKH86%GHYLFHVGULYHUVEHIRUHFRQQHFWLQJWR

the USB server is recommended.

USB server

Laptop

Scanner

Printer

Wireless

Wireless

USB
cable

USB
cable

Summary of Contents for FW2140

Page 1: ...4 Port Wireless USB Server User s Manual...

Page 2: ......

Page 3: ...onnection 8 Network connection 10 Utility installation 13 Utility operation 14 Getting started 14 Device mapping 16 Device request 18 Device setting 20 Printer sharing 23 Server manager 25 HE EDVHG FR...

Page 4: ...PHQW checked by a service technician The equipment has been exposed to moisture The equipment has been dropped and damaged The equipment has obvious sign of breakage The equipment has not been working...

Page 5: ...ection the built in WiFi connection allows you to access these USB devices without 5 meters limitation of USB cable Features RPSOLDQW ZLWK 86 YHUVLRQ VSHFL FDWLRQ LJK VSHHG 86 GDWD WUDQVPLVVLRQ UDWH X...

Page 6: ...USB Server provides the following connections to your Network 5 WKHUQHW FRQQHFWRU 0ESV DXWR VHQVLQJ XWR 0 FDSDEOH 3 DGGUHVVLQJ 6WDWLF 3 System requirement 0 FRPSDWLEOH FRPSXWHU RU 0DF LQGRZV LQGRZV 9...

Page 7: ...data is transmitting 4 Power indicator Lights up when the power is on 5 Signal strength Displays the status of signal strength 6 RJ 45 Ethernet connector Connects to an available LAN Local area networ...

Page 8: ...ction To power the USB server choose one of the below methods Power LED lights up when the USB server s power is on DC In Plug the supplied power adapter into a wall outlet and the other end to the US...

Page 9: ...9 Power cable QVHUW WKH FDEOH LQWR WKH SRZHU terminal block 2 Tighten the screw using screwdriver 3 Plug the power terminal block into the USB server according to the connector s orientation...

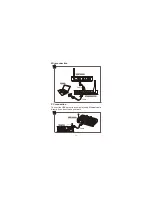
Page 10: ...onnect the USB server Note that the connection diagrams shown below are examples only The real applications may be different from the actual conditions Wireless connection Wireless Wireless USB server...

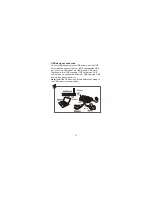
Page 11: ...11 Wire connection Cable Cable USB server Laptop Wireless router PC connection Connect the USB server to a computer using Ethernet cable directly if you do not have a network Cable USB server Desktop...

Page 12: ...ices of this USB server are USB printers USB multi function printers USB scanners USB hard drives USB GHYLFHV L H NH ERDUGV DQG PLFH 86 FDPHUDV 86 XGLR 9LGHR SURGXFWV DQG HWF Note QVWDOO WKH 86 GHYLFH...

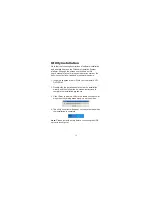
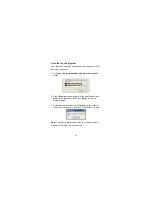
Page 13: ...VDPH QVHUW WKH VXSSOLHG GULYHU LQWR RXU FRPSXWHU V 9 520 RXEOH FOLFN WKH LQVWDOODWLRQ OH WR VWDUW WKH LQVWDOODWLRQ ZL DUG DQG WKHQ IROORZ WKH RQ VFUHHQ LQVWUXFWLRQV WR complete the installation proced...

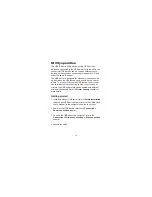
Page 14: ...86 GHYLFH WKH UVW XVHU has to relinquish the connection to other user Q FDVH R I printers the USB server utility can be shared with different XVHUV VLPXOWDQHRXVO 5HIHU WR Printer sharing chapter for m...

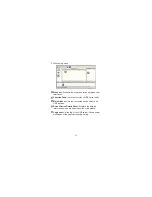
Page 15: ...Panel Lists the function of USB server utility 3 Main window Lists the connected device server and USB devices 4 Server Device Details Panel Displays the detailed information which are selected on th...

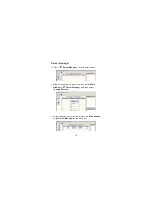
Page 16: ...apping on the function panel 2 Click the on the toolbar to start the device mapping after connecting USB devices 3 All the connected USB devices will be listed as a tree hierarchy under the USB server...

Page 17: ...H VWDWXV RI 86 GHYLFH VKRZV Disconnect right click on the main window of Device Mapping to bring up the pop up menu and then select Connect WR YLUWXDOL HV WKH 86 GHYLFH RQWR RXU FRPSXWHU 5 To disable...

Page 18: ...this USB device has been claimed by one user already To access this USB device you have to request that user to relinquish the connection 5LJKW FOLFN WKH EXV 86 GHYLFH RQ WKH Main window of Device Ma...

Page 19: ...urrent user which is accessing the USB device will receive a Device Free Request message as shown below 4 The current user can either click Free to release the USB device or click Ignore the reject th...

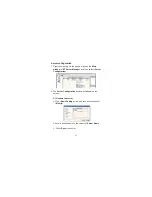
Page 20: ...ng up the pop up menu and then select Settings Automatically connect this device The auto connection can be enabled or disabled for each device By default the auto connection is enabled for all USB de...

Page 21: ...g To enable the auto re connect back to the network as your default setting tick this option otherwise re connect the network manually To exit the setting window click Save Note The reasons for discon...

Page 22: ...ice connects option 2 Click Browse to set the path of the application which needs to be launched then click Save to exit the dialog window 3 A message as shown below will appear on the screen if the s...

Page 23: ...below QVWDOO WKH SULQWHU GULYHU WR D FOLHQW 3 DW OHDVW 2 Connect the printer to the USB server 3 Disconnect the printer from the main window of Device Mapping 4 Click the Printer Sharing button on the...

Page 24: ...then select Remove option on the Printer Sharing window The obsolete printer means the driver KDV EHHQ XQLQVWDOOHG IURP D FOLHQW XVHU 5HPRYH WKH SULQWHU which is not an obsolete printer is banned The...

Page 25: ...er Manager from function panel 5LJKW FOLFN WR EULQJ XS D SRS XS PHQX RQ WKH Main window of Server Manager and then select Search Servers 3 All the searched server will be listed on the Main window of...

Page 26: ...XQORFN SURFHGXUH LV necessary 5LJKW FOLFN DQG VHOHFW Unlock to bring up the password dialog window H LQ WKH SDVVZRUG 7KH GHIDXOW SDVVZRUG IRU WKH 86 server is usbip 7 The message of Unlock OK appears...

Page 27: ...window of Server Manager and then select Server RQ JXUDWLRQ 2 The 6HUYHU RQ JXUDWLRQ window will appear on the screen 2 1 Rename the server 1 Click Basic Settings tab and then tick checkbox of Modify...

Page 28: ...ick IP Setting tab and then tick the checkbox of Modify Note GHIDXOW WKH 3 DGGUHVV RI WKLV VHUYHU LV 192 168 3 22 6HOHFW D SUHIHUUHG 3 FRQ JXUDWLRQ 3 Enter the desired IP address Subnet Mask and Gate...

Page 29: ...XH 3 DGGUHVV LQ WKH QHWZRUN R QRW XVH WKH 3 DGGUHVV ZKLFK KDV EHHQ assigned to other device already 2 3 Enable disable or change the password 1 Click the Password tab 2 Tick the checkbox of upper Modi...

Page 30: ...settings 5LJKW FOLFN WR EULQJ XS WKH SRS XS PHQX RQ WKH Main window of Server Manager and then select Restore Defaults 2 Click OK to restore the settings Note All settings will restore the factory def...

Page 31: ...FRQ JXUHG HYHQ LI WKH 86 VHUYHU LV QRW FRQ JXUHG LQ WKH VDPH QHWZRUN 5LJKW FOLFN WR EULQJ XS WKH SRS XS PHQX RQ the Main window of Server Manager and then select Search by MAC ID 2 A reminder message...

Page 32: ...32 3 The 6HUYHU 4XLFN RQ JXUDWLRQ 8WLOLW will be launched after clicking Yes and then click Search 7KH SUHFRQ JXUHG 86 VHUYHUV ZLOO EH VHDUFKHG DV shown below...

Page 33: ...om Search Result list and then click Next Alternatively enter the MAC address to the columns of MAC address directly KRRVH WR FRQ JXUH WKH 86 VHUYHU 3 DGGUHVV LQ DHCP mode if the connected network sup...

Page 34: ...ick checkbox of Server Name to assign a desired user QDPH IRU LGHQWL FDWLRQ 2QFH WKH VHWWLQJV KDYH EHHQ completed click Update to apply 4 Click Yes WR VDYH WKH VHWWLQJV LI WKH HQWHUHG 3 VHWWLQJV are c...

Page 35: ...VV LV 2 Enter the user name and password and then click Submit to enter The default user name is admin and the password is usbip 6HYHUDO FRQ JXUDWLRQ SDJHV DUH FRQWDLQHG ZKHQ WKH ZHE FRQ JXUDWLRQ LV R...

Page 36: ...HUQHW FDEOH RQ JXUH WKH Static IP Subnet Mask and Gateway PDQXDOO RU HQDEOH WKH 3 WR REWDLQ DQ 3 address Wireless connection 1 Click the wireless option when using a wireless connection to a router 2...

Page 37: ...the current status of the connected USB devices and update the information automatically every 10 seconds Upgrade page 7R XSGDWH WKH UPZDUH RI WKH 86 VHUYHU FOLFN WR HQDEOH Complete Firmware Upgrade o...

Page 38: ...o setup the FTP address enable the Advanced Settings and then click Submit 2 Enable the FTP Transfer 3 Enter the FTP address that you wish to receive the log OH WR WKH FTP IP Address 4 Enter the user...

Page 39: ...password and then click Submit Change the Server Name Enter a desired name to the Server Name option Restore the settings 7R UHVWRUH WKH IDFWRU GHIDXOW VHWWLQJV FOLFN Restore Defaults Once the restore...

Page 40: ...th the requirements of the following regulations EN 55 022 CLASS B WEEE information For EU European Union member users According to the WEEE Waste electrical and electronic equipment Directive do not...

Page 41: ...Ports 4xUSB2 0 Connector USB A female ESD protect 9 6 Transmission Speed 12M 480Mbps Interface LJD 1 L L Interface connector 5 QWHQQD Power requirements 9 a 9 Operating temperature 0 55 C Operating hu...

Page 42: ......

Page 43: ......

Page 44: ...4 Port Wireless USB Server User s Manual 0614v1...

Reviews: