to
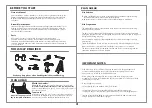
TOOLS MAY REQUIRED
Use heavy duty gloves when handling steel sheets and flashing
BEFORE YOU START
Owner's Manual
Prior to installation, it is important that you contact your local government authority to
determine if building approval is required. Study and understand this owner's manual.
Important information and helpful tips will make your construction easier and more
enjoyable.
Assembly instructions
Instructions are supplied in this manual and contain all appropriate information for your
building model. Review all instructions before you begin. During assembly, follow the
step sequence carefully for correct results .Please be aware: this unit takes two people
about one full day to complete.
Parts
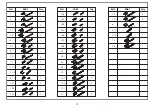
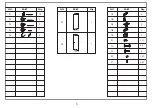
Check to be sure that you have all the necessary parts for the building.
Separate contents of the carton by the part number while reviewing parts list.
Familiarize yourself with the hardware and fasteners for easier use during construction.
These are packaged within the carton. Note that extra fasteners have been supplied for
your convenience.
PLAN AHEAD
Watch the weather:
Please be sure the day you select for installation is dry and calm.
DO NOT
attempt to assemble your shed in windy weather
because of risk of damage to panels, or personal injury. Be careful of
wet or muddy ground.
Teamwork:
Whenever possible, two or more people should work together to
assemble the building. One person can position parts or panels
while the other is able to handle the fasteners and the tools.
It requires two people a full
day to complete installation.
PLAN AHEAD
Site Selection
Avoid overhanging trees as much as possible as leaves will make regular cleaning
necessary and broken branches are a potential hazard.
Small trees,bushes or fences nearby can be helpful,acting as a wind break.
Site Preparation
The site must be prepared so that the base of the shed is level all round and checking
with a spirit level is required.
The base can be constructed by treated timber or concrete,in order to stop the moisture
getting into the shed.The shed is not designed to be built onto lawn directly.Also the ground
will get muddy during rainy days.
If a concrete pad is made,it is important that this slopes towards the edges to prevent
water ingress.
Time must be allowed for any concrete or cement to dry before building the shed on top.
Bases can also be constructed from bricks,blocks,or mounted on a concrete pad.
The bricks or blocks should be cemented onto firm and level concrete footings and the
shed frame drilled and screwed to the base.
IMPORTANT NOTES:
Find someone to help you:it is much easier with someone to hold parts,pass tools
ect.Also some steps require two people to lift structures together.This is not very
heavy work so would suit most able-bodied people.
Allow plenty of time:rushing often causes errors and the re-doing of incorrect
assemblies.If you have never built a shed before,it can take most of a day to carefully
complete the construction.
Have the right tools to hand.
Safety clothing as recommended in the 'Tools' section.
Ideally lat out the parts and check that all are present before commencing
construction.Lay on cloths or plastic sheets if there is any risk of scratching the parts.
Tighten all nuts carefully,being sure not to miss any.Check the frame is square and
using a spirit level to check that it is upright.
333
Summary of Contents for 502323397
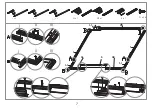
Page 7: ...F1 x 24 3L x 1 3R x 1 5 x 1 1 x 2 2 x 1 1 1 x 3 5 3R 1 1 3L 1 1 2 1 1 1 1 7...
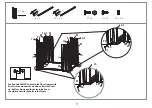
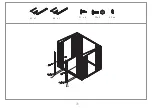
Page 11: ...4L x 1 4R x 1 F2 x 2 F1 x 4 S3 x 6 4L 4R F1 F1 F2 F2 1 1...
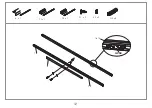
Page 12: ...F1 x 2 S3 x 2 6 x 1 7L x 1 7R x 1 F1 7L 7R 6 G2X4 7L 7R G2 x 4 12...
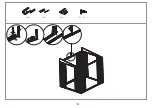
Page 13: ...F1 x 12 S3 x 12 7L 7R 6 13...
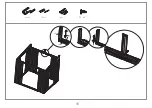
Page 14: ...F1 x 1 19R x 1 15R x 1 16R x 1 19R 15R 16R 14...
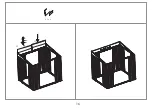
Page 15: ...F1 x 1 19L x 1 15L x 1 16L x 1 19L 15L 16L 15...
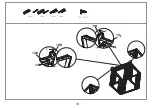
Page 16: ...P 5 x 2 P5 P5 16...
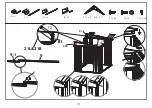
Page 17: ...F1 x 20 17...
Page 18: ...F1 x 12 12L x 1 12R x 1 14L x 1 14R x 1 F1 14R 12R 19R F1 F1 14L 12L 19L F1 18...
Page 19: ...F1 22 F1 x 6 22 x 2 19...
Page 20: ...11 11 1 F1 F1 x 14 F1 11x 1 11 1 x 1 F1 F1 F1 S3 x 6 20...
Page 21: ...19R 19L 11 2 F1 F2 F2 x 4 F1 x 2 11 2 x1 21...
Page 22: ...P1 x 7 P1 P1 P1 P1 P1 P1 P1 P1 P1 F 1x62 S3 x 72 F2 x 10 22...
Page 23: ...P2 x 2 P3 x 3 P4 x 1 F1x 46 S3 x 46 P2 P4 P4 P2 P3 P3 P3 P2 23...
Page 26: ...F3 18 7R G2 F3 x 8 F3 18 7L G2 26...
Page 34: ...F1 x 24 3L x 1 3R x 1 5 x 1 1 x 2 2 x 1 1 1 x 3 5 3R 1 1 3L 1 1 2 1 1 1 1 34...
Page 38: ...4L x 1 4R x 1 F2 x 2 F1 x 4 S3 x 6 4L 4R F1 F1 F2 F2 38...
Page 39: ...F1 x 2 S3 x 2 6 x 1 7Lx 1 7R x 1 F1 7L 7R 6 G2X4 7L 7R G2 x 4 39...
Page 40: ...F1 x 12 S3 x 12 7L 7R 6 40...
Page 41: ...F1 x 1 19R x 1 15R x 1 16Rx 1 19R 15R 16R 41...
Page 42: ...F1 x 1 19L x 1 15L x 1 16Lx 1 19L 15L 16L 42...
Page 43: ...P5 x 2 P5 P5 43...
Page 44: ...F1 x 20 44...
Page 45: ...F1 x 12 12Lx 1 12R x 1 14L x 1 14R x 1 F1 14R 12R 19R F1 F1 14L 12L 19L F1 45...
Page 46: ...F1 22 F1 x 6 22 x 2 46...
Page 47: ...11 11 1 F1 F1 x 14 F1 11x 1 11 1 x 1 F1 F1 F1 S3 x 6 47...
Page 48: ...19R 19L 11 2 F1 F2 F2 x 4 F1 x 2 11 2 x1 48...
Page 49: ...P1 x 7 P1 P1 P1 P1 P1 P1 P1 P1 P1 F1x 62 S3 x 72 F2 x 10 49...
Page 50: ...P2 x 2 P3 x 3 P4 x 1 F1x 46 S3 x 46 P2 P4 P4 P2 P3 P3 P3 P2 50...
Page 53: ...F3 18 7R G2 F3 x 8 F3 18 7L G2 53...
Page 61: ...F1 x 24 3L x 1 3R x 1 5 x 1 1 x 2 2 x 1 1 1 x 3 5 3R 1 1 3L 1 1 2 1 1 1 1 61...
Page 65: ...4L x 1 4R x 1 F2 x 2 F1 x 4 S3 x 6 4L 4R F1 F1 F2 F2 65...
Page 66: ...F1 x 2 S3 x 2 6 x 1 7Lx 1 7R x 1 F1 7L 7R 6 G2X4 7L 7R G2 x 4 66...
Page 67: ...F1 x 12 S3 x 12 7L 7R 6 67...
Page 68: ...F1 x 1 19R x 1 15R x 1 16Rx 1 19R 15R 16R 68...
Page 69: ...F1 x 1 19L x 1 15L x 1 16Lx 1 19L 15L 16L 69...
Page 70: ...P5 x 2 P5 P5 70...
Page 71: ...F1 x 20 71...
Page 72: ...F1 x 12 12Lx 1 12R x 1 14L x 1 14R x 1 F1 14R 12R 19R F1 F1 14L 12L 19L F1 72...
Page 73: ...F1 22 F1 x 6 22 x 2 73...
Page 74: ...11 11 1 F1 F1 x 14 F1 11x 1 11 1 x 1 F1 F1 F1 S3 x 6 74...
Page 75: ...19R 19L 11 2 F1 F2 F2 x 4 F1 x 2 11 2 x1 75...
Page 76: ...P1 x 7 P1 P1 P1 P1 P1 P1 P1 P1 P1 F1x 62 S3 x 72 F2 x 10 76...
Page 77: ...P2 x 2 P3 x 3 P4 x 1 F1x 46 S3 x 46 P2 P4 P4 P2 P3 P3 P3 P2 77...
Page 80: ...F3 18 7R G2 F3 x 8 F3 18 7L G2 80...
Page 81: ...Tr dg rdsskjul i metall Grundsats Monteringsanvisningar Storlek MF T 0608PS 81...
Page 88: ...F1 x 24 3L x 1 3R x 1 5 x 1 1 x 2 2 x 1 1 1 x 3 5 3R 1 1 3L 1 1 2 1 1 1 1 88...
Page 92: ...4L x 1 4R x 1 F2 x 2 F1 x 4 S3 x 6 4L 4R F1 F1 F2 F2 92...
Page 93: ...F1 x 2 S3 x 2 6 x 1 7Lx 1 7R x 1 F1 7L 7R 6 G2X4 7L 7R G2 x 4 93...
Page 94: ...F1 x 12 S3 x 12 7L 7R 6 94...
Page 95: ...F1 x 1 19R x 1 15R x 1 16Rx 1 19R 15R 16R 95...
Page 96: ...F1 x 1 19L x 1 15L x 1 16Lx 1 19L 15L 16L 96...
Page 97: ...P5 x 2 P5 P5 97...
Page 98: ...F1 x 20 98...
Page 99: ...F1 x 12 12Lx 1 12R x 1 14L x 1 14R x 1 F1 14R 12R 19R F1 F1 14L 12L 19L F1 99...
Page 100: ...F1 22 F1 x 6 22 x 2 100...
Page 101: ...11 11 1 F1 F1 x 14 F1 11x 1 11 1 x 1 F1 F1 F1 S3 x 6 101...
Page 102: ...19R 19L 11 2 F1 F2 F2 x 4 F1 x 2 11 2 x1 102...
Page 103: ...P1 x 7 P1 P1 P1 P1 P1 P1 P1 P1 P1 F1x 62 S3 x 72 F2 x 10 103...
Page 104: ...P2 x 2 P3 x 3 P4 x 1 F1x 46 S3 x 46 P2 P4 P4 P2 P3 P3 P3 P2 104...
Page 107: ...F3 18 7R G2 F3 x 8 F3 18 7L G2 107...
Page 108: ...Metall hagebod Fundamentsett Monteringsinstruksjoner St rrelse MF T 0608PS 108...
Page 110: ...Metallist aiakuur Kasutusjuhend Kiire ja lihtne T 0608PS 1 10...
Page 115: ...F1 x 24 3L x 1 3R x 1 5 x 1 1 x 2 2 x 1 1 1 x 3 5 3R 1 1 3L 1 1 2 1 1 1 1 1 15...
Page 119: ...4L x 1 4R x 1 F2 x 2 F1 x 4 S3 x 6 4L 4R F1 F1 F2 F2 1 19...
Page 120: ...F1 x 2 S3 x 2 6 x 1 7Lx 1 7R x 1 F1 7L 7R 6 G2X4 7L 7R G2 x 4 120...
Page 121: ...F1 x 12 S3 x 12 7L 7R 6 121...
Page 122: ...F1 x 1 19R x 1 15R x 1 16Rx 1 19R 15R 16R 122...
Page 123: ...F1 x 1 19L x 1 15L x 1 16Lx 1 19L 15L 16L 123...
Page 124: ...P5 x 2 P5 P5 124...
Page 125: ...F1 x 20 125...
Page 126: ...F1 x 12 12Lx 1 12R x 1 14L x 1 14R x 1 F1 14R 12R 19R F1 F1 14L 12L 19L F1 126...
Page 127: ...F1 22 F1 x 6 22 x 2 127...
Page 128: ...11 11 1 F1 F1 x 14 F1 11x 1 11 1 x 1 F1 F1 F1 S3 x 6 128...
Page 129: ...19R 19L 11 2 F1 F2 F2 x 4 F1 x 2 11 2 x1 129...
Page 130: ...P1 x 7 P1 P1 P1 P1 P1 P1 P1 P1 P1 F1x 62 S3 x 72 F2 x 10 130...
Page 131: ...P2 x 2 P3 x 3 P4 x 1 F1x 46 S3 x 46 P2 P4 P4 P2 P3 P3 P3 P2 131...
Page 134: ...F3 18 7R G2 F3 x 8 F3 18 7L G2 134...
Page 135: ...Metallist aiakuur Vundamendikomplekt Kokkupanemisjuhised Suurus MF T 0608PS 135...


