background image

7

Downflow Conversion

Conversion to downflow MUST be performed in an area that
allows access to all sides prior to placing the air handler in its
final location.  To prevent the evaporator coil pan from “sweat-
ing” the DPI accessory insulation kit is to be used when per-
forming this conversion.  NOTE: The DPI kit is not supplied
with this product and is to be purchased separately.  See

Table 7

 for the correct DPI kit.

ASPF

Insulation Kit

1830

DPI36-42/20

3137 / 4260

DPI48-61/20

Table 7

Refer to 

Figures 3 through 5

 for the location of the compo-

nents referenced in the following steps. 

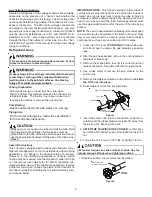
Figure 3 

illustrates

the new installation location for the removed components.

1. Before inverting the air handler, remove all access pan-

els, the coil rear channel bracket, and the filter close-off
panel.

2. Remove the evaporator coil and the horizontal drain pan.

Discard horizontal drain pan.

3. Install the provided plastic plug into the vacated access

panel.

4. Remove the two (2) zee coil support brackets and insu-

lation retaining brackets.

5. Remove the tie bracket.

6. Install the DPI Insulation Kit onto the bottom of the drain

pan.

NOTE: The filter provision is not applicable

in THIS downflow application.

ACCESS
PANEL

RETURN AIR SIDE
OF UNIT

REAR CHANNEL
BRACKET

ZEE COIL
SUPPORT BRACKET

COIL RETAINING
BRACKET

TIE BRACKET

Figure 3

7. Install the zee coil supports and the wrapper stiffeners.

8. Install the tie bracket.

9. Install the rear channel bracket.

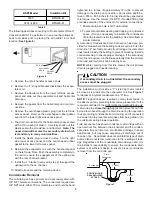
10. To prevent possible condensate “blow off” the insula-

tion retainers are to be laid into the evaporator coil pan
as shown in 

Figure 4.

3” FLAT INSULATION
RETAINER
(BOTH SIDES)

Figure 4

To complete the conversion, slide the evaporator coil into
the chassis and attach the three (3) access panels. 

(Figure

5).

WRAPPER

INSULATION
JACKET

ZEE COIL
SUPPORT

WRAPPER
STIFFENER

DRAIN PAN
INSULATION KIT

BLOWER
ASSEMBLY

Figure 5

NOTE: 

When converted to downflow position, the coil may

protrude above the cabinet on some models.

Horizontal Conversion

The only field modification required for conversion to “Hori-
zontal Right-Hand” is the removal of the plastic knockouts in
the horizontal panel drain connections.  To prevent the hori-
zontal drain pan from sweating in high humidity applications,
it is recommended that a DPIH insulation accessory kit be
used. NOTE: The DPIH insulation kit is not supplied with this
product and should be purchased separately. See 

Table 8

for the correct DPIH kit.

Summary of Contents for ASPF Series

Page 1: ...4 Electric Heat 4 HKR Installation 4 Electrical Supply Wire and MOP 4 Building Electrical Service Inspection 5 Wire Sizing 5 Maximum Overcurrent Protection MOP 5 Electrical Connections Supply Voltage...

Page 2: ...ng Areas Carbon monoxide producing devices such as an automobile space heater gas water heater etc should not be operated in enclosed areas such as unventilated garages utility rooms or parking areas...

Page 3: ...tion of your nearest distributor consult the white business pages the yellow page section of the local telephone book or contact CONSUMER AFFAIRS GOODMAN MANUFACTURING COMPANY L P 7401 SECURITY WAY HO...

Page 4: ...19 28 37 41 2000 5 8 11 12 17 25 34 37 HEAT KIT NOMINAL kW CFM Table 2 230 1 60 Supply Voltage Temperature Rise Table F 3 5 6 8 10 15 20 21 600 17 27 34 39 800 13 20 25 30 40 1000 10 16 20 24 32 48 12...

Page 5: ...314 235 188 157 134 118 110 Based on NEC 1996 Maximum Allowable Length in Feet to Limit Voltage Drop to 2 Minimum Circuit Ampacity MCA Wire Size AWG Table 6 Maximum Overcurrent Protection MOP Every i...

Page 6: ...tched applications a flowrator piston change may be required See the Goodman piston kit chart or consult your local distributor for details regarding mix matched piston sizing If the mix match applica...

Page 7: ...rain pan NOTE The filter provision is not applicable in THIS downflow application ACCESS PANEL RETURN AIR SIDE OF UNIT REAR CHANNEL BRACKET ZEE COIL SUPPORT BRACKET COIL RETAINING BRACKET TIE BRACKET...

Page 8: ...the enclosure for external connections 1 Ensure drain pan hole is NOT obstructed 2 To prevent potential sweating and dripping on to finished space it may be necessary to insulate the condensate drain...

Page 9: ...Delivery Table 9 shows the CFM speed tap settings for the ASPF Start Up Procedure Prior to start up ensure that all electrical connections are properly sized and tightened All panels must be in place...

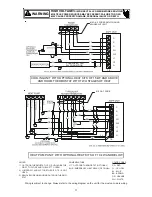
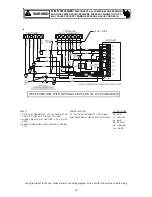
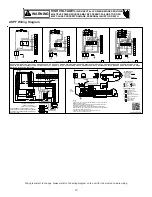
Page 10: ...owing composite wiring diagrams detail various con figurations in which the ASPF air handlers can be used Ex amples include single stage cooling and heat pump with single or two stage electric heating...

Page 11: ...B YL BL CONDENSING UNIT 24V CONNECTION BL YL GR RD 18 GA 5 WIRES WITH COOLING 4 WIRES WITHOUT WH YL BR BR BR YL G C R HEAT PUMP UNIT WITH OPTIONAL HEAT KITS OF 10 kW AND BELOW C W1 W2 Y2 Y1 O G R TB 1...

Page 12: ...IT WITH OPTIONAL HEAT KITS OF 15 kW AND ABOVE C W1 W2 Y2 Y1 O G R TB 18 GA 7 WIRE O Y C W2 R Y O W2 E RD GR BL OR YL YL BL OR WH BR WH BL WH WH RD BR RD WH GR YL OR OR RD OR NOTES 1 OUTDOOR THERMOSTAT...

Page 13: ...OF CR RELAY TOAPPROPRIATE TAP AT TB 4 BROWN AND WHITE WIRES ARE USED FOR HEAT KITS ONLY 5 FUSE 3A 250V 3AG CARTRIDGE FUSE RELAY EVAPORATOR MOTOR TERMINALBOARD R EM TB BK RD BL YL BLUE BLACK RED YELLOW...

Page 14: ...14 THIS PAGE LEFT INTENTIONALLY BLANK...

Page 15: ...e airflow If cleaning of the outdoor coil becomes necessary hire a qualified servicer Inexperienced people could easily puncture the tubing in the coil Even a small hole in the tubing could eventually...

Page 16: ...2 Goodman Manufacturing Company L P 5151 San Felipe Suite 500 Houston TX 77056 www goodmanmfg com or www amana hac com NOTE SPECIFICATIONS AND PERFORMANCE DATA LISTED HEREIN ARE SUBJECT TO CHANGE WITH...

Reviews: