background image

39

If supply pressure differs from table, make the necessary adjust-
ments to pressure regulator, gas piping size, etc., and/or consult
with local gas utility.

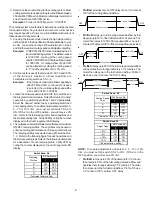
5. Turn OFF gas to furnace at the manual shutoff valve and

disconnect manometer.  Reinstall plug before turning on
gas to furnace.

6. Turn OFF any unnecessary gas appliances stated in step

3.

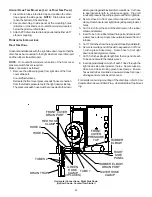
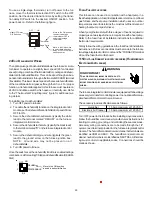
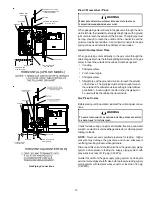
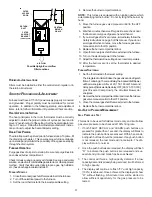
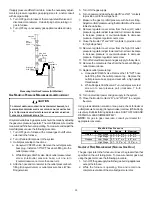
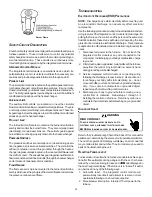
Gas Line

Gas
Shutoff
Valve

Gas Line 
To Furnace

Drip Leg Cap 
With Fitting

Manometer Hose

Manometer

Open To
Atmosphere

Measuring Inlet Gas Pressure (Alt. Method)

G

AS

 M

ANIFOLD

 P

RESSURE

 M

EASUREMENT


AND

 A

DJUSTMENT

T

O


PREVENT


UNRELIABLE


OPERATION


OR


EQUIPMENT


DAMAGE

,


THE


GAS


MANIFOLD


PRESSURE


MUST


BE


AS


SPECIFIED


ON


THE


UNIT


RATING


PLATE

.


O

NLY


MINOR


ADJUSTMENTS


SHOULD


BE


MADE


BY


ADJUSTING


THE


GAS


VALVE


PRESSURE


REGULATOR

.

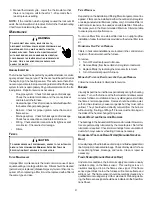
CAUTION

Only small variations in gas pressure should be made by adjusting
the gas valve pressure regulator.  The manifold pressure must be
measured with the burners operating.  To measure and adjust the
manifold pressure, use the following procedure.

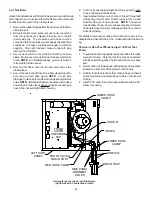
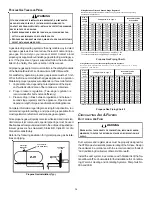
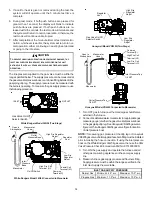
1. Turn OFF gas to furnace at the manual gas shutoff valve

external to the furnace.

2. Turn off all electrical power to the system.
3. Outlet pressure tap connections:

a. Honeywell VR9205 valve: Remove the outlet pressure

boss plug.  Install an 1/8" NPT hose barb fitting into the
outlet pressure tap.

b. White-Rodgers 36G54 valve: Back outlet pressure test

screw (inlet/outlet pressure boss) out one turn
(counterclockwise, not more than one turn).

4. Attach a hose and manometer to the outlet pressure barb

fitting (Honeywell valve) or outlet pressure boss (White-
Rodgers valve).

5. Turn ON the gas supply.
6. Turn on power and close thermostat “R” and “W1” contacts

to provide a call for low stage heat.

7. Measure the gas manifold pressure with burners firing.

Adjust manifold pressure using the 

Manifold Gas Pressure

table shown below.

8. Remove regulator cover screw from the low (LO) outlet

pressure regulator adjust tower and turn screw clockwise
to increase pressure or counterclockwise to decrease
pressure.  Replace regulator cover screw.

9. Close thermostat “R” and “W2” contacts to provide a call

for high stage heat.

10. Remove regulator cover screw from the high (HI) outlet

pressure regulator adjust tower and turn screw clockwise
to increase pressure or counterclockwise to decrease
pressure.  Replace regulator cover screw.

11. Turn off all electrical power and gas supply to the system.
12. Remove the manometer hose from the hose barb fitting or

outlet pressure boss.

13. Replace outlet pressure tap:

a. Honeywell VR9205 valve: Remove the 1/8" NPT hose

barb fitting from the outlet pressure tap.  Replace the
outlet pressure boss plug and seal with a high quality
thread sealer.

b. White-Rodgers 36G54 valve: Turn outlet pressure test

screw in to seal pressure port (clockwise, 7 in-lb
minimum).

14. Turn on electrical power and gas supply to the system.
15. Close thermostat contacts “R” and “W1/W2” to energize

the valve.

Using a leak detection solution or soap suds, check for leaks at
outlet pressure boss plug (Honeywell valve) or screw (White-Rodg-
ers valve).  Bubbles forming indicate a leak.  SHUT OFF GAS AND
REPAIR ALL LEAKS IMMEDIATELY!

NOTE: 

For gas to gas conversion, consult your dealer for

appropriate conversion.

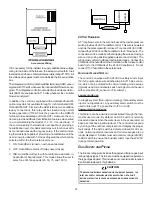
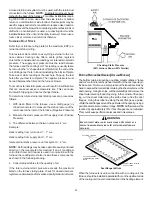
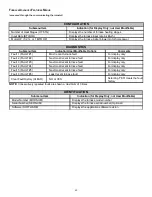
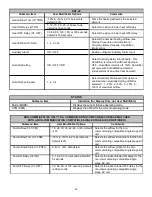
Range

Nom inal

Natural

Low  Stage 

1.6 - 2.2"  w .c.

1.9" w .c.

High Stage

3.2 - 3.8"  w .c.

3.5" w .c.

Propane

Low  Stage 

5.7 - 6.3"  w .c.

6.0" w .c.

High Stage

9.7 - 10.3" w .c.

10.0" w .c.

M anifold  Gas   Pre s s ure

Gas

G

AS

 I

NPUT

 R

ATE

 M

EASUREMENT

 (N

ATURAL

 G

AS

 O

NLY

)

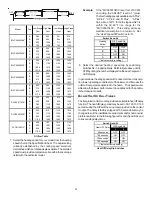
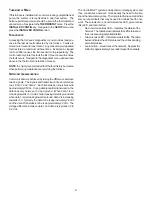
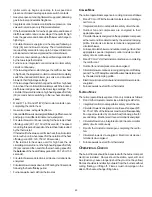
The gas input rate to the furnace must never be greater than that
specified on the unit rating plate.  To measure natural gas input
using the gas meter, use the following procedure.

1. Turn OFF the gas supply to all other gas-burning appliances

except the furnace.

2. While the furnace is operating, time and record one

complete revolution of the smallest gas meter dial.

Summary of Contents for ComfortNet CVC9 Series

Page 1: ...ustomer This includes all safety precautions and related items Prior to actual installation thoroughly familiarize yourself with this Instruction Manual Pay special attention to all safety warnings Often during installation or repair it is possible to place yourself in a position which is more hazardous than when the unit is in operation Remember it is your responsibility to install the product sa...

Page 2: ...RIALS AND JOINING METHODS 13 PROPER VENT FLUE AND COMBUSTION AIR PIPING PRACTICES 13 TERMINATION LOCATIONS 13 CANADIAN VENTING REQUIREMENTS 14 STANDARD FURNACE CONNECTIONS 14 ALTERNATE FURNACE CONNECTIONS 15 NON DIRECT VENT SINGLE PIPE PIPING 17 DIRECT VENT DUAL PIPE PIPING 18 VENT INTAKE TERMINATIONS FOR INSTALLATION OF MULTIPLE DIRECT VENT FURNACES 20 CONCENTRIC VENT TERMINATION 20 SIDE WALL VEN...

Page 3: ...INPUT RATE MEASUREMENT NATURAL GAS ONLY 39 TEMPERATURE RISE 40 CIRCULATOR BLOWER SPEEDS 40 BLOWER HEAT OFF DELAY TIMINGS 42 COMFORTNET SYSTEM 43 OVERVIEW 43 AIRFLOW CONSIDERATIONS 43 FOSSIL FUEL APPLICATIONS 43 CTK0 WIRING 44 COMFORTNET SYSTEM ADVANCED FEATURES 44 FURNACE ADVANCED FEATURES MENUS 45 THERMOSTATE 47 DIAGNOSTICS 47 NETWORK TROUBLESHOOTING 47 SYSTEM TROUBLESHOOTING 48 NORMAL SEQUENCE O...

Page 4: ...E A LICENSE TO INSTALL OR SERVICE HEATING AND AIR CONDITIONING EQUIPMENT WARNING Table of Contents MAINTENANCE 51 ANNUAL INSPECTION 51 FILTERS 51 BURNERS 51 INDUCED DRAFT AND CIRCULATOR BLOWERS 51 CONDENSATE TRAP AND DRAIN SYSTEM QUALIFIED SERVICER ONLY 51 FLAME SENSOR QUALIFIED SERVICER ONLY 51 FLUE PASSAGES QUALIFIED SERVICER ONLY 52 BEFORE LEAVING AN INSTALLATION 52 REPAIR AND REPLACEMENT PARTS...

Page 5: ...ITIONAL ASSISTANCE OR INFORMATION CONSULT A QUALIFIED INSTALLER SERVICER AGENCY OR THE GAS SUPPLIER WARNING IF THE INFORMATION IN THESE INSTRUCTIONS IS NOT FOLLOWED EXACTLY A FIRE OR EXPLOSION MAY RESULT CAUSING PROPERTY DAMAGE PERSONAL INJURY OR LOSS OF LIFE DO NOT STORE OR USE GASOLINE OR OTHER FLAMMABLE VAPORS AND LIQUIDS IN THE VICINITY OF THIS OR ANY OTHER APPLIANCE DO NOT TRY TO LIGHT ANY AP...

Page 6: ...o not touch ungrounded objects etc Ifyoucomeincontactwithanungrounded object repeat step 2 before touching control or wires 4 Discharge your body to ground before removing a new control from its container Follow steps 1 through 3 if installing the control on a furnace Return any old or new controlstotheircontainersbeforetouchinganyungrounded object TOTHEINSTALLER Before installing this unit please...

Page 7: ... is op tional and the furnace can be vented as a Non directvent singlepipe centralforcedairfurnacein which combustion air is taken from the installation area or from air ducted from the outside or Directvent dualpipe centralforcedairfurnace inwhich allcombustionairsupplieddirectlytothefurnaceburners through a special air intake system outlined in these instructions This furnace may be used as a co...

Page 8: ... condensate flows downwards to the drain Do not locate the furnace or its condensate drainage system in any area subject to below freezing temperatures without proper freeze protection Refer to CondensateDrainLinesandTrapforfurtherdetails Ensure adequate combustion air is available for the furnace Improper or insufficient combustion air can exposebuildingoccupantstogascombustionproducts that could...

Page 9: ...ncertified Theminimum clearanceinformationforthisfurnaceisprovidedontheunit sclear ance label These clearances must be permanently maintained Clearancesmustalsoaccommodateaninstallation sgas electri cal and drain trap and drain line connections If the alternate combustionairintakeorvent flueconnectionsareusedadditional clearancemustbeprovidedtoaccommodatetheseconnections RefertoVent FluePipeandCom...

Page 10: ...he back of the furnace Contact your distributor for proper airflow requirements and number of required ductwork connec tions Refer to Recommended Installation Positions figure for appropriate installation positions ductwork connections and re sulting airflow arrangements 2 Inspect the venting system for proper size and horizon tal pitch as required by the National Fuel Gas Code ANSI Z223 1 or the ...

Page 11: ...changerandinduceddraftblower Forproperfluepipedrainage thefurnacemustbelevellengthwisefromendtoend Thefurnace should also be level from back to front or have a slight tilt with the access doors downhill approximately 3 4 inches from the back panel Theslighttilt allowstheheatexchangercondensate gen eratedintherecuperatorcoil toflowforwardtotherecuperatorcoil frontcover ALTERNATEVENT FLUEANDCOMBUSTI...

Page 12: ...or propane gas and or high altitude installa tions The indicated kits must be used to insure safe and proper furnaceoperation Allconversionsmustbeperformedbyaquali fiedinstaller orserviceagency VENT FLUE PIPE COMBUSTION AIR PIPE FAILURE TO FOLLOW THESE INSTRUCTIONS CAN RESULT IN BODILY INJURY OR DEATH CAREFULLY READ AND FOLLOW ALL INSTRUCTIONS GIVEN IN THIS SECTION WARNING UPON COMPLETION OF THE F...

Page 13: ...ortedtoprohibitsag ging jointseparation and ordetachmentfromthefurnace Hori zontalrunsofvent fluepipingmustbesupportedeverythreetofive feet and must maintain a 1 4 inch per foot downward slope back towardsthefurnace toproperlyreturncondensatetothefurnace s drain system Allowances should be made for minor expansion and contraction due to temperature variations For this reason particular care must b...

Page 14: ...nstalled on the combus tionairintake coupling toguardagainstinadvertentblockage Vent Termination Clearances NOTE InCanada theCanadianFuelGasCodetakesprecedence overtheprecedingterminationrestrictions CANADIANVENTINGREQUIREMENTS In Canada venting must conform to the requirements of the cur rentCAN CSA B149 1 05InstallationCode UseonlyCSA listed ULC S636complianttwo orthree inchdiameterPVCorABSpipe ...

Page 15: ...ft blower and the vent fluepipe 3 UpflowandCounterflowunits Removethevent fluepipefromthefurnace 4 Cut the vent flue pipe 3 75 inches from the flanged end of the pipe see Vent Flue Pipe Cuts figure The section of pipe attached to the coupling will reach through the side panel to the induced draft blower Discard remaining pipe andelbows Counterflowunits Cut the vent flue pipe 3 75 inches from the b...

Page 16: ... with the plastic plug included in the drain kit bag 4 With the gasket facing the cabinet side panel and the flange sflatspotfacingforward securethecombustionair intakecouplingtothecabinetusingthescrewsremovedin step 1 or with field supplied 3 8 8 self drilling screws BE SURE NOT TO DAMAGE INTERNAL WIRING OR OTHER COMPONENTS WHEN REINSTALLING COUPLING AND SCREWS CAUTION 5 For non directventinstall...

Page 17: ...ngtableforapplicablelength elbows andpipe diameter for construction of the vent flue pipe system of a non directventinstallation Inadditiontothevent fluepipe asingle90 elbow should be secured to the combustion air intake to prevent inadvertent blockage The tee used in the vent flue termination must be included when determining the number of elbows in the piping system 1 2 3 4 5 6 7 8 45 000 2 or 2...

Page 18: ...Single Pipe MIN 12 FROM WALL 12 TO GROUND OR HIGHEST ANTICIPATED SNOW LEVEL HorizontalTermination SinglePipe _______________________ VENT FLUE TEE 45 ELBOW TURNED DOWN or 90 ELBOW TURNED DOWN 12 MIN ABOVE HIGHEST ANTICIPATED SNOW LEVEL 12 MIN HorizontalTermination SinglePipe AboveHighestAnticipatedSnowLevel DIRECTVENT DUALPIPE PIPING Theinletairscreensprovidedintheinstallationinstructionpacket are...

Page 19: ...ows and or tees used in terminations must be included when determin ing quantity of allowable elbows in the system 2 Number of elbows tabulated are for each Vent Flue Combustion Air Intake pipe 3 Minimum requirements for each Vent Flue Combustion Air Intake pipe is five 5 feet in length and one elbow tee 4 2 1 2 or 3 diameter pipe can be used in place of 2 diameter pipe 5 Increased Clearance Confi...

Page 20: ...n roof top maintain the same minimum clear ances between the exhaust vent and air intake terminations of adjacentunitsaswiththeexhaustventandairintaketerminations of a single unit If more than one direct vent furnace is to be installed horizontally through a common side wall maintain the clearances as in the following figure Always terminate all exhaust vent outlets at the same elevation and alway...

Page 21: ...drain hose hook ups Thedraintrapsuppliedwiththefurnacemustbeused Thedrainlinebetweenfurnaceanddrainlocationmust be constructed of 3 4 PVC Thedrainlinebetweenfurnaceanddrainlocationmust maintaina1 4inchperfootdownwardslopetowardthe drain Do not trap the drain line in any other location than at thedraintrapsuppliedwiththefurnace Do not route the drain line outside where it may freeze If the drain li...

Page 22: ... elbow drain port and secure with silverhoseclamp Angletubeoutwardtowardfrontoffurnace 5 Cut173 4inchesfromthelongendofHoseBanddiscard Secure the remaining hose to Tube 1 with a green hose clamp Route the other end of Hose B to front right side panelgrommethole Fordetailsconcerningmountingofthedraintrap refertoHorizontal DrainTrapMounting 6 Insertshortendofeachoftube2throughsidepanelgrommet holes ...

Page 23: ...ountedrubberelbow Discardcutportion 5 InsertTube1intorubberelbowdrainportandsecurewitha silver hose clamp Angle tube toward trap 6 Cut173 4inchesfromthelongendofHoseBanddiscard 7 Secure straight end of Hose B to exposed end of Tube 1 with a green hose clamp Route hose toward right side panelgrommetholes 8 InsertshortendofoneTube2throughrearrightsidepanel grommet drain hole Secure tube to HoseAwith...

Page 24: ... length to cut Secure remaininghosetoTube1withagreenhoseclamp Route other end of Hose B to front left side panel grommet hole NOTE Longhose B mustalwaysbeconnectedtoTube1and the elbow and not on the front cover 6 InsertshortendofeachTube2throughsidepanelgrommet holes Secure tubes to Hose A and Hose B with green hose clamps Ensure hoses and tubes maintain a downward slope for proper drainage and th...

Page 25: ...ug left unused pressure tap with plug removed from right side 2 Secure Hose A to front cover drain tap with a red hose clamp Routehosetorearright down sidepanelgrommet holes 3 Cut 1 4 inch from the end of the drain port on the rubber elbow and discard 4 InsertTube1intorubberelbowdrainportandsecurewith a silver hose clamp Angle tube outward toward front of furnace 5 Cut173 4inchesfromthelongendofHo...

Page 26: ...he induced draft blower housing 6 Cut 5 1 2 inches straight length from the long end of each Tube 2 and discard radius ends 7 Insert approximately one inch of each Tube 2 through left side panel grommet hole Secure tubes to Hose A and Hose B with a green hose clamps NOTE Tube must reach bottom of trap Ensure hoses and tubes maintain a downward slope for proper drainage and that they are not kinked...

Page 27: ...rved when making field connections Line voltage connections can be made through either the right or left side panel The furnace is shipped configured for a right side left side for counterflows electrical connection with the junction box located inside the burner compartment To make electrical connections through the opposite side of the furnace the junc tion box must be relocated to the other sid...

Page 28: ...ted between Y1 and Y2 at the furnace control in order to achieve the desired single stage cooling airflow Use of ramping profiles and dehumidification features require a jumper between Y1 and O and Y1 and DEHUM respectively NOTE Thermostat R requiredifoutdoorunitisequippedwitha Comfort Alert module or if the out door unit is a part of the ComfortNet family of equipment AND is wired as a non commun...

Page 29: ...hisset thedehumidifyfunctionisenabledduringa combinationcallforcooling T Stat anddehumidification DEHUM Stat 1 2 DEHUM TRIM ENABLE Move to the ON position to enable dehumidification ON OFF S5 FOSSILFUELAPPLICATIONS This furnace can be used in conjunction with a heat pump in a fossilfuelapplication Afossilfuelapplicationreferstoacombined gas furnace and heat pump installation which uses an outdoor ...

Page 30: ...owered anytimethepressureswitchisclosed Toconnect24VACHUM connectthe24VAClineofthehumidifiertothe5 brownwire The connection can be made by either stripping the wire and using a wire nut or by using a field supplied quick connect terminal The wiring must conform to all local and national codes Connect the COMsideofthehumidifiertotheCterminalonthefurnacecontrol board or to the COM side of the 24 VAC...

Page 31: ...conversion kit must be applied for propanegasinstallations RefertothePropaneGasand orHigh Altitude Installations for details Consult the furnace Specification Sheet for a listing of appro priate kits The indicated kits must be used to insure safe and properfurnaceoperation Allconversionsmustbeperformedbya qualifiedinstaller orserviceagency GAS VALVE This unit is equipped with a 24 volt gas valve c...

Page 32: ...is 375 in lbs excessive over tightening may damagethegasvalve Install a manual shutoff valve between the gas meter and unit within six feet of the unit If a union is installed the union must be downstream of the manual shutoff valve betweentheshutoffvalveandthefurnace Tighten all joints securely Connect the furnace to the building piping by one of the followingmethods Rigid metallic pipe and fitti...

Page 33: ...rom the gas valve to reach the outside of the cabinet must be supplied Coupling 90degreeelbow 2 inch close nipple 90degreeelbow Straightpipe withagroundjointunion toreachtheexterior ofthefurnace Therigidpipemustbelongenoughtoreach theoutsideofthecabinetsoastosealthegrommetcabinet penetration Asemi rigid connector to the gas piping can be used outside the cabinet per local codes GAS PIPING CHECKS B...

Page 34: ... 200 5 300 8 300 3 200 7 500 20 500 1 100 220 3 700 5 800 2 200 4 200 30 400 920 2 000 2 900 4 700 1 800 4 000 40 370 850 1 700 2 700 4 100 1 600 3 700 50 330 770 1 500 2 400 3 700 1 500 3 400 60 300 700 1 300 2 200 3 300 1 300 3 100 80 260 610 1 200 1 900 2 900 1 200 2 600 100 220 540 1 000 1 700 2 600 1 000 2 300 125 200 490 900 1 400 2 300 900 2 100 150 190 430 830 1 300 2 100 830 1 900 175 170...

Page 35: ...upply duct Positive Pressure 3 The difference between the two numbers is 4 w c Example static reading from return duct 1 w c static reading from supply duct 3 w c total external static pressure on this system 4 w c NOTE Both readings may be taken simultaneously and read directly on the manometer if so desired If an air conditioner coil or Electronic Air Cleaner is used in conjunction with the furn...

Page 36: ...illcausereducedairflow RefertoMinimumFilterAreatablestodeterminefilterarearequire ments 600 800 1000 1200 1400 1600 1800 2000 0453__X 207 207 240 288 0704__X 318 318 336 384 0905__X 413 413 413 432 480 1155__X 437 437 437 432 480 600 800 1000 1200 1400 1600 1800 2000 0714__X 316 316 336 384 0915__X 409 409 409 432 480 1155__X 430 430 430 432 480 Input__Airflow UPFLOW COOLING AIRFLOW REQUIREMENT CF...

Page 37: ... then smell for gas Be sure check near the floor as some types of gas are heavier than air 7 If you smell gas after five minutes immediately follow the Safety Instructions on page 5 of this manual If you do not smell gas after five minutes move the furnace gas valve manual control to the ON position 8 Replacetheburnercompartmentdoor 9 Openthemanualgasshutoffvalveexternaltothefurnace 10 Turnontheel...

Page 38: ... Regulator Adjust Regulator Vent Outlet Pressure Boss Open to Atmosphere On Off Switch High Fire Coil Terminal HI Coaxial Coil Terminal M Common Terminal C White Rodgers Model 36G54 Connected to Manometer Gas Valve On Off Selector Switch Regulator Vent High Fire Regulator Adjust Low Fire Regulator Adjust HoneywellModelVR9205 Two Stage i Manometer Manometer Hose Common Terminal C High Fire Coil Ter...

Page 39: ...heManifoldGasPressure tableshownbelow 8 Remove regulator cover screw from the low LO outlet pressure regulator adjust tower and turn screw clockwise to increase pressure or counterclockwise to decrease pressure Replaceregulatorcoverscrew 9 Close thermostat R and W2 contacts to provide a call for high stage heat 10 Remove regulator cover screw from the high HI outlet pressure regulator adjust tower...

Page 40: ...fully or partially open position 2 Placethermometersinthereturnandsupplyductsasclose to the furnace as possible Thermometers must not be influenced by radiant heat by being able to see the heat exchanger 3 Subtract the return air temperature from the supply air temperature to determine the air temperature rise Allow adequatetimeforthermometerreadingstostabilize 4 Adjust temperature rise by adjusti...

Page 41: ... positions and theircorrespondingtaps VerifyCFMbynotingthenumber displayed on the dual 7 segment LED display 6 Themulti speedcirculatorbloweralsooffersseveralcustom ON OFF ramping profiles These profiles may be used to enhancecoolingperformanceandincreasecomfortlevel TherampingprofilesareselectedusingDIPswitchesS4 1 2 Refer to the following figure for switch positions and theircorrespondingtaps Re...

Page 42: ...the ADJUST is set to plus Thefourheatingspeedsavailableare APlus B Plus C Plus and D Plus A Plus has a rise of 46 F for both stages which is within the 30 60 F rise range for the MVC950704CX This setting will keep electrical consumption to a minimum Set the Heat speed DIP switches to A 3 4 A OFF OFF B ON OFF C OFF ON D ON ON Switch Bank S4 Heating Airflow DIP Switch No Indicates factory setting 8 ...

Page 43: ...it to the ECM motor If the outdoor unit or thermostat is respon sible for determining the demand it calculates the demand and transmits the demand along with a fan request to the indoor unit The indoor unit then sends the demand to the ECM motor The table below lists the various ComfortNet systems the operating mode and airflow demand source System System Operating Mode Airflow Demand Source Cooli...

Page 44: ...ns NOTE Use of a transformer is recommended if installing a dual fuel fossil fuelsystem Failuretousethetransformerintheoutdoor unitcouldresultinoverloadingofthefurnacetransformer 1 2 R C 1 2 R C CTK0 Thermostat ComfortNet Compatible Furnace Integrated Control Module ComfortNet Compatible AC HP Integrated Control Module 40VA Transformer 208 230 VAC 24 VAC 1 2 R C System Wiring using Two Wires betwe...

Page 45: ...most recent furnace fault For display only Fault 3 FAULT 3 Next most recent furnace fault For display only Fault 4 FAULT 4 Next most recent furnace fault For display only Fault 5 FAULT 5 Next most recent furnace fault For display only Fault 6 FAULT 6 Least recent furnace fault For display only Clear Fault History CLEAR NO or YES Selecting YES clears the fault history NOTE Consecutively repeated fa...

Page 46: ...25 2 50 3 75 4 100 of maximum airflow SET UP Submenu Item Indication for Display Only not User Modifiable Mode MODE Displays the current furnace operating mode CFM CFM Displays the airflow for the current operating mode STATUS Submenu Item User Modifiable Options Comments Cool Airflow CL CFM 18 24 30 36 42 48 or 60 default is 18 Selects the airflow for the non communicating compatible single stage...

Page 47: ...c signals The signals and transmission lines are referred to as data 1 and data 2 Each transmission line is biased to approximately 2 5Vdc During data reception transmission the data lines vary between 5V and ground When data 1 is in creasing towards 5V data 2 is decreasing towards ground and when data 1 is decreasing towards ground data 2 is increasing towards 5V Typically the data 1 line is appr...

Page 48: ...wire Possible Cause Corrective Action Comments None None None Communications Failure Depress Learn Button Verify that bus BIAS and TERM dipswitches are in the ON position Depress once quickly for a power up reset Depress and hold for 2 seconds for an out of box reset Control power up Learn button depressed None None No power to furnace Open fuse Communications error Check fuses and circuit breaker...

Page 49: ... of closed low stage pressure switch contacts Gasvalveopensatendofigniterwarmupperiod delivering gas to burners and establishing flame Integrated control module monitors flame presence Gas valvewillremainopenonlyifflameisdetected Ifthethermostatcallisforlowheat gasvalveandinduced draftblowerwillcontinueonlowstage Ifthecallisforhigh heat thegasvalveandinduceddraftblowerwillchangeto highstage Circul...

Page 50: ... discharge can adversely affect electrical components Usethefollowingprecautionsduringfurnaceinstallationandser vicing to protect the integrated control module from damage By putting the furnace the control and the person at the same elec trostatic potential these steps will help avoid exposing the inte grated control module to electrostatic discharge This procedure is applicable to both installed...

Page 51: ...tralreturnregister orasidepanelexternalfilterrack upflowonly Amediaairfilteror electronicaircleanercanbeusedasanalternatefilter Followthe filter sizes given in the Recommended Minimum Filter size table toensureproperunitperformance To remove filters from an external filter rack in an upright upflow installation follow the directions provided with external filter rack kit HORIZONTAL UNIT FILTER REM...

Page 52: ...obtainsufficientcleaning Repeat foreachtube 9 Cleanresiduefromfurnaceusingavacuumcleaner 10 Replacethepartsremovedinthepreviousstepsinreverse order 11 Turn on electrical power and gas to furnace Check for leaksandproperunitoperation 12 Severe heat exchanger fouling is an indication of an operationalproblem Performthecheckslistedin Startup Procedure and Adjustments to reduce the chances of repeated...

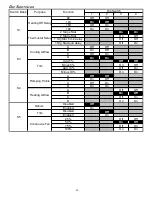
Page 53: ...n D On On Add 5 Off Off Minus 5 On Off Add 10 Off On Minus 10 On On A Off Off B On Off C Off On D On On A Off Off B On Off C Off On D On On Disabled Off Enabled On Disabled Off Enabled On 25 Off Off 50 On Off 75 Off On 100 On On Dip Switch S1 Switch Bank Purpose Function Heating Off Delay Thermostat Setup Cooling Airflow Trim S3 S4 Ramping Profile Heating Airflow Continuous Fan S5 Dehum Trim ...

Page 54: ...t Call for Service icon illuminated ComfortNet thermostat scrolls Check Furnace message E0 Furnace lockout due to an excessive number of ignition retries 3 total LOCKOUT E0 Failure to establish fame Cause may be no gas to burners front cover pressure switch stuck open bad igniter or igniter alignment improper orifces or coated oxidized or improperly connected fame sensor Loss of fame after establi...

Page 55: ...ers and ductwork for blockage Clean flters or remove obstruction Check circulator blower speed and performance Correct speed or replace blower motor if necessary Check burners for proper alignment Check fue and air inlet piping for blockage proper length elbows and termination Correct as necessary Check induced draft blower for proper performance Replace if necessary Tighten or correct wiring conn...

Page 56: ...ed improperly Blocked fue and or inlet air pipe blocked drain system or weak induced draft blower Incorrect pressure switch set point or malfunctioning switch contacts Loose or improperly connected wiring Inspect pressure switch hose Repair replace if necessary Inspect fue and or inlet air piping for blockage proper length elbows and termination Check drain system Correct as necessary Check induce...

Page 57: ...control module has lost communications with circulator blower motor MOTOR COMM b1 Loose wiring connection at circulator motor control leads Failed circulator blower motor Failed integrated control module Tighten or correct wiring connection Check circulator blower motor Replace if necessary Check integrated control module Replace if necessary Turn power OFF prior to repair Replace circulator motor...

Page 58: ...at scrolls Check Furnace message b7 MOTOR PARAMS b7 Furnace operates at reduced performance or Integrated control module LED display provides b9 error code b9 LOW ID AIRFLOW B9 Blocked filters Restrictive ductwork Undersized ductwork Check filters for blockage Clean filters or remove obstruction Check ductwork for blockage Remove obstruction Verify all registers are fully open Verify ductwork is a...

Page 59: ...ED 115 VAC POLARITY DATANOT YET ON NETWORK INVALID MEMORYCARD DATA BLOWER MOTOR NOT RUNNING BLOWER COMMUNICATION ERROR BLOWER HP MIS MATCH BLOWER MOTOR OPERATING IN POWER TEMPERATURE OR SPEED LIMIT BLOWER MOTOR CURRENT TRIP OR LOST ROTOR BLOWER MOTOR LOCKED ROTOR OVER UNDER VOLTAGE TRIP OR OVER TEMPERATURE TRIP INCOMPLETE PARAMETERS SENT TO MOTOR LOW INDOOR AIRFLOW LOW STAGE COOL HIGH STAGE COOL L...

Page 60: ...SET ROLLOUT LIMIT CONTROLS SINGLE CONTROL ON 45 kBTU GY GRAY RD RED OR 1 WH AUTO RESET PRIMARY LIMIT CONTROL NO WH BR BL GN 3 LOW VOLTAGE FIELD FIELD GND FIELD SPLICE SWITCH PRESS WH 115 JUNCTION BOX 1 AND GROUNDED RD BL 1 TO UNIT MUST BE VAC C FRONT COVER PRESSURE SWITCH GR GN GREEN FLAME SENSOR LOW FIRE PRESSUR E SWITCH 1 COLOR CODES 4 UNIT MUST BE PERMANENTLY GROUNDED AND CONFORM TO N E C AND L...

Reviews: