background image

10

1.

TEMP Button


T

T

T

T

T

: Press this button to decrease the in-

door temperature setting.

2.

TEMP Button 

S

S

S

S

S

: Press this button to increase the in-

door  temperature setting .

3.

MODE Selection Button

: Each time the button is

pressed, the  operation mode is shifted in the direction of
the arrow:

NOTE: COOL only model has no HEAT feature.

4.

SWING Button

: Press this switch button to activate auto

swing feature of the horizontal louver. Push it again to
stop.

5.

RESET Button

: When you press the recessed RESET

button, all current settings are cancelled and the control
will return to  the initial settings.

6.

AIR DIRECTION Button

: Press this button to change

the swing angle of the louver. The swing angle of the
louver is 6° for each press. When the louver swing at a
certain angle which would affect the cooling and heating
effect of the air conditioner, it would automatically change
the swing direction . No symbol will appear in the display
area when this button is pressed.

7.

LED DISPLAY Button

: Press this button to clear the

digit  display in the air conditioner, press it again to illu-
minate (Not  available for the units without LED display
window).

8.

FAN SPEED Button

: Used to select the Fan Speed in

four steps of AUTO, LOW, MED or HIGH. Each time the
button is pressed, the fan speed mode is shifted.

9.

ON/OFF Button

: Press this button to start operation;

press the button again to stop operation.

10.

TIMER ON Button

: Press this button to initiate the AUTO-

ON time sequence. Each press will increase the auto-
timed setting in 30 minute increments. When the setting
time displays 10h, each press will increase the auto-
timed setting 60 minutes increments.

To cancel the auto-timed program, simply adjust the auto-
on time to 0.0.

11.

SLEEP Button

: Press this button to go into the Energy-

Saving operation mode. Press again to cancel. This func-
tion can only be used on COOL, HEAT and AUTO modes
and will maintain the most comfortable temperature for
you.

NOTE:

 While the unit is running under SLEEP operation

mode, pressing the MODE, FAN SPEED or ON/OFF
button will cancel the SLEEP operation mode.

12.

TIMER OFF Button

: Press this button to initiate the

AUTO-OFF time sequence. Each press will increase the
auto-timed setting in 30 minutes increments. When the
setting time displays 10h, each press will increase the
auto-timed setting in 60 minutes increments.  To cancel
the auto-timed program, simply adjust the auto-off time
to 0.0.

13. 

LOCK Button

: When you press the recessed LOCK

button, all current settings are locked in and the remote
control does not accept any operation except that of the
LOCK. Press again to cancel the LOCK mode.

14.

TURBO Button

: When pushing this button on COOL

mode, the air conditioner ramps up into a more powerful
cooling operation. Push again to  cancel the TURBO func-
tion. (Not available for air conditioners without TURBO
function.)

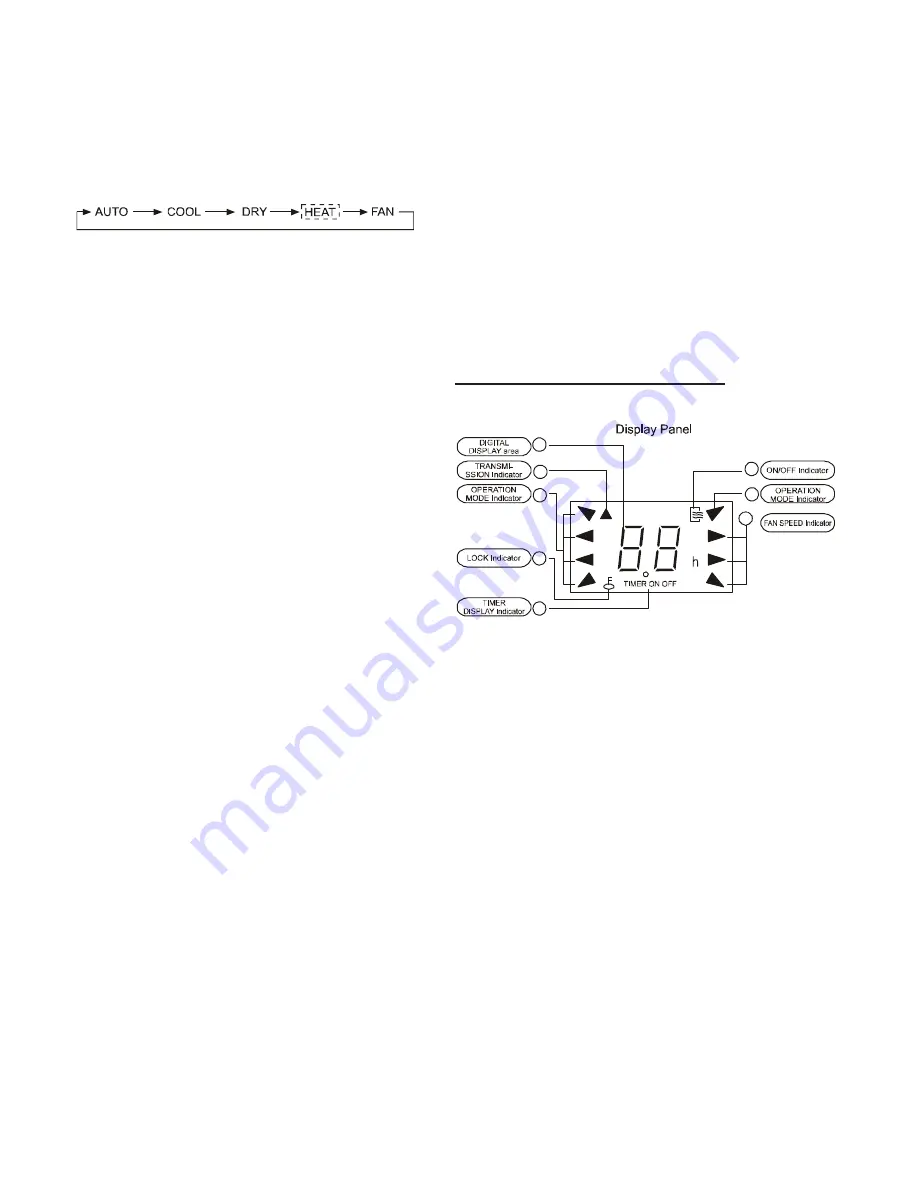
INDICATORS ON DISPLAY PANEL

1

2

5

4

6

4

3

7

Figure 2

1.

DIGITAL DISPLAY area

: This area will show the set

temperature and, if in the TIMER mode, will show the ON
and OFF settings of the TIMER. If in the FAN mode,
nothing will be displayed.

2.

TRANSMISSION Indicator

: This indicator flashes one

time when remote control transmits signals to the indoor
unit.

3.

ON/OFF Indicator

: This symbol appears when the unit

is turned on by the remote control, and disappears when
the unit is turned off.

4.

OPERATION MODE Indicator

: When the MODE button

is pressed, the current operating mode is displayed:
AUTO, COOL, DRY, HEAT (cooling only models without
heat), or FAN mode.

5.

LOCK Indicator

: LOCK is displayed by pushing the

LOCK button. Pushing the LOCK button a second time
will clear the display.

Summary of Contents for HG31ES

Page 1: ...E OR SERVICE PROCEDURES IF YOU PERFORM SERVICE ON YOUR OWN PRODUCT YOU ASSUME RESPONSIBILITY FOR ANY PERSONAL INJURY OR PROPERTY DAMAGE WHICH MAY RESULT TO PREVENT THE RISK OF PROPERTY DAMAGE PERSONAL INJURY OR DEATH DO NOT STORE COMBUSTIBLE MATERIALS OR USE GASOLINE OR OTHER FLAMMABLE LIQUIDS OR VAPORS IN THE VICINITY OF THS APPLIANCE TO PREVENT HEAT RELATED ILLNESS OR DEATH DO NOT USE THIS DEVIC...

Page 2: ...nd familiarize yourself with all the features and how they operate INDOOR UNIT defrost auto timer ion Horizontal air flow grille Connecting pipe 6 OUTDOOR UNIT DISPLAY PANEL INDICATOR LIGHTS INDICATOR LIGHTS AUTO Indicator Lighted when the unit is in AUTO operation OPERATION Indicator Lighted when the unit is in operation DIGITAL Display When the air conditioner is in operation the digital display...

Page 3: ...operation Press the manual control button twice within five seconds and the unit will go into COOL operation AUTO COOL Manual Control Button 3 Close the panel to its original position THE MANUAL CONTROL BUTTON IS USED FOR TESTING PURPOSES AND IS ONLY TO BE USED TEMPORARILY To restore remote control operation use the remote control directly AIRFLOWDIRECTIONCONTROL Adjusting the unit s airflow direc...

Page 4: ...automatic and is dependent upon the tempera ture you have selected and the room s temperature The unit will control the room temperature automati cally at approximately the temperature point you se lected If the AUTO mode isn t a comfortable setting for your room you can manually select the desired settings SLEEP Operation When the SLEEP button on the remote control is pressed during Cooling Heati...

Page 5: ...pe unit with a clean soft dry cloth Never use bleach or abrasives on the unit NOTES A cloth dampened with cold water may be used on the indoor unit if it is very dirty Dry with a soft cloth Do not use chemically treated cloths or dusters to clean the unit Do not use benzine thinner polishing powder or simi lar solvents for cleaning These may cause the plas tic surface to crack or warp Water hotter...

Page 6: ...e remote control 3 The outdoor unit requires periodic maintenance and clean ing and should be done by a qualified service technician Contact your dealer or servicer Checks Before Operation HIGH VOLTAGE DISCONNECT ALL POWER BEFORE SERVICING MULTIPLE POWER SOURCES MAY BE PRESENT FAILURE TO DO SO MAY CAUSE PROPERTY DAMAGE PERSONAL INJURY OR DEATH NEVER USE WATER TO CLEAN THE INSIDE OF THE UNIT EXPOSU...

Page 7: ...e louver returning to its original position 4 Dust is blown from the unit This is a normal condition when the air conditioner has not been used for a long time or during the first use of the unit 5 An unusual smell comes from the indoor unit This is caused by the indoor unit giving off smells ab sorbed from building material furniture or smoke 6 The air conditioner migrates to FAN ONLY mode from H...

Page 8: ...e setting is incorrect Fuse blows frequently or circuit breaker trips frequently Water liquid or other foreign objects penetrate the unit The remote control doesn t work or works abnormally If operation indicator or other indicators flash rapidly disconnect the power and then reconnect it Contact service if the rapid flashes continue after restarting If one of the following codes appear on the dis...

Page 9: ...tage of CPC Emitting Signal Transmitting Distance 8m 26 23 F 140 F 5 C 60 C Environment 2 0V Model PERFORMANCE FEATURES 1 Operating Modes AUTO COOL DRY HEAT cooling only model without heat and FAN 2 Timer Setting Function in 24 hours 3 Indoor Setting Temperature range 62 F 86 F 17 C 30 C 4 Full function LCD Liquid Crystal Display REMOTE CONTROL FEATURES O Figure 1 ...

Page 10: ...ime to 0 0 11 SLEEP Button Press this button to go into the Energy Saving operation mode Press again to cancel This func tion can only be used on COOL HEAT and AUTO modes and will maintain the most comfortable temperature for you NOTE While the unit is running under SLEEP operation mode pressing the MODE FAN SPEED or ON OFF button will cancel the SLEEP operation mode 12 TIMER OFF Button Press this...

Page 11: ...Do not dispose batteries as unsorted municipal waste Collection of such waste separately for special treat ment is necessary AUTOMATIC OPERATION Turn on the power The OPERATION indication lamp on the display panel of the indoor unit will begin to flash and will turn off after flashing 6 times 1 Use the MODE button to select AUTO 2 Push the TEMP button to set the desired temperature within a range ...

Page 12: ...adjust the TIMER ON to start the operation B Push the TIMER ON button again to set the time you want to start the operation C Push the TIMER OFF button The remote control will show TIMER OFF the last set time for STOP opera tion and the signal h will be shown on the DIGITAL display area You are now ready to reset the time to STOP operation D Press the TIMER OFF button again to set the time you wan...

Reviews: