background image

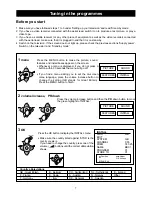
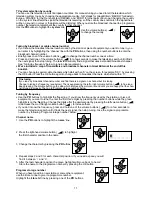
Remember, the menu will go off if you do not press a button within 30 seconds. 

You can keep pressing the MENU button at any time to return to normal viewing.

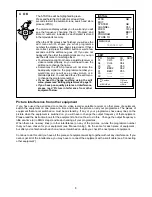
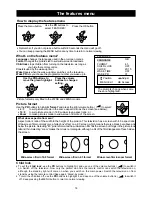
‘PR’  is the programme number you store a broadcast channel under.
‘NAME’ is either read automatically from the broadcast, or you create it.
‘CH’ is the broadcast channel number.
‘SKIP’ - see below.

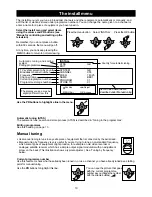
Move a channel

When the channel is not on the programme number you want it on, you
can move it.
1 Use the PR  buttons to highlight the channel you want to move.

The picture for that channel will show behind the menu.

2  Press the green MOVE button on the remote control, the highlight will

change to red, and the green block on the screen will be 
labelled Confirm.

3 Use the PR buttons to move the red highlight onto the programme

number where you want to put the channel.

4  Press the green MOVE button to finish the move.

Delete a channel

1 Use the PR buttons to highlight the channel you want to delete. The picture for that channel will show behind

the menu.

2  Press the yellow DELETE button on the remote control. The highlight will change to red for a moment and the

programme list shifts down to get rid of the empty slot.

Skip

You set the tick mark under ‘SKIP’ so that you can’t select a programme with the PR buttons.
1  Use the PR buttons to highlight the programme number where you want to set or remove the tick mark. The

picture for channel will show behind the menu.

2  Press the red SKIP button on the remote control to set the tick mark or to remove it.

13

Editing programmes

INSTALL 
ATSS GB

SYSTEM GB
CHANNEL C55
FREQ 743.25
NAME BBC1
PROGRAM 01
STORE TO 

01

EDIT 
PR

NAME     CH     SKIP

07

--------

C37

06

--------

C64

05  

CH5

C59

04 CH4  C62
03 ITV

C55

O2 BBC2

---

01 BBC1 - 

---

V

Position

CB

Adjust

W

MENU Exit

OK Access

V

Position

Move

W

Delete

MENU Exit

Skip

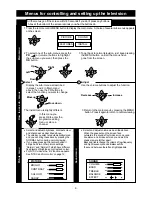
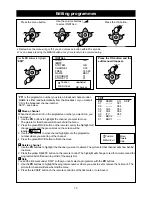
Use the PR buttons to highlight 
‘EDIT’.

Press the OK button and the
edit menu will appear.

EDIT

PR

PR

PR

PR

NORMAL/OK

PR

PR

PR

PR

PR

PR

PR

PR

NORMAL/OK

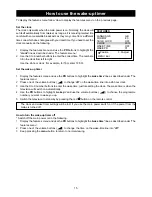
Press the menu button.

Use the volume buttons (        )
to select ‘INSTALL’.

Press the OK button.

Summary of Contents for 217NS

Page 1: ...217NS 257NS 289NS COLOUR TELEVISION OPERATING INSTRUCTIONS...

Page 2: ...rvice engineer contact your Comet service centre Phone numbers for Comet service centres are given on your Comet sales receipt Troubleshooting and helpline If you have a problem using this product ple...

Page 3: ...nus Picture format normal or wide screen Child lock Clock Wake time and wake up programme number 14 How to use the wake up timer 15 The sleep function 16 The mode button 16 Teletext 17 18 The scart an...

Page 4: ...olWbutton makes the sound quieter The headphone socket takes a 3 5mm diameter plug Warning Prolonged listening through headphones at high volume may damage your hearing PR Features on the television a...

Page 5: ...buttons 4 Television mode 1 The stand by button switches the television on or puts it back on stand by page 6 2 The number buttons are mainly for changing channels 3 NORMAL means this button selects...

Page 6: ...in the remote control Press the edge of the catch at the top of the battery cover towards the cover and lift off the cover Put in the two batteries that came with your television size AAA or LR3 Make...

Page 7: ...the number buttons 0 to 9 One of the PR buttons on the remote control The PRVor PRWbutton on the front panel of the television When you switch the television on the stand by light will change from re...

Page 8: ...d by mode 7 Tuning in the programmes Before you start Press the MENU button to make the picture sound features and install boxes appear on the screen Whenever a menu is displayed if you do not press a...

Page 9: ...t below INSTALL ATSS GB EDIT SYSTEM GB CHANNEL C55 FREQ 743 25 NAME BBC1 PROGRAM 01 STORE TO 01 MENU Exit PLEASE WAIT EDIT PR NAME CH SKIP 05 CH5 C37 04 CH4 C64 03 ITV C59 02 BBC2 C62 01 BBC1 C55 00 9...

Page 10: ...the function you want to change The install menu is slightly different 3 Return to the main menu by pressing the MENU button Press it again to return to normal viewing In this menu you press OK to ent...

Page 11: ...e types of equipment might produce for example an old video recorder or analogue satellite receiver which has a simple output signal modulator with an adjustment screw on the back This illustration sh...

Page 12: ...utton again to change back to broadcast channels which start with a C Tuning by frequency Use the PR buttons to highlight the freq line If you know the frequency used by the station or piece of equipm...

Page 13: ...the OK button Copying a programme to another number 1 Choose the programme you want to copy to another programme number 2 Select the install menu as described under The install menu on page 10 3 Choo...

Page 14: ...ighlight the channel you want to delete The picture for that channel will show behind the menu 2 Press the yellow DELETE button on the remote control The highlight will change to red for a moment and...

Page 15: ...creen film in zoom format 14 The features menu FEATURES GB FORMAT 4 3 CHILD LOCK OFF CLOCK 20 15 WAKE TIME OFF WAKE PR 01 VPosition CBAdjust W MENU Exit OK Access The prompts change when some lines ar...

Page 16: ...one of the volume buttons to change off on the wake time line into a 24 hour clock 3 Use the 0 to 9 number buttons to enter the wake time just like setting the clock The wake time is when the televis...

Page 17: ...o see how much sleep time is left before the television will switch off The information display goes off after about five seconds The sleep timer will be cancelled if you switch the television off or...

Page 18: ...one you are on press the PR down button This television has a page memory which stores a few pages above the one you are reading When you press the PR button the next page will appear almost instantly...

Page 19: ...top left of the screen This symbol tells you whether or not the television has found the page means the television has not found the page yet A page number like tells you the page or sub page is ready...

Page 20: ...NTSC and tint control Imported video discs and cassettes may be recorded with the NTSC television system which is used in America and Japan This television can play NTSC videos as long as the video r...

Page 21: ...ision aerial should go to the satellite receiver then to the video recorder then to your television You may need to read your video recorder instructions to find out which is the best scart socket to...

Page 22: ...aerial Aerial cable Aerial out Aerial in Aerial out Aerial in Scart AV1 SCART socket Scart cable Aerial cable Scart cable Scart AV2 Video recorder VCR TV Satellite or digital receiver Connect the scar...

Page 23: ...the screen synchronisation signal Please check through the guide below before you call a service department or the shop where you bought your television If there is something about your television wh...

Page 24: ...your main fuse box equipment not working The fuse in the plug has blown Check what could have made the fuse blow before you replace it 23 Normal events The following things are normal so don t worry a...

Page 25: ...n find the correct terminals as follows The wire that is coloured brown is connected to the terminal that is marked with the letter L or coloured red The wire that is coloured blue is connected to the...

Page 26: ...tands which are recommended for the television and make sure that the fixings are properly tightened Never use a make shift stand or legs fixed with wood screws Cleaning Unplug the television and use...

Page 27: ...odel 217NS 4 5 W 4 5 W rms Model 257NS 7 W 7 W rms Model 289NS 7 W 7 W rms Headphone type Impedance 32 ohms or more with 3 5mm stereo jack plug Aerial impedance 75 ohms Channel coverage VHF UHF and ca...

Page 28: ...9 Midlands East 22 Waltham 58 64 61 54 Northern Ireland 23 Brougher Mountain 22 28 25 32 24 Divis 31 27 24 21 25 Limavady 55 62 59 65 North 26 Belmont 22 28 25 32 56 27 Emley Moor 44 51 47 41 37 North...

Reviews: