background image

1.SYSTEM SETUP

2. LANGUAGE SETUP

- it is used to select the TV mode.

Options:
Please select this option as per your TV set.

it is used to select the TV scan mode, please

set as per your TV set.

Options:

Normal Pan & scan mode

normal Letter box mode

16:9 wide screen mode

- it is used to select whether or not

the

multi-angle icon is display on the screen when a multi-
angle DVD disc is playing.

Options: On: Icon will be displayed

Off: Icon will be turned off

Reset to factory settings.

Options: RESTORE

1.1 TV SYSTEM

NTSC / PAL / AUTO

1.2

1.3 TV TYPE-

4:3PS :

4:3LB :
16:9 :

1.4 ANGLE MARK

1.5 DEFAULT -

SCREEN SAVER

- when the player is not in used for 3

minutes, a running DVD logo will move across the TV
screen to protect the TV CRT.

Options: On: Screen saver is enabled

Off: Screen saver is disabled

LANGUAGE SETUP

LANGUAGE SETUP

OSD LANGUAGE

AUDIO LANG

SUBTITLE LANG

MENU LANG

EXIT SETUP

2.1 OSD LANGUAGE -

ENGLISH

/

FRENCH

It is used to select different On

Screen Display language for different user.

Options:

Options:

select preferred audio language.(DVD

only, need disc software support)

ENGLISH

(The number of these options depends on the
customer's need.)
2.2 AUDIO LANG -

/GERMAN SPANISH/

/

PORTUGUESE/ITALIAN

SPEAKER SETUP

SPEAKER SETUP

DOWNMIX

EXIT SETUP

3. VIDEO SETUP

VIDEO SETUP

VIDEO SETUP

HUE

SATURATION

EXIT SETUP

3.1 HUE--to set the colour impression for display.

3.2 SATURATION--to set the saturation level for display.

Options: -6/-4/-2/0/+2/+4/+6

Options: 0/2/4/6/8/10/12

4. SPEAKER SETUP

4.1 DOWNMIX

Options:

Left/Right mix mode

Select this option if you don't

have a 5.1 channels amplifier.

LT/RT-

STEREO-

2.3 SUBTITLE LANG-

ENGLISH/GERMAN/SPANISH/FRENCH/
PORTUGUESE/ITALIAN/OFF

2.4 MENU LANG -

ENGLISH/GERMAN/SPANISH/FRENCH/
PORTUGUESE/ITALIAN

Select preferred subtitle language.

(DVD only, need disc software support)

Options:

Select preferred disc menu language.

(DVD only, need disc software support)

Options:

9

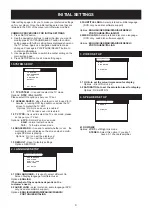
SYSTEM SETUP

SYSTEM SETUP

TV SYSTEM

ANGLE MARK

DEFAULT

EXIT SETUP

68 6;2-

SCREEN SAVER

Initial settings page is for you to make your preferred settings
up for your player. Once the initial settings are done they are
retained in the CPU of the player until otherwise modified.

1. Press SETUP button.
2. Use the navigation buttons to select the item you want to

modify, press PLAY/PAUSE/SELECT button to confirm,
setting page with further setting items displayed shows on
the TV screen. Again use navigation buttons to make
changes. Press again PLAY/PAUSE/SELECT button to
confirm modifications.

3. Use navigation buttons to switch to another setting on the

main setting page.

4. Press SETUP button to exit main setting page.

COMMON PROCEDURES FOR INITIAL SETTINGS

Goodmans Helpline 0870 8730080

INITIAL SETTINGS

Summary of Contents for GCE70W6DVDK

Page 1: ...ED IN THIS IM THOROUGHLY PRIOR TO CONNECTING AND OPERATING PLEASE RETAIN THIS MANUAL IN CASE YOU MAY NEED IT FOR FUTURE REFERENCE THE ILLUSTRATIONS GRAPHICS HEREIN ARE FOR REFERENCE ONLYAND SUBJECT TO...

Page 2: ...d where children might see it WARNING To prevent fire or shock hazerd do not expose this unit to rain or moisture CAUTION DANGEROUS VOLTAGES EXIST INSIDE THIS UNIT DO NOT REMOVE COVER OR BACK NO USER...

Page 3: ...enjoying video CDs with PBC feature MP3 playback KODAK Picture CD JPEG CD playback KODAK Picture CD JPEG CD operations system setup language setup audio setup video setup speaker setup common procedu...

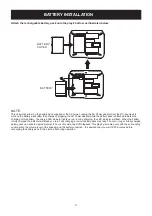
Page 4: ...s up red during charging the LED indicator will flash When the battery is fully charged the indicator will steady on red Fully charging a run out battery pack may take 5 hours or longer A fully charge...

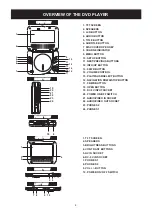
Page 5: ...14 VOLUME CONTROL 15 PLAY PAUSE SELECT BUTTON 16 NAVIGATION DOWN STOP BUTTON 17 F BWD BUTTON 18 OPEN BUTTON 19 DC 9V INPUT SOCKET 20 POWER ON OFF SWITCH 21 AUDIO VIDEO IN SOCKET 22 AUDIO VIDEO OUT SOC...

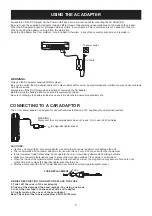
Page 6: ...video software while driving a vehicle Make sure the unit is fastened securely to prevent from moving outside of the vehicle in an accident When the inside of the cigarette lighter socket is dirty wit...

Page 7: ...h the instructions before connecting other equipment Ensure that you observe the color coding when connecting audio and video cables Note During DVD play the TV volume may be at a lower level than dur...

Page 8: ...istening at high power for a long moment could damage users ears HOW TO USE A PAIR OF EARPHONES OR HEADPHONES DIAMETER 3 5MM OPEN OPEN Adjust the volume Connecting to audio equipment To audio input co...

Page 9: ...anguage appears release the button to view the subtitle in that language Note this function only works on the DVDs recorded with multi language subtitles ENJOYING VIDEO CDS WITH PBC FEATURE After load...

Page 10: ...P VIDEO SETUP VIDEO SETUP HUE SATURATION EXIT SETUP 3 1 HUE to set the colour impression for display 3 2 SATURATION to set the saturation level for display Options 6 4 2 0 2 4 6 Options 0 2 4 6 8 10 1...

Page 11: ...the battery pack is charged If not recharge it Check that the A V cables are securely connected Check that the disc is a DVD region number 2 DVD RW VIDEO CD or AUDIO CD Do not use a disc that has scr...

Page 12: ...ure 4 Do not expose the battery pack to water fire or heat 5 Always use the included AC adapter when charging the battery pack 6 This battery pack is designed exclusively for your portable DVD player...

Page 13: ...ure or cold and humid environments Cleaning and Maintenance Many plastic parts are used in this DVD player casing Do not use volatile chemicals such as benzene or thinner This might damage the finish...

Reviews: