background image

16

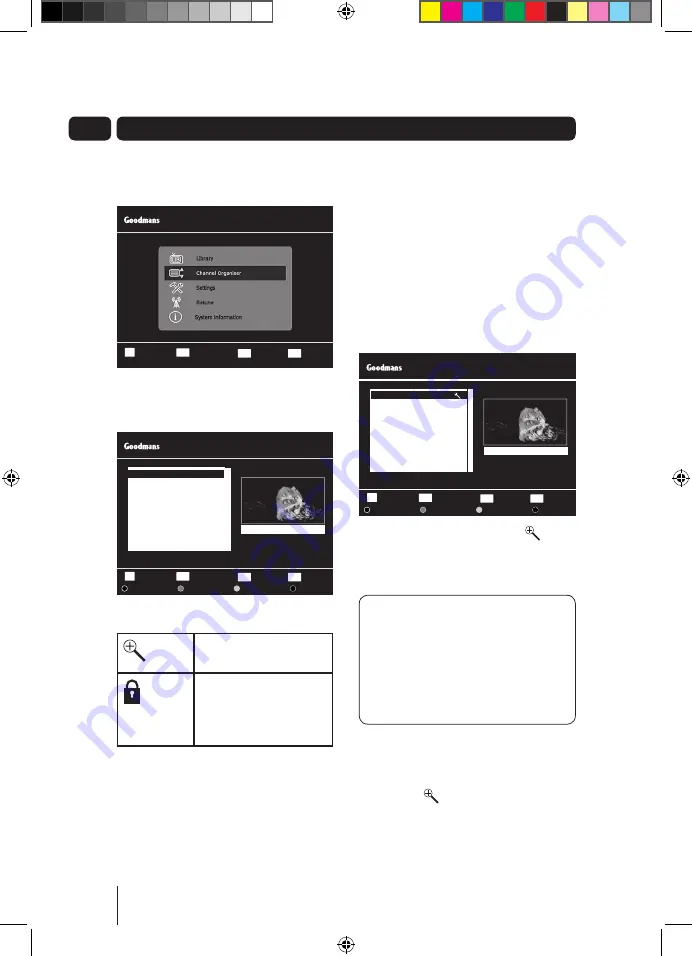
07 Channel Organiser

You can open the channel organiser 

window from the main menu

This channel organiser allows you to 

delete, hide and lock channels.

Channel list icons


This channel has been 

hidden
This channel has been 

locked and will require 

the parental PIN to 

unlock it.

Hiding a channel

You can hide any channel so that it does 

not appear in the programme guide 

window and it will not be available 

when using the 

CH+

 or 

CH-

 buttons. 

You may want to do this for channels 

that you do not watch regularly.
Use the 

p

 and 

q

 buttons to select the 

channel that you want to hide. Press the 

YellOW

 button to hide the channel.

When a channel is hidden, the   

will be shown to the right side of the 

channel name.

DON’T FORGeT!

 Hidden 

channels will not be shown in the 

programme guide window.
You will only be able to view the 

hidden channels by entering the  

channel number.

To show a channel, use the 

p

 and 

q

 buttons to select the channel that 

you want to show. Press the 

YellOW


button. The   will no longer be shown 

and will be available in the programme 

guide window again.

Select

Confirm

OK

Return

BACK

Wed 08 Sep     16:52

Channel Organiser

    2     BBC TWO

    3     ITV 1

    4     Channel 4

    5     FIVE

    6     ITV 2

    7     BBC THREE

    9     BBC FOUR

  10     ITV 3

    1     BBC ONE

Delete

Lock

Hide

Move

Exit Menu

EXIT

Channels                                 Lock        Hide

BBC ONE

Select

Confirm

OK

Return

BACK

Wed 08 Sep     16:52

Main Menu

Exit Menu

EXIT

Select

Confirm

OK

Return

BACK

Wed 08 Sep     16:52

Channel Organiser

    2     BBC TWO

    3     ITV 1

    4     Channel 4

    5     FIVE

    6     ITV 2

    7     BBC THREE

    9     BBC FOUR

  10     ITV 3

    1     BBC ONE

Delete

Lock

Hide

Move

Exit Menu

EXIT

Channels                                 Lock        Hide

BBC ONE

A5 GDB1232DTR_UserGuide.indd   16

3/25/2011   12:43:02 PM

Summary of Contents for GDB1232DTR

Page 1: ...GDB1232DTR Freeview Digital TV Recorder User Guide IMPORTANT Please read all instructions carefully before use and keep for future reference OK R A5 GDB1232DTR_UserGuide indd 1 3 25 2011 12 42 38 PM ...

Page 2: ...t Use of any electrical equipment should be undertaken with care Please read the safety section on pages 30 and 31 before using the Freeview Digital TV Recorder This appliance is for household use only A digital TV recorder lets you access the free digital channels that are broadcast in the UK It uses a digital signal received through your wideband aerial and lets you watch it through your existin...

Page 3: ...eband rooftop aerial in order to get the best out of your Freeview Digital TV Recorder See www digitaluk co uk for more information GDB1232DTR Freeview Digital TV Recorder User Guide IMPORTANT Please read all instructions carefully before use and keep for future reference OK R GDB1232DTR Freeview Digital TV Recorder Quick Start Guide Welcome to your new Freeview Digital TV Recorder This guide will...

Page 4: ... use 10 The programme guide window 14 Channel Organiser 16 The Library Window 18 The settings menu 20 Retune 23 System information menu 24 Help and Advice 25 Specifications and Guarantee 29 Warnings 30 Electrical Safety 31 05 06 07 08 09 10 11 12 13 14 15 A5 GDB1232DTR_UserGuide indd 4 3 25 2011 12 42 39 PM ...

Page 5: ...CORD Record live TV navigation Move up down left right and OK Stop Stop the playback of a recorded programme Front Rear RF IN from your rooftop aerial RF OUT to your TV RF input TV and VCR Standard definition SCART outputs USB Factory upgrade connection COAXIAL Digital audio out for connection to a surround sound system A5 GDB1232DTR_UserGuide indd 5 3 25 2011 12 42 48 PM ...

Page 6: ...rd a programme and scheduled recordings INFO Displays the Information bar OK Confirm selection in menu on screen displays TEXT Displays digital text when available EXIT Exits screens and Menus SWAP Changes between current and previous channels FAST FORWARD Remote Control MENU Opens the main menu screen NAVIGATION Selects options in menu on screen displays WIDE Switches between 4 3 and 16 9 screen ...

Page 7: ...of your digital TV recorder Connect the RF cable between the RF OUT socket of your digital TV recorder and the RF IN socket of your TV see illustration above Connect the Scart lead between the TV Scart socket and your TV Scart socket Connecting up 1 A5 GDB1232DTR_UserGuide indd 7 3 25 2011 12 42 58 PM ...

Page 8: ... of the remote control and put two AAA size batteries so that the and marks on the batteries match the and marks inside the remote control Replace the battery cover To use the remote control simply direct it towards the front of the digital TV recorder and press the desired buttons DON T FORGET When replacing the batteries make sure that you use the same size and type 2 A5 GDB1232DTR_UserGuide ind...

Page 9: ... recorder press the standby button on the remote control 5 4 Getting Started Select Start Install OK Select Your TV Screen type using the arrow buttons Press OK to start the installation 16 9 Widescreen First Time Installation CH LIST INFO 2 1 3 5 4 6 8 7 9 0 TV AV abc def ghi jkl mno pqrs tuv wxyz MENU GUIDE VOL LIB R OK V O L VOL CH C H A5 GDB1232DTR_UserGuide indd 9 3 25 2011 12 43 00 PM ...

Page 10: ... the remote control Alternatively you can use the number buttons to type in the channel number When you change the channel the channel information bar will be displayed for a few seconds This shows the details of the programme currently showing and the next scheduled programme Changing the volume You can change the volume using the VOL and VOL buttons on the remote control You can turn off the vol...

Page 11: ...COS reinvestigate the death of a wealthy financier when a psychic tells his daughter to resolve his unfinished business DRAMA S AD Select Confirm OK Audio Selection 1 1 Language ENG Stereo Audio Type MPEG Exit Menu EXIT Subtitles Press the SUB button to toggle the subtitles on and off DON T FORGET Not all programmes have subtitles You can use the information bar to see if the S icon is shown It s ...

Page 12: ...1 2 3 4 5 smooth rewind 1 2 3 4 5 To stop time shifting mode and go back to live TV press the STOP button Digital text Your digital TV recorder gives you access to digital text for information on news events weather and a variety of topics Digital text services vary depending on the country and channel DON T FORGET Some channels use the RED button to access digital text whilst you are watching TV ...

Page 13: ...ser see page 16 Settings The settings menu lets you configure the audio and visual settings of the digital TV recorder For further information about the settings menu see page 20 Retune The retune menu lets you retune the digital TV recorder For further information about the retune menu see page 23 System Information The system information menu provides important information about your digital TV ...

Page 14: ...oing to start Use the and buttons to select a programme Press the OK button to set the reminder DON T FORGET If the programme is part of a series you can choose to set a reminder for a single event or the entire series When the reminder has been set a clock icon is shown before the programme name DON T FORGET To cancel a programme reminder highlight the programme where the reminder has been set an...

Page 15: ...ct the option and the OK button to confirm your selection When a recording has been set the record icon is shown before the programme name DON T FORGET You can change channel and watch a programme or recording at the same time when the digital TV recorder is recording Recording Clashes If you try to record more then two programmes at the same time you will see a warning screen If you want to conti...

Page 16: ...FORGET Hidden channels will not be shown in the programme guide window You will only be able to view the hidden channels by entering the channel number To show a channel use the p and q buttons to select the channel that you want to show Press the YELLOW button The will no longer be shown and will be available in the programme guide window again Select Confirm OK Return BACK Wed 08 Sep 16 52 Chann...

Page 17: ... and then press the OK button The icon will no longer be displayed Deleting a channel You can permanently delete a channel from the channel organiser Use the p and q buttons to select the channel you want to delete Press the RED button A warning will appear asking you if you want to delete the channel Use the and buttons to select YES or NO then press OK DON T FORGET You will need to do a retune t...

Page 18: ...ecording press the GREEN button A keypad will appear Use the buttons as directed on the keypad to rewrite the programme name as shown at the top of the keypad When you have finished press the OK button to save the new name and go back to the Library window Press the EXIT button at any time to go back to the Library window your changes will not be saved The Library Window Select Play OK Return BACK...

Page 19: ...stance To unlock a recording use the p and q buttons to select the recording that you want to unlock and then press the YELLOW button The lock code window will appear again Use the NUMBER buttons to enter the parental PIN and then press the OK button The icon will no longer be displayed HDD information The HDD information bar shows state of the Hard Disk Drive HDD The GREEN part is the amount of f...

Page 20: ...having to setup your digital TV Recorder again You can choose from 4 3 Normal 16 9 Widescreen and Auto Video Output This setting allows you to choose the video signal type which is sent through the Scart sockets on the rear of the digital TV recorder Choosing RGB will provide the best picture quality for the majority of TVs This breaks down the signal into Red Green and Blue signals If your TV can...

Page 21: ...stallation For more information on first time installations and retuning see page 23 or refer to the quick start guide DON T FORGET By performing a first time installation you will reset all options in the settings menus and cancel reminders Advanced Settings Select Return BACK Wed 08 Sep 16 52 Advanced Settings Exit Menu EXIT Preferred Language This setting is your preferred default subtitle lang...

Page 22: ...sound system you may notice a delay in the audio You can use this function to correct the delay in the audio Show HDD Space as You can choose how the hard drive space is shown The two options are show as an amount in time or to show as a percentage DON T FORGET The default setting is to show space as time Format HDD This setting reformats the hard disk drive DON T FORGET Reformatting the HDD will ...

Page 23: ...der will search for all available channels The progress and signal strength bars are shown for reference If you are in an area that can receive programmes from more than one region you will see the following screen TV Region Selection Wed 08 Sep 16 52 Select Confirm OK Please select your preferred region Gloucestershire West is your currently selected region England Recommended Gloucestershire Cen...

Page 24: ...ct the helpline you should have the system information menu open DON T FORGET The system information menu can be accessed by pressing the MENU followed by the 0 button Return BACK Exit Menu EXIT System Information Manufacturer Model Number Hardware Version Software Version Subtitle Status Language Status Helpline Number No of Channels Found Goodmans GDB1232DTR Main Board V1 1 A30_14_011C OFF Engli...

Page 25: ... to the digital TV recorder and TV Check that the digital TV recorder is properly plugged into the mains power supply If the standby indicator is blue Check you have the correct channel and input selected on your TV Check that all cables are correctly attached Check the brightness level of the TV The picture appears to be squashed or cut off Make sure the aspect ratio settings are suitable for you...

Page 26: ...cables and make sure that the connectors are properly fitted If this does not work get a professional to check the installation your aerial may provide a better signal if it is moved somewhere else Please remember that older aerials and indoor aerials aren t as effective as new outdoor and roof aerials Or try using a signal amplifier or booster to improve the reception Check the digital TV coverag...

Page 27: ... a different house You will need to retune your digital TV recorder For more information on retuning see page 23 I have forgotten my PIN Contact the helpline on 0871 230 1777 who will be able to help you reset your PIN Don t forget to have your system information available For more information see page 24 The digital TV recorder is behaving in an unusual way for example the wrong information is on...

Page 28: ...er languages are available Need any help or information setting up You may find the information you are looking for on our web site www thesupportsite co uk or on the freeview website www freeview co uk If you still need help or information you can phone our call centre on 0871 230 1777 Calls are charged at 10p per minute when called from a BT land line Call charges may vary if using other network...

Page 29: ...e Have your receipt of purchase on hand The guarantee is subject to the following provisions It is only valid within the boundaries of the country of purchase The product must be correctly installed and operated in accordance with the instructions contained in this User Guide The digital TV recorder must be used solely for domestic purposes The guarantee will be rendered invalid if the digital TV ...

Page 30: ...sult your dealer if you are ever in doubt about the installation operation or safety of your digital TV recorder Don t continue to operate the digital TV recorder if you are ever in doubt about it working normally or if it is damaged in any way Switch it off withdraw the plug from the mains and consult your dealer Don t remove any fixed covers as this may expose you to dangerous voltages Don t lea...

Page 31: ...2 If the plug is changed a fuse of the appropriate rating must be fitted in the plug adapter or at the distribution board If the fuse in a moulded plug is replaced the fuse cover must be refitted before the appliance can be used Wiring Instructions The supply cable will be either 2 core or 3 core Follow the appropriate wiring instructions given below In both cases ensure that the outer sheath of t...

Page 32: ... completely digital TV region by TV region The map shows when your area will switchover to digital When the TV switchover happens in your area there are at least two occasions when you will need to re tune your digital TV recorder in order to continue receiving your existing TV channels and also to pick up new ones Digital UK the body leading the digital TV switchover will advise you when you need...

Reviews: