background image

8

02 Getting started

Basic DVD Operation

1. Before use, open the disc cover and carefully remove and discard the white card tab from inside the 

deck.

2. Remove all transparent protection film from the player.

3. Connect the mains power adaptor to the DC-in socket.

4. (Optional) Charge the battery fully for 5.5 hours.

5. Slide the ‘Off / On’ switch to ‘On’.

6. Open the disc cover and carefully insert a DVD (label side facing up) until it clicks into place. Close the 

disc cover, the DVD will load automatically.

USB / SD Operation

The USB input and SD/MMC card slot can be used for movie, music or photo playback.
1. Insert either a USB device or SD/MMC card into the relevant slot at the side of the player.

2. If Media is inserted in both the USB port and SD/MMC card slot, then you can select which input source 

you require by pressing the MODE button on the remote control.

3. Use the directional arrow keys to highlight your selection and press ENTER to confirm.

MP3 / MPEG4 Playback

After the unit loads an MP3/MPEG4 disc, USB device or SD/MMC memory card, a menu showing the 

contents will be displayed on screen. Use the UP and DOWN directional arrow keys to highlight your 

selection and press ENTER to confirm. The RIGHT arrow key can be used to enter sub-folders. Pressing the 

left arrow will guide you back to the main root menu. Press STOP to go directly back to the main menu and 

MODE on remote control or USB/SD on DVD to switch between DVD, USB or SD/MMC again.

JPEG Photo Playback

When a CD, USB device or SD/MMC memory card containing photographs is loaded, the player after a 

few seconds will automatically begin a photo slideshow. Press      to end the slideshow and       again to 

display the root folder. 
Various playback options are available by pressing REPEAT. Press          to pause playback and          again 

to resume playback. Press MODE on the remote control to switch between DVD, USB or SD/MMC again.

Summary of Contents for GDVD01

Page 1: ...GDVD01 Portable DVD Player With 7 TFT LCD Screen User Guide IMPORTANT Please read all instructions carefully before use and keep for future reference...

Page 2: ...back control PLAY PAUSE FAST FORWARD FAST REWIND USB Input SD MMC card reader Integrated stereo speakers Selectable screen mode 16 9 or 4 3 Built in rechargeable battery Infra red remote control Mains...

Page 3: ...on the underside of the DVD player Do not leave your DVD player in direct sunlight or near any heat sources as the casing may be damaged Cleaning Disconnect the DVD player from the power supply befor...

Page 4: ...e mains power supply The time required to fully charge the battery is 5 5 hours After a full charge the battery can be used for up to 3 hours To prolong the life of the battery always disconnect the p...

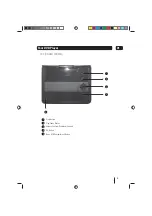
Page 5: ...5 01 Stop Button Play Pause Button Volume Controls Directional Controls OK Button Open DVD Compartment Button Your DVD Player 1 2 3 4 5 1 2 3 4 5 TOP UNDER SCREEN...

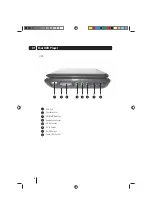
Page 6: ...6 01 Your DVD Player SIDE 1 2 3 4 5 6 7 8 USB Port Ventilation Slot SD MMC Card Slot Headphones Socket AV Out Socket AV In Socket On Off Switch Power DC Socket 1 2 3 4 5 6 7 8...

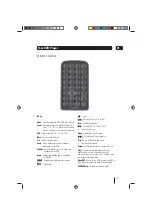
Page 7: ...gle Change the viewing angle if available on the DVD Skip backwards to previous chapter Play Pause Stop Rewind x2 x4 x8 x16 x32 Enter Confirm a selection Forward x2 x4 x8 x16 x32 Turn the volume up Se...

Page 8: ...n the remote control 3 Use the directional arrow keys to highlight your selection and press ENTER to confirm MP3 MPEG4 Playback After the unit loads an MP3 MPEG4 disc USB device or SD MMC memory card...

Page 9: ...mote control to the DVD player Note Sunlight or very bright light will reduce the remote control sensitivity Using Headphones The headphones socket is located on the right side of the DVD player See p...

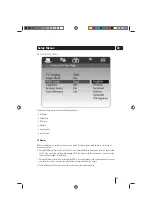
Page 10: ...erence Press the ENTER or DOWN arrow key to enter the selected menu and use the UP or DOWN arrow keys to move through the list of settings Press the LEFT arrow key at any time to return to the menus o...

Page 11: ...l PS Normal Pan and Scan is used for most normal television broadcasts It has an aspect ratio of 4 3 If you select this setting when viewing a DVD the picture will fill the screen but you will not see...

Page 12: ...or off Screen Saver If you set the screen saver on it will be displayed if the DVD player is left in the stop mode for between 3 and 4 minutes The default is On Last Memory Set this to ON to remember...

Page 13: ...es you to alter the audio out options Mode Left Speaker Right Speaker Stereo Stereo L Stereo R L Mono L Mono L Mono R Mono R Mono R Mono Mix Mono L Mono R Mono L Mono R Mono Dynamic This option enable...

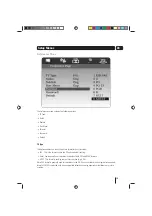
Page 14: ...default is Medium The picture brightness contrast hue or saturation levels can be adjusted by 1 Selecting the appropriate option Brightness Contrast Hue Saturation from the list and pressing the right...

Page 15: ...ion PAL This is the format used in the UK and the default setting Auto Can be used if your television is capable of both PAL and NTSC formats NTSC This format is used by some other countries e g USA N...

Page 16: ...le if the DVD has been recorded with different menu languages Refer to the DVD case for details Parental This option enables you to set a content level above which DVDs will not play There are eight l...

Page 17: ...played Enter the existing old password this is initially set to 0000 In the other two fields enter a new four digit password and confirm the password change by entering the new password again Then pre...

Page 18: ...ery compartment Replacing the Batteries Locate the battery cover on the bottom of the remote control Insert a thumbnail into the groove next to the battery cover and a fingernail into the groove on th...

Page 19: ...n a straight line from the inside to the outside of the disc Small dust particles and light stains should have no effect on reproduction quality Never use chemicals such as record sprays antistatic sp...

Page 20: ...e battery plug the mains power cable in to the DVD player and a suitable power outlet and allow the battery to recharge fully If using the vehicle power cable make sure there is power to the lighter s...

Page 21: ...lens cleaning disc to clean the lens Relocate the player away from shock or vibration No response from the remote control Check that there are no obstructions between the remote control and the DVD p...

Page 22: ...losed 245 W x 40 H 165 L mm Open 245 W x 180 H 165 L mm Frequency Response 20Hz to 20KHz Video Output 1 Vp p75 Ohm unbalanced Audio Output 1 8 Vrms 10 kOhm Dynamic Range Greater than 85dB Laser Semico...

Page 23: ...d without distortion Damage to your hearing is accumulative and is irreversible Any ringing or discomfort in the ears indicates that the volume is too loud Once you have established a comfortable list...

Page 24: ...www goodmans co uk DCS JUN13 GDVD01...

Reviews: