background image

9

PORTABLE DVD PLAYER USER GUIDE

B.  

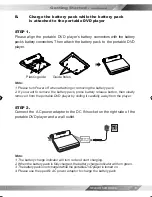
Charge the battery pack while the battery pack    


is attached to the portable DVD player

STEP 1.


Please align the portable DVD player’s battery connectors with the battery 
pack’s battery connectors. Then attach the battery pack to the portable DVD 
player. 

Note:


1. Please turn Power off when attaching or removing the battery pack.
2. If you want to remove the battery pack, press battery release button, then slowly 
remove it from the portable DVD player by sliding it carefully away from the player.

STEP 2. 

Connect the  AC power adaptor to the DC IN socket on the right side of the 
portable DVD player and a wall outlet. 

Note: 

1. The battery charge indicator will turn red and start charging.
2. When the battery pack is fully charged, the battery charge indicator will turn green.
3. The battery pack is not charged while the portable DVD player is turned on.
4. Please use the speci

fi

 c AC power adaptor to charge the battery pack. 

Plastic guide

Guide holes

Getting Started - 

continued

82-227-00060 goodmans.indd   9

5/12/2006, 12:03:41

Summary of Contents for GDVD90W11

Page 1: ...82 227 00060 GDVD90W11 Portable DVD Player User Guide Goodman Product Information Helpline 0870 873 0080...

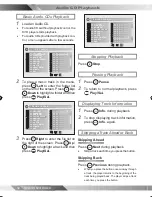
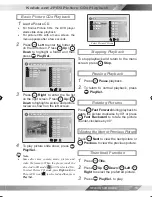
Page 2: ...gles 11 Using a DVD Menu 11 Using the Menu Function 11 CHAPTER 3 Audio CD Playback 12 Basic Audio CDs Playback 12 Stopping Playback 12 Pausing Playback 12 Displaying Track Information 12 Skipping a Tr...

Page 3: ...Button OPEN Button PREVIOUS Button LCD Screen Speakers 1 2 3 4 5 6 7 8 9 14 13 12 11 10 16 15 SETUP Button MENU Button PAUSE UP Button F FWD RIGHT Button STOP DOWN Button NEXT Button Remote Sensor PO...

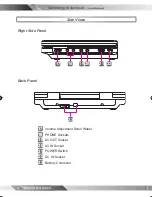
Page 4: ...UIDE Right Side Panel Volume Adjustment Scroll Wheel PHONE Sockets AV OUT Socket AV IN Socket POWER Switch DC IN Socket Battery Connector 18 17 23 22 21 20 19 Back Panel 23 22 21 20 19 17 18 Getting S...

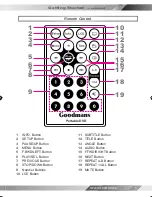
Page 5: ...7 PREVIOUS Button 8 STOP DOWN Button 9 Number Buttons 10 LCD Button 11 SUBTITLE Button 12 TITLE Button 13 ANGLE Button 14 AUDIO Button 15 F FWD RIGHT Button 16 NEXT Button 17 REPEAT A B Button 18 REPE...

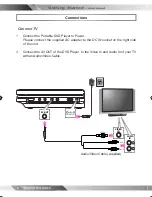
Page 6: ...onnect the supplied AC adapter to the DC IN socket on the right side of the unit 2 Connect the AV OUT of the DVD Player to the Video In and Audio In of your TV with an Audio Video Cable VIDEO IN AUDIO...

Page 7: ...e DC IN socket on the right side of the unit 2 Connect the Video Audio In of the DVD Player to the Video Audio Out of external devices AUDIO OUT R L VIDEO OUT Camcorder example only Videotape Player e...

Page 8: ...ttery will not charge whilst using the unit 2 The charging time of the battery pack is approximately 4 hours and the playing time is approximately 2 5 hours A Charge the battery pack directly Connect...

Page 9: ...press battery release button then slowly remove it from the portable DVD player by sliding it carefully away from the player STEP 2 Connect the AC power adaptor to the DC IN socket on the right side...

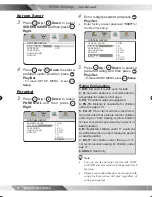
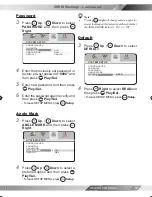
Page 10: ...y pressing Play Sel 2 To completely stop the disc playback press Stop again Pausing Playback 1 Press Pause 2 To return to normal playback press Play Sel Frame Advance Step 1 Press Pause to pause playb...

Page 11: ...ears Changing Audio Soundtrack Language 1 Press Audio during playback 2 Press Audioa number of times until a preferred language is selected Note When the preferred language is not selected even after...

Page 12: ...s Info again Skipping a Track Ahead or Back Skipping Ahead Press Next during playback Skip a track each time you press the button Skipping Back Press Previous during playback When you press the button...

Page 13: ...menu appears after a few seconds 2 Press Left to enter the folder list on the left screen Press Up Down to highlight a folder and then press Play Sel 3 Press Right to enter the file list on the right...

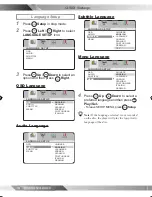
Page 14: ...Note If the language selected is not recorded on the disc the player will play the top priority language of the disc LANGUAGE SETUP OSD AUDIO SUBTITLE MENU LANGUAGE SETUP OSD AUDIO SUBTITLE MENU LANGU...

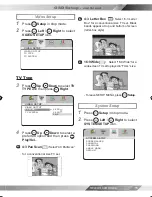
Page 15: ...e SETUP MENU press Setup System Setup 1 Press Setup in stop mode 2 Press Left Right to select SYSTEM SETUP icon SYSTEM SETUP SCREEN SAVER PARENTAL PASSWORD ANGLE MARK DEFAULT Video Setup 1 Press Setup...

Page 16: ...safe even for kids 2 G General audience recommended as acceptable for viewers of all ages 3 PG Parental Guidance suggested 4 PG 13 Material is unsuitable for children under the age of 13 5 PG R Paren...

Page 17: ...ss Right 4 Press Up Down to select a preferred option and then press Play Sel To leave SETUP MENU press Setup SYSTEM SETUP SCREEN SAVER PARENTAL PASSWORD ANGLE MARK DEFAULT OLD _ _ _ _ NEW _ _ _ _ VER...

Page 18: ...il the LCD setting box disappears Panel Setting 1 Press LCD a number of times to select PANEL 2 Press Left Right to choose a preferred panel setting Press LCD again until the LCD setting box disappear...

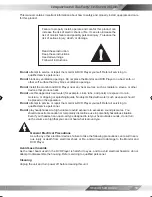
Page 19: ...ubs and pools or expose it to rain moisture or dripping or splashingliquids No objects filled with water such as vases should be placed on the apparatus Do not attempt to service or repair the monitor...

Page 20: ...room away from traffic 50dB normal conversation quiet office light traffic 60dB Electric sewing machine The following noise can be harmful under constant exposure 80dB Average city traffic alarm clock...

Page 21: ...source such as heating pipe DO NOT leave a disc inside a car under direct sunlight After Playback always remove the disc from the player and return it to the display storage case To clean discs use a...

Page 22: ...serious damage to the player Do not attempt to disassemble the player z Do not put any foreign object onto the player on the disc tray Keep away from water magnet z Keep the player away from flower v...

Page 23: ...oose the correct setup TV Aspect item No operations perform with the remote Check the batteries are installed with the correct polarities and control The batteries are depleted replace them with new o...

Page 24: ...motion circular scratches are likely to occur which will cause noise If the disc is brought from a cold to a warm environment moisture may form on the disc Wipe the moisture off with a soft dry lint...

Page 25: ...erminals Audio Video Section AV Output x 1 AV Input x 1 Headphone Sockets Headphone Socket x 2 Line Voltage AC 100 240 VAC 10 50 60 Hz Adapter Power Consumption 15W 12V 1 25A Dimensions 250 mm L x 180...

Page 26: ......

Page 27: ......

Reviews: