background image

7

POWER SUPPLY

POWER/STANDBY

Mains power

Battery power

NOTE:

Important:

Connect one end of the supplied mains power cord to the AC IN socket on the back panel, and plug
the other end into a mains socket and turn the power switch on the rear of the unit to the ON position.

First plug the transformer (not supplied) in to the mains socket. Then plug the other end into the DC
socket. The unit will be in standby mode.

NOTE : 1.The rated electric current of the transformer should be 5 A and the voltage should be 12 V.

2.When using a DC transformer(not supplied) ensure that correct polarities

DC Power

are observed

when connecting.

You must disconnect the mains power cord before operating the set using battery power.

- Remove the battery compartment cover.
- Insert LR20 (D cell)(MN1300) batteries(1.5Vx8) with the correct polarity (as shown by the + and

symbols in the diagram inside the battery compartment), then replace the cover.

- Never mix new and old batteries
- Never mix different types of battery.

Replace the old batteries with new ones when the sound output begins to fluctuate or the volume
fades.

When replacing spent batteries, always dispose of them in accordance with applicable regulations.
Take them to an approved disposal point so that they can be safely recycled without damaging the
environment.

1.

Press the POWER/STANDBY button on the unit or the remote) to turn the unit on.

2.

Select the sound source ( CD , TAPE or RADIO ) using the function switch.

3.

Adjust the volume with the VOLUME ( UP or DOWN ) buttons.

4.

Press the POWER/STANDBY button to switch off the unit.

(

Mains power

Battery power

NOTE:

Important:

DC Power

(

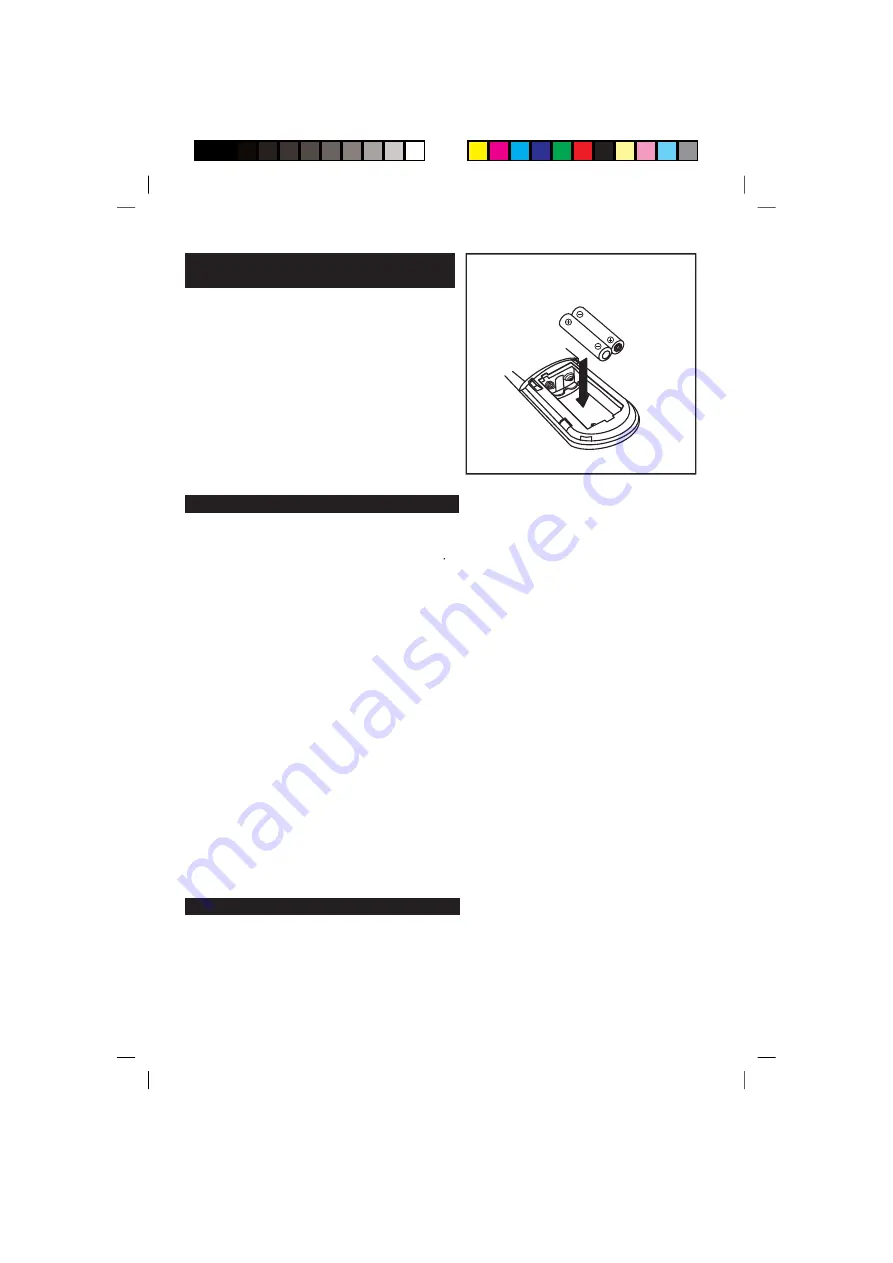
PUTTING THE BATTERIES INTO
THE REMOTE CONTROL UNIT

Press down the compartment cover, and slide the
cover off to open the compartment. Place the two
(UM4), (AAA), (R03)

batteries in the remote

control according to the polarity markings ("+" and
"-") inside the compartment and on the batteries.
Place the cover over the compartment, press down
lightly, and push it upward until it is in place .

Remove the batteries from the remote

control if not in use for long period of the time.
Do not mix normal batteries with rechargeable
batteries, when the batteries become weak, the
remote control will not function and replace with
new batteries.

NOTE :

** BATTERIES NOT INCLUDED **

Summary of Contents for GPS357R

Page 1: ...7R Portable CD Player with Digital Read Out and Cassette Recorder Portable CD Player with Digital Read Out and Cassette Recorder Before using please read this manual carefully GOODMANS HELPLINE 0870 8730080 ...

Page 2: ...er fitted Replacement fuse covers are available from your dealer or most electrical retail outlets 3 If the mains plug is cut off from the cable rewire the replacement plug in accordance with the instruction given in this manual 4 CAUTION Under no circumstances should the discarded plug be inserted into the mains socket To prevent a shock hazard carefully dispose of the discarded plug Do not leave...

Page 3: ...level Slowly increase the level until you can hear comfortably and clearly and without distortion Damage to your hearing is accumulative and is irreversible Any ringing or discomfort in the ears indicates that the volume is too loud Remember listening for prolonged period of time at high volume levels will harm your hearing ESTABLISH A SAFE SOUND LEVEL ESTABLISH A SAFE SOUND LEVEL Once you have es...

Page 4: ...witch off withdraw the mains plug and consult your dealer Don t remove any fixed cover as this may expose dangerous voltages Don t leave equipment switched on when it is unattended unless it is specifically stated that it is designed for unattended operation or has a standby mode Switch off using the switch on the equipment and make sure that your family knows how to do this Special arrangements m...

Page 5: ...Window 6 Putting The Batteries Into The Remote Control Unit 7 Power Supply 7 POWER STANDBY Control 7 Clock Setting And Radio Operation 8 Listening To Compact Disc CD 9 Programming The CD Player 10 CD MODE control 11 BASS control 11 MUTE control 11 Listen To The Music By Using Headphone 11 Compact Disc 11 12 Cassette Operation 12 13 Troubleshooting Guide 14 Specification 15 Save the carton and pack...

Page 6: ...FEATURES AND CONTROLS GPS357R 1 2 3 4 5 6 7 8 9 10 11 12 13 14 15 16 31 33 32 5 34 17 18 19 20 21 22 23 25 26 27 28 29 30 17 2 5 ...

Page 7: ...12 CASSETTE STOP EJ BUTTON 13 CASSETTE FAST FORWARD BUTTON 14 CASSETTE REWIND BUTTON 15 CASSETTE PLAY BUTTON 16 CASSETTE RECORD BUTTON 17 SPEAKER 18 CD SKIP DOWN F REV BUTTON 19 CD SKIP UP F FWD BUTTON 20 CASSETTE LOCK UNLOCK KNOB 21 CD MODE BUTTON 22 CD PROG C ADJ BUTTON 23 CD STOP BUTTON 24 IR SENSOR 25 POWER STANDBY BUTTON 26 POWER INDICATOR 27 LCD DISPLAY 28 FM STEREO LED 29 CD PLAY PAUSE BUTT...

Page 8: ...s when the sound output begins to fluctuate or the volume fades When replacing spent batteries always dispose of them in accordance with applicable regulations Take them to an approved disposal point so that they can be safely recycled without damaging the environment 1 Press the POWER STANDBY button on the unit or the remote to turn the unit on 2 Select the sound source CD TAPE or RADIO using the...

Page 9: ...hen a FM STEREO broadcast is being received If the FM stereo reception is noisy large amounts of hiss move the band select switch to the FM position MW FM FM STEREO RECEPTION RADIO OPERATION FM STEREO INDICATOR LED will turn on Fig5 Fig6 8 CLOCK SETTING The clock can only be set when the unit is in standby 1 Press the PROG C ADJ button the display will show either 12H or 24H Fig1 2 Press CD SKIP U...

Page 10: ...ose the CD compartment the total of number of tracks will be shown on the display Fig7 If the disc is not detected or there is no disc in the CD compartment two horizontal lines will be shown in the display Fig8 button to begin playback button button button Playing The Entire Disc SKIP UP DOWN Stopping Play 1 Press CD SKIP UP or DOWN button on the unit or the remote until the required track number...

Page 11: ... track is shown on the display press PROG C ADJ again 5 The display will show MEMORY and P02 then will show MEMORY and TRACK NUMBER FIG15 FIG16 6 Repeat this procedure to program other tracks into the memory 7 Press PLAY PAUSE 8 Play starts with the first track of the program Fig17 9 When all tracks have been played playback will stop and the display will show the total number of tracks on the CD ...

Page 12: ...4 Press the CD MODE button again to resume normal playback You can press the BASS button to enhance the level of bass Press the BASS button again to resume normal playback REPEAT PLAY RANDOM indicator will disappear from the display 1 Press the MUTE button on the remote to mute the audio output 2 To restore audio output press the MUTE button again A stereo headphone socket is provided for private ...

Page 13: ...WIND button to rewind the tape To stop playback press the CASS STOP EJECT button once To open the cassette door ensure the cassette door LOCK is in the unlocked position and press the CASS STOP EJECT button again 2 Notes on handling discs Removing the disc from its storage case and loading it Do not touch the reflective recorded surface Do not stick paper or write anything on the surface Do not be...

Page 14: ... the cassette function is brought automatically to a stop the RADIO or CD PLAYER will continue to play The use of only good quality cassettes IEC TYPE1 for making recordings is recommended other types of cassette may be used but it is unlikely to make proper recordings on these more specialised tapes The use of C120 cassettes is not recommended in this machine Normally anything recorded on the tap...

Page 15: ...Tape old or worn Replace the cassette tape Dirty roller and capstan Clean roller and capstan Cassette recorder Cassette recorder Will not record Prevention tab removed Cover p hole with tape revention tab Distorted sound on playback Defective tape or dirty tape head Replace tape or clean tape head Compact disc player Compact disc player CD player will not play CD function switch not selected Selec...

Page 16: ...kg FREQ RANGE FM 88 108 MHz MW 540 1600 kHz TAPE SPEED 4 75 CM SEC FREQUENCY RESPONSE 125Hz 8KHz OPTICAL PICKUP 3 BEAM LASER FREQUENCY RESPONSE 100Hz 16kHz RADIO SECTION CASSETTE SECTION COMPACT DISC SECTION SPECIFICATION SUBJECT TO CHANGE WITHOUT FURTHER NOTICE RADIO SECTION CASSETTE SECTION COMPACT DISC SECTION 15 ...

Reviews: