3
4
IMPORTANT SAFEGUARDS
PRE FITTED MAINS PLUGS
For your convenience a mains plug has been fitted to this appliance. For your safety please
observe the following information.
1. Should the fuse in the plug fail remove the plug from the wall socket and replace the fuse
with a 3 Amp ASTA approved to BS 1362 fuse.
2. Never use the plug without the fuse cover fitted. Replacement fuse covers are available
from your dealer or most electrical retail outlets.
3. If the mains plug is cut off the cable, rewire the replacement plug in accordance with
instruction give in this manual.
4. CAUTION: Under no circumstances should the discarded plug be inserted into the mains
socket.To prevent a shock hazard carefully dispose of the discarded plug.
Do not leave the plug lying around where children might see it.
WARNING: To prevent fire or shock hazard do not expose this unit to rain or moisture.
CAUTION: DANGEROUS VOLTAGES EXIST INSIDE THIS UNIT. DO NOT
REMOVE COVER (OR BACK).
NO USER SERVICEABLE PARTS INSIDE REFER SERVICING TO
QUALIFIED SERVICE PERSONNEL. DISCONNECT FROM MAINS
SUPPLY WHEN NOT IN USE.
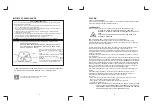
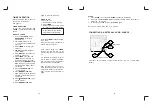
This wires in this mains lead are coloured in
accordance with the following wiring codes:
Blue..........................................................Neutral
Brown..................................................... ......Live
This wires in this mains lead must be connected
to the terminals in the plug as follows:
Blue Wire............................................N or Black
Brown Wire..........................................L or Red
Only a 3 Amp fuse should be fitted in the plug
or a 5 Amp fuse at the distribution board.
WARNING: UNDER NO CIRCUMSTANCES MUST THE LIVE OR NEUTRAL WIRES
BE CONNECTED TO THE EARTH TERMINAL IN A 3- PIN MAINS PLUG.
This symbol means that this unit is double insulated.
An earth connection is not required.
BLUE
CORD GRIP
BROWN
FUSE
CAUTION
CLASS 1 LASER PRODUCT
Use of contents or adjustments of performance of procedures other than those specified
Herein may result in hazardous radiation exposure.
LASER SAFETY
This unit employs a laser, only qualified service personnel should attempt repair.
DANGER: INVISIBLE LASER RADIATION WHEN OPEN AND
INTERLOCK FAILED OR DEFEATED. AVOID DIRECT EXPOSURE TO
BEAM.
CAUTION: HAZARDOUS LASER RADIATION WHEN OPEN AND
INTERLOCK DEFEATED.
SOME DO’ S AND DON’T’S ON THE SAFE USE OF EQUIPMENT
This equipment has been designed and manufactured to meet European safety
standards but like any electrical equipment, care must be taken if you are to obtain the
best results and safety is to be assured.
Do read the operating instruction before you attempt to use the equipment. Do ensure
that all electrical connections(including the mains plug, extension leads and
interconnections between pieces of equipment ) are properly made in accordance with
the manufacture’s instructions. Switch off and withdraw the main plug when making or
changing connections.
Do consult your dealer if you are ever in doubt of the installation, operation, or safety of
your equipment.
Don’t continue to operate the equipment if you are in any doubt about it working normally,
or if it is damaged in any way-switch off, withdraw the mains plug and consult your dealer.
Don’t remove any fixed covers as this is may this is may expose DANGEROUS VOLTAGES.
Don’t leave equipment switched on when it is unattended unless it is specifically stated
that it is designed for unattended operation or has a standby mode, Switch off using the
swich on the equipment and made sure that your family knows how to do this, special
arrangements may need to be made for infirm of handicapped people.
Don't listen to headphones at high volume, as such use can permanently damage your
hearing.
Don’t obstruct the ventilation of the equipment, for example with curtains or soft
furnishings overheating will cause damage and shorten the life of the equipment.
Don’t allow electrical equipment to be exposed to rain or moisture.
Above all
- Never let anyone, especially children, push anything into holes, slots or any other
opening, as this could result in a fatal electric shock.
- Never guess or take chances with electrical equipment of any kind.
- It is better to safe than sorry.
WARNING: TO REDUCE THE RISK OF FIRE OR ELECTRIC SHOCK. DO NOT EXPOSE
THIS APPLIANCE TO RAIN MOISRURE, DANGEROUS HIGH VOLTAGES
ARE PRESENT INSIDE THE ENCLOSURE, DO NOT OPEN THE CABINET
REFER SERVICING TO QUALIFIED PERSONNEL ONLY.


