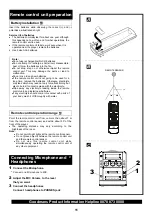
TO PLAY THE RADIO
NOTE:
CASSETTE TAPE SELECTION
!
!
!
!
!
!
!
!
!
!
!
!
!
!
!
Connect the unit to the power source. Press POWER
ON/OFF button
to turn on the unit. The Power STANDBY
INDICATOR will be steady on when the unit is turned off by
remote.
Press FUNCTION button until the radio is selected.
Select required receiving band with BAND/AM/FM button .
Tune to required station by press or tuning -
buttons
Adjust the direction of antenna until best reception is
achieved.
Adjust the VOLUME UP and VOLUME DOWN to your
listening preference.
To program the service, press the PROGRAM button
firstly , then press a numeric button that you desire ,press
PROGRAM button again to store the station.
To turn off the radio, press FUNCTION button to TAPE or
DVD position or press the standby button.
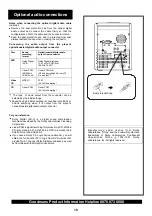
Please connect the AM&FM antenna properly ,otherwise,
you may not receive the service. See the connecting to
the back of main unit as below:
The quality and condition of the cassettes tapes you use
will have a direct effect on the performance of this unit.
Low quality tapes tend to break and stretch and a broken
tape can easily become entangled in the drive mechanism,
causing major damage. Stretched tapes will run at uneven
speeds and will distort anything recorded on them.
Use only well-known brands of tapes.
—
FM
AM
FAST FORWARD AND REWIND BUTTONS
PAUSE BUTTON
AUTOMATIC STOP
STOP/EJECT BUTTON
CASSETTE OPERATION
For fast forward or rewinding of the tape, depress the
CASSETTE FAST FORWARD button or CASSETTE
REWIND button.
The CASSETTE PAUSE button is used to edit
commercials or in case recording is temporarily interrupted.
Since the deck motor is still running, while the pause key
is depressed, this pause feature should be used for a short
time only.
This instrument has a built-in automatic stop the tape
mechanism will stop playing or recording when it reached
the end of the tape.
The tape player can be stopped manually by pressing the
CASSETTE STOP/EJECT button.
!
!
!
!
!
!
!
!
!
!
!
Use of C-120 (120 minutes) cassette is not
recommended. The extreme thinness
Tapes tangling where the tape wraps itself around vital
parts of the mechanism.
To reduce the chances of these problems occurring, you
should take the following precautions:
Check that there are no loose layers of tape visible
through the cassette center window. Take-up these
loose layers using a pencil or ballpoint pen before
inserting the cassette into the machine.
If the cassette feels tight while performing the
operation, the tape may be jamming due to "ridges" in
the winding of the tape (visible through the center
window). These may be removed in most cases by
fast winding the cassette from one end to the other
and back again. Or the tape may be permanently
damaged. Do not play damaged or worn out tapes, as
this may cause your set to break.
of this tape may
result in breakage or other failures.
This unit is not designed for CrO2 , Fe-Cr or METAL tape
use. Therefore, be sure to use name brand normal
cassette tapes.
After a period of time, especially when inexpensive
brands of tape are used, the sound during playback may
become "muffled" or in extreme cases, almost inaudible.
This is most frequently NOT A FAULT OF THE
MACHINE ITSELF but merely a deposit of oxide and
other contaminating element on the tape head.
The easiest way to overcome the problem is by using a
head-cleaning cassette.
Follow the instructions provided with the cleaner
carefully and DO NOT OVER-USE as this may cause
undue wear.
Don't attempt to scrape the contamination away with a
sharp implement.
Other common causes of trouble are:
Tapes jamming leading to uneven speed during
playback.
Do not put a cassette near a magnetic field, such as a
TV set, or speaker. Magnetic fields may reduce the
tape sensitivity or even erase the recording.
Do not store cassette for any length of time in a
hot,moist or dusty place.
IMPORTANT NOTES CONCERNING CASSETTE TAPES
NOTES FOR STORING CASSETTE TAPES
Radio and cassette operations
24
(Continued on the next page)
Goodmans Product Information Helpline 0870 873 0080

