background image

21

7/2022

THIS PAGE INTENTIONALLY LEFT BLANK

Summary of Contents for RETROFIT II

Page 1: ...IMPORTANT DO NOT DESTROY Installation Operation Maintenance Manual Month Year Gorbel Dealer Date RETROFIT II TRACTION DRIVE Gorbel Customer Order No Serial No Issued 12 2010 Revised 07 2022...

Page 2: ...ol Drive 4 5 Step 4 Limit Switch Installation 6 8 Step 5 Endstop Tagline Installation 9 Step 6 Shut Down Procedures 10 Step 7 Final Steps 10 Safety Warnings and Precautions 10 Troubleshooting Guide 11...

Page 3: ...tices should be employed to assemble these cranes because of the necessity of properly interpreting these instructions Gorbel is not responsible for the quality of workmanship employed in the installa...

Page 4: ...o secure the assembly 2 7 Insert spring pressure rod assembly into main frame assembly Secure with cotter pin 2 8 Attach drive mounting frame and spring tension frame assembled in Step 2 6 to the main...

Page 5: ...STEP 2 INSTALLATION AND DRIVE ASSEMBLY CONTINUED Diagram 2A Frame Installation Diagram 2B Retrofit II 3 7 2022...

Page 6: ...t Gorbel for single speed two speed or three speed operation For troubleshooting and general information a brief summary of how the drive controller is designed to be used is included below No additio...

Page 7: ...ving too much inertia for the reducer and motor to stop in such a short time If this occurs increase the deceleration time WARNING Do not remove or install the EPM module while power is applied to the...

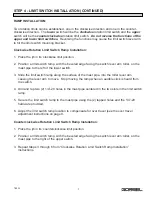
Page 8: ...annel with the two limit switches has been installed the switch set up is as follows 1 Loosen the hex socket screw that locks the adjustable lever arm in position 2 Loosen the lock pin hex nut that fa...

Page 9: ...the lower switch 3 Slide the limit switch ramp along the surface of the mast pipe into the roller lever arm causing the lever arm to move Stop moving the ramp when an audible click is heard from the...

Page 10: ...wer controls 3 Start rotating jib crane in the direction of the previously installed limit switch ramp It is important to give the jib crane enough starting distance before the ramp to accelerate to f...

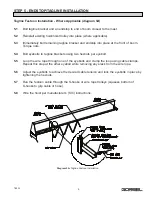
Page 11: ...to tagline brackets using two hexnuts per eyebolt 5 5 Loop the wire rope through one of the eyebolts and clamp the loop using cable clamps Repeat this step at the other eyebolt while removing any sla...

Page 12: ...y warnings and precautions the operator should be aware of These include but are not limited to the following The jib can only be used to pick up a MAXIMUM of RATED CAPACITY The load will swing when l...

Page 13: ...Gorbel Trunnion Rollers should be lubricated prior to operation WARNING Note Only competent personnel familiar with standard fabrication procedures should be allowed to perform maintenance operations...

Page 14: ...d immediately to the proper supervisor and appropriate corrective action taken Operating Suggestions One measure of a good crane operator is the smoothness of the crane operation The good crane operat...

Page 15: ...amages are expressly excluded E DEALER OR DISTRIBUTOR NOT AN AGENT Gorbel and Purchaser agree that Purchaser has been put on notice that dealer or distributor is not Gorbel s agent in any respect for...

Page 16: ...y qualified personnel and compliant with local and national electrical codes GENERAL Before assembly the pressure plates facings and center member sprocket sheave plate etc should be free of oil greas...

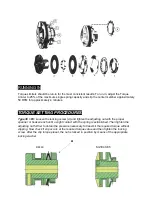
Page 17: ...the locking screw A and tighten the adjusting nut with the proper spanner or hook wrench until a slight contact with the spring is established Then tighten the adjusting nut further to obtain the pres...

Page 18: ...olding pins C and make pre adjustment of the adjusting nut Wind the adjusting nut by hand until tight against pilot plate Ensure friction facing are concentric on the bushing and that the springs are...

Page 19: ...ntervals or if proper torque is not being maintained inspect Torque Limiter for presence of oil grease moisture or corrosion on the driving surfaces and for proper setting of spring load Clean and adj...

Page 20: ...EXTRA NOTES FOR TYPE C ASSEMBLING PROCEDURES When assembling type C friction torque limiter make sure that misalignments are within the allowed values indicated below...

Page 21: ...19 7 2022 THIS PAGE INTENTIONALLY LEFT BLANK...

Page 22: ...20 7 2022 THIS PAGE INTENTIONALLY LEFT BLANK...

Page 23: ...21 7 2022 THIS PAGE INTENTIONALLY LEFT BLANK...

Page 24: ...ndall SR 12X open gear dipper stick and wire rope lubricant Monthly Trunnion roller bearings Hi pressure bearing grease Lubriplate 630 2 multi purpose grease N A Factory lubricated Worm gear reducer A...

Reviews: