background image

6

473998

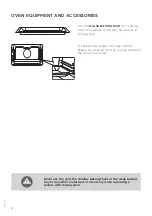
OVEN EQUIPMENT AND ACCESSORIES

Use the 

GLASS BAKING DISH

 for cooking 

with microwaves. It can also be used as a 

serving tray.

In case of wire guides, the tray should 

always be inserted into the groove between 

the two wire profiles.

Never use the grid, the shallow baking sheet or the deep baking
tray or any other metal part or accessory when operating a
system with microwaves!

Summary of Contents for BM589S11X

Page 1: ...EN DETAILED INSTRUCTIONS FOR USE OF MICROWAVE OVEN www gorenje com www gorenje com...

Page 2: ...received an undamaged appliance If you do find transport damage please contact the seller from which you purchased the appliance or the regional warehouse from which it was supplied The telephone numb...

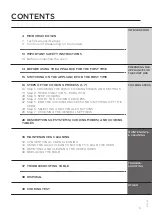
Page 3: ...Step 3 STEP COOKING 22 Step 4 START THE COOKING PROCESS 22 Step 5 END THE COOKING PROCESS AND SWITCHING OFF THE OVEN 24 Step 6 SELECTING ADDITIONAL FUNCTIONS 26 Step 7 CHOOSING THE GENERAL SETTINGS 28...

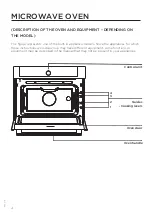
Page 4: ...ven handle Guides Cooking levels 4 3 2 1 473998 The figure represents one of the built in appliance models Since the appliances for which these instructions were drawn up may have different equipment...

Page 5: ...oking process When the door is closed the switches turn the microwaves back on COOLING FAN The appliance is fitted with a cooling fan that cools the housing and the appliance control panel EXTENDED OP...

Page 6: ...ves It can also be used as a serving tray In case of wire guides the tray should always be inserted into the groove between the two wire profiles Never use the grid the shallow baking sheet or the dee...

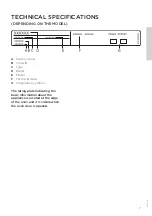
Page 7: ...L 473998 The rating plate indicating the basic information about the appliance is located at the edge of the oven and it is visible when the oven door is opened A Serial number B Code ID C Type D Bran...

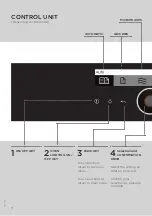
Page 8: ...WAVES 1ON OFF KEY 2OVEN LIGHTING ON OFF KEY 3BACK KEY Touch briefly to return to previous menu Touch and hold to return to main menu 4Selection and CONFIRMATION KNOB Select the setting by rotating the...

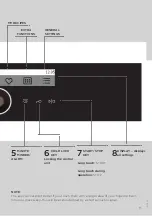
Page 9: ...g touch START Long touch during operation STOP 8DISPLAY displays all settings NOTE The keys will respond better if you touch them with a larger area of your fingertip Each time you press a key this wi...

Page 10: ...nd user maintenance shall not be made by children without supervision WARNING The appliance and some of its accessible parts may become very hot during use Be careful not to touch the heaters Children...

Page 11: ...t Therefore keep the power cords of other appliances at a safe distance If the power cord is damaged it should be replaced by the manufacturer or an authorized service technician in order to avoid haz...

Page 12: ...r temperature checked before feeding in order to avoid burns Eggs in their shell should not be heated in microwave ovens since they may explode even after microwave heating has ended If you observe sm...

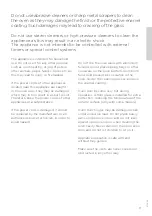
Page 13: ...g alcohol containing food as a combustible mixture of alcohol and air may form inside the oven Open the door carefully When using the microwave or the combined microwave and convection functions use o...

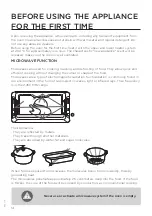
Page 14: ...rst time heat it with the upper and lower heater system at 200 C for approximately one hour The characteristic new appliance scent will be released make sure the room is well ventilated MICROWAVE FUNC...

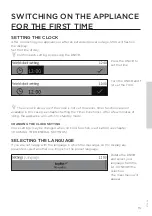
Page 15: ...e Timer Functions After a few minutes of idling the appliance will switch to standby mode CHANGING THE CLOCK SETTING Clock settings may be changed when no timer function is activated see chapter CHOOS...

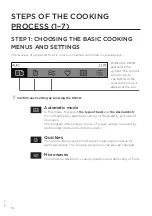
Page 16: ...mode In this mode first select the type of food and the desired dish This is followed by automatic setting of the quantity and level of doneness The program offers a large choice of preset recipes rev...

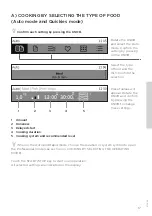
Page 17: ...on Preset values will appear Rotate the KNOB and confirm by pressing the KNOB to change these settings 1 Amount 2 Doneness 3 Delayed start 4 Cooking duration 5 Cooking system and recommended level Whe...

Page 18: ...defrosting softening butter or ice cream 90 W Defrosting cream filled pastry 473998 In microwave systems the timer function delayed start is not available Touch the START STOP key to start oven operat...

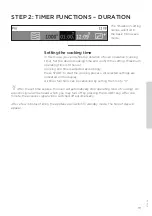
Page 19: ...djusted accordingly Press START to start the cooking process All selected settings are indicated on the display All timer functions can be cancelled by setting the time to 0 After the set time expires...

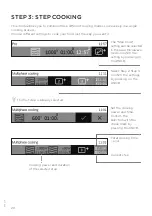
Page 20: ...ant it The Step Cook setting can be selected in the basic Microwave mode Confirm the setting by pressing on the KNOB Select Step 2 Step 3 Confirm the settings by pressing on the KNOB The first step is...

Page 21: ...t the bottom of the display indicates the cooking step currently in progress After the set cooking time elapses Step 2 and then Step 3 are activated if specified If you wish to delete a step during op...

Page 22: ...TOP key and holding it for a while When the cooking process is complete the display will read Program complete Bon app tit Turn the KNOB to display the End menu with a display of symbols End Select th...

Page 23: ...d enter the name by rotating the KNOB and confirming respective letters If necessary delete a character using the arrow use the check mark or touch the START STOP key to confirm the name Select the ty...

Page 24: ...Use this function when the oven has fully cooled down See chapter CLEANING AND MAINTENANCE Defrosting In this mode the air will circulate without any heaters operating Only the fan will be activated U...

Page 25: ...process can be stopped or switched off Child lock remains active after the oven is switched off To select a new system the child lock must first be deactivated OVEN LIGHTING Oven lighting is switched...

Page 26: ...to the power mains for the first time or after being disconnected from the power mains for a longer period of time more than one week Set the CLOCK time Set the display mode in the Time Design field d...

Page 27: ...you can set the following Oven lighting during operation oven lighting is switched off when oven door is opened during operation Other settings Factory settings After a power outage or after switchin...

Page 28: ...o cooking in a single level Cooking times are rough estimates and may vary subject to some conditions When cooking larger chunks of meat vegetables or pastry a lot of steam will be generated inside th...

Page 29: ...20 30 Steaks 500 90 20 30 Whole pieces of meat 1000 90 70 80 Poultry portions 500 90 25 35 Whole fish 200 90 15 20 PASTRY Bread 1000 90 20 25 Bread rolls 500 90 10 15 Walnut cake 500 90 15 25 Fruit ca...

Page 30: ...0 g 600 2 4 Soups stews 5 dl 750 2 4 Pizza 500 g 600 2 4 Chicken medallions 500 g 600 2 4 Open sandwiches 600 2 4 Popcorn 90 g 1000 2 4 Melting chocolate 100 g 600 2 4 Butter softening 250 g 180 2 4 B...

Page 31: ...aking dish 750 12 17 Custard creams glass baking dish 360 23 28 Type of food Weight g Water addition Power W Cooking time min VEGETABLE Potatoe 500 1 tablespoons 100 g 1000 13 18 Eggplant aubergines 5...

Page 32: ...1000 10 15 Oatmeal 500 Ratio food to liquit 1 2 1000 5 10 Brown rice 200 Ratio food to liquit 1 2 750 25 30 Risotto 500 Ratio food to liquit 1 2 750 20 25 Couscous 250 Ratio food to liquit 1 2 1000 3...

Page 33: ...with a mild detergent soapsuds and a soft sponge that will not scratch the finish Do not use abrasive cleaners or cleaners containing solvents as they may damage the housing finish Lacquer coated sur...

Page 34: ...sive cleaners abrasive sponges stain and rust removers etc Clean the accessories baking sheets and trays grids etc with hot water and detergent The oven the oven cavity and the baking trays are lined...

Page 35: ...guides from the holes in the back wall Take care not to lose the spacers fitted on the wire guides Replace the spacers after cleaning otherwise sparks may appear After cleaning re tighten the screws o...

Page 36: ...1Undo the four screws on the cover Remove the cover and the glass 2Remove the halogen light bulb and replace it with a new one Use protection to avoid burs There is a gasket on the cover which should...

Page 37: ...rror There is an error in the electronic module operation Disconnect the appliance from the power mains for a few minutes Then reconnect it and set the time of day If the error is still indicated call...

Page 38: ...ld be taken to an authorized collection center for waste electric and electronic equipment processing Correct disposal of the product will help prevent any negative effects on the environment and heal...

Page 39: ...cm uncovered glass baking dish 1 600 10 Defrost meat minced meat 500 g 12 15 Defrost meat minced meat 500 g Glass baking dish 1 180 8 90 15 17 Defrosting raspberries 250 g Glass container uncovered gl...

Page 40: ...rature C BEEF Raw 40 45 Rare 55 60 Medium 65 70 Well done 75 80 VEAL Well done 75 85 PORK Medium 65 70 Well done 75 85 LAMB Well done 79 MUTTON Raw 45 Rare 55 60 Medium 65 70 Well done 80 GOAT MEAT Me...

Page 41: ...41 473998...

Page 42: ...42 473998...

Page 43: ......

Page 44: ...SOLO MW_DM_45 en 09 16...

Reviews: