background image

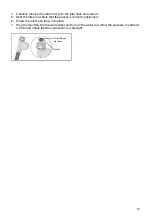
4. Carefully remove the outer filter from the inlet hose and clean it.
5. Refit the filter and check that the gasket is correctly positioned.
6. Screw the inlet hose firmly into place.
7. Plug the machine into the wall socket and turn on the water tap. Allow the pressure to settle for

a while and check that the connection is watertight.

Outer filter on
inlet hose

Gasket

31

Summary of Contents for GS693C60XUVAD

Page 1: ...User manual Dishwasher GS693C60XUVAD ...

Page 2: ...shes 12 Loading affects the results 12 The dishwasher s baskets 12 Top cutlery tray 13 Upper basket 14 Lower basket 15 Using the dishwasher 15 Add detergent 16 On Off 16 Select program 17 Select option 18 Start Pause Stop 19 If you want to load more dishes 19 Power failure 19 Once the program has finished 19 The best drying results 20 Unloading the dishwasher 21 Program chart 22 WiFi connection 22...

Page 3: ...e blockages 32 Troubleshooting 32 General 37 WiFi 38 Installation 38 Safety instructions 39 Transport protection for the door 39 Placing the dishwasher 39 Adjust the height and slide the dishwasher into place 40 Drainage connection 40 Connection to water supply 41 Electrical connection 41 Fit the sound insulation 42 Remove dishwasher worktop 43 Service 44 Technical data and energy labelling 44 Tec...

Page 4: ...p On Off WiFi Option Program UV Technology Auto 45 65 SmartDry Eco 55 Delayed start 1h 65 Speed wash Intensive 70 IonTech Glass 40 Hygiene 70 Night 55 Clean Self clean Remote WiFi Information on the display See the chapter Care and cleaning Connected to the cloud Flashes when connecting Top up with rinse aid Top up dishwasher detergent for automatic dosing Top up with salt CLn Run the Clean Self c...

Page 5: ... using the machine or have instructions on how to use the machine and understand the risks that can occur Cleaning of the machine must not be carried out by children without supervision Damaged supply cord must only be replaced by the manufacturer s service centre or someone similarly professionally qualified Only use the dishwasher in household type environments for dishwashing household dishes A...

Page 6: ...water appears on the display Turn off the water tap and contact your nearest service centre To avoid water leakage outside the dishwasher do not remove the plug from the wall socket until the water tap on the supply line has been turned off Winter storage transport Store the dishwasher above freezing and avoid long transport distances in very cold weather Transport the dishwasher upright or laying...

Page 7: ... the end of its service life and is to be disposed of it should immediately be made unusable Pull out the power cable and cut it as short as possible Remove the light source light sources Contact your local authority for information about where and how your dishwasher should be correctly recycled 7 ...

Page 8: ...4 19 24 26 34 15 19 05 3 5 4 3 25 30 35 43 20 24 06 4 4 5 2 31 36 44 52 25 29 07 5 3 7 0 37 49 53 70 30 39 08 7 1 8 8 50 61 71 88 40 49 09 8 9 62 89 50 If the water hardness exceeds 50 dH 89 fH 62 eH 8 9 mmol l we recommend connecting an external water softener Increased consumption during regeneration The dishwasher s built in water softener is regularly regenerated to maintain its function Regen...

Page 9: ...to close 1 Open the rinse aid compartment lid 2 Carefully top up with rinse aid to the level marked MAX 3 Wipe up any splashes of rinse aid around the compartment 4 Close the lid firmly Top up with salt Add salt to the salt compartment if you have selected Water hardness 01 09 1 Remove the salt compartment lid by turning it anticlockwise 2 Place the funnel supplied with the dishwasher in the salt ...

Page 10: ...r detergent gel in the automatic dosing compartment Do not use dishwasher detergent powder Washing up liquid must not be used as the foam that forms prevents the dishwasher from operating effectively Some thick dishwasher detergent gels are not suitable for the automatic dosing compartment Add very thick dishwasher detergent gel into the manual detergent compartment See the detergent manufacturer ...

Page 11: ...shing normally soiled dishes and is the most effective program in terms of combined energy and water consumption This program is used to assess compliance with EU legislation on ecodesign The dishwashing program is designed for an effective wash using as little energy and water as possible The program washes at a low temperature for a long time Select option SmartDry A shorter dishwashing program ...

Page 12: ...hes as thoroughly as possible All dirty surfaces should face inwards and downwards Dishes should not be placed in or on each other Angle dishes with hollows such as cups so that the rinse water will run off This is also important for plastic items Make sure small items cannot fall through the dishwasher basket place them in the top cutlery tray NOTE Check that the spray arms can rotate freely The ...

Page 13: ...wnwards Wine glasses are placed on the wine glass shelf and knives are placed in the knife stand on the right Knife stand 3 positions Raising and lowering the upper basket 1 Pull out the upper basket 2 Grab the sides of the upper basket with both hands and lift it up 3 If the upper basket is raised while in the top position it will drop to the bottom position Note that both sides of the basket mus...

Page 14: ...sket Place plates side plates serving dishes and pots in the lower basket Cutlery can be placed in the cutlery holder Fit the cutlery holder to achieve maximum loading capacity Found inside the enclosed plastic bag Adjustable plate supports The adjustable plate supports can be folded down to make it easier to load pots and bowls 14 ...

Page 15: ...ust be dry when adding detergent If powder or liquid dishwasher detergent is used add a small amount of the detergent to the compartment for prewash detergent Press to open Close the lid Prewash detergent Main wash detergent NOTE Use only dishwasher detergent Washing up liquid must not be used as the foam that forms prevents the dishwasher from operating effectively All in one detergent There are ...

Page 16: ...pensing is activated the dosage of dishwasher detergent gel is also adjusted Eco 55 This program is suitable for washing normally soiled dishes and is the most effective program in terms of combined energy and water consumption This program is used to assess compliance with EU legislation on ecodesign You can read more about greener dishwashing in the chapter Greener dishwashing For heavily soiled...

Page 17: ... function Automatic detergent dispensing Special dishwasher cleaners are also available on the market For the removal of limescale deposits see Dishwasher tub in the chapter Care and cleaning The dishwasher will indicate at regular intervals that Self clean needs to be run Remote WiFi You can remote control this dishwasher with your smartphone tablet Connect the dishwasher to your wireless network...

Page 18: ... the door Delayed start When you select Delayed start the dishwasher will start 1 24 hours after you press or 1 Press or once to activate Delayed start Press several times or hold it in to set the desired number of hours The time for Delayed start is shown on the display 2 Press The timer counts down and the dishwasher starts after the selected delay If you want to cancel the Delayed start option ...

Page 19: ... start it again Power failure If the dishwasher is turned off due to a power failure when a dishwashing program is running the program continues when power is restored If the power is cut during drying the program is interrupted If the dishwashing program was remote started and has not ended the program will continue once the power is restored You can monitor the dishwasher using the ConnectLife a...

Page 20: ...her Hot porcelain is more fragile Leave the dishes to cool in the dishwasher before unloading them Unload the lower basket first to avoid any water drops from the upper basket falling onto the dishes in the lower basket 20 ...

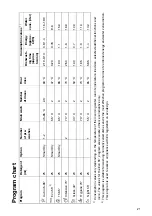
Page 21: ... C 2 25 Intensive 70 10 0 0 7 1 40 50 C 2 40 C 20 Glass 40 11 0 1 3 1 05 70 C 2 70 C 25 Hygiene 70 14 0 1 4 5 35 65 C 2 55 C 1 25 Night 55 1 Consumption values vary depending on the temperature of the incoming water room temperature load size selected additional functions and more The values for the Eco 55 program are accurate others are indicative only 2 This program is suitable for washing norma...

Page 22: ...range of your wireless network Use your smartphone tablet to download the ConnectLife app from the appropriate app store or scan the QR code below You will find the dishwasher s QR code and the AUID code on the serial number plate QR code AUID code 37 digits Connect to a network and pair Connect the dishwasher to your wireless network and pair with your smartphone tablet Open the ConnectLife app a...

Page 23: ...onnectLife app are blocked for 10 seconds Pair more devices Pair more devices users with the dishwasher Open the ConnectLife app and log in to your account or register a new account Go to Appliances Click on Add appliances or the button Select Home appliances Scan the dishwasher s QR code see the serial number plate Follow the further instructions in the app Press on the dishwasher On the dishwash...

Page 24: ...n pressed 00 03 Sounds 2 A beep indicates when a dishwashing program has ended Error messages are always indicated by a loud buzzer Setting for rinse aid dosage The rinse aid dispenser can be adjusted between 00 Off and 05 High dosage 00 05 Rinse aid 3 Increase the rinse aid dosage If the dishes have water marks Decrease the rinse aid dosage If the dishes have a sticky white blue film If the dishe...

Page 25: ...ing 6 The exact dosage depends on which program is running For the Auto 45 65 program the dosage also depends on how dirty the dishes are Pre selected at factory 00 Off Select whether the interior light is to be switched on when the dishwasher is turned off and the door is opened If the dishwasher is turned on the interior light is always switched on when the door is opened 00 Off 01 On Interior l...

Page 26: ...he above symbol lights on the display 1 Remove the salt compartment lid by turning it anticlockwise 2 Place the funnel supplied with the dishwasher in the salt compartment top up hole Water is only needed the first time 3 Add enough salt to fill the salt compartment max 750 gram Use special dishwasher salt 4 Wipe up any excess salt so that the lid can be screwed on firmly After topping up it may t...

Page 27: ...at forms prevents the dishwasher from operating effectively Some thick dishwasher detergent gels are not suitable for the automatic dosing compartment Add very thick dishwasher detergent gel into the manual detergent compartment See the detergent manufacturer s recommendations Clean the automatic dosing compartment and holder If necessary clean the automatic dosing compartment and holder Detergent...

Page 28: ...rinsed away during each wash Clean the fine filter when necessary It should be cleaned at regular intervals depending on how often the dishwasher is used Fine filter 1 Turn the locking ring anticlockwise and lift the fine filter straight up 2 Clean the fine filter 3 Refit the fine filter and turn the locking ring clockwise to its stop position Check that the edges seal properly Remember to refit t...

Page 29: ...ve the spray arms Remember to fit them firmly back into place afterwards Top spray arm Pull out the top cutlery tray Push up on the top spray arm while turning it anticlockwise to release it Upper spray arm Pull out the upper basket Unscrew the spray arm bearings anticlockwise to remove the spray arm from the upper basket Lower spray arm Pull the lower spray arm straight up to release it 29 ...

Page 30: ...e dishwasher still contains water after the program has finished something may be blocking the drainage pump which results in the Water outlet fault error message 1 Turn off the machine using and remove the plug from the wall socket 2 Remove the coarse filter and the fine filter 3 Scoop out the water from the dishwasher tub 4 In order to inspect the drainage pump remove the yellow drainage pump st...

Page 31: ...ilter and check that the gasket is correctly positioned 6 Screw the inlet hose firmly into place 7 Plug the machine into the wall socket and turn on the water tap Allow the pressure to settle for a while and check that the connection is watertight Outer filter on inlet hose Gasket 31 ...

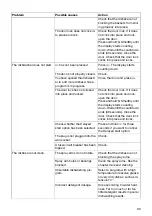
Page 32: ... level fault F52 Turn off the water tap and contact your nearest service centre Overfilling water F54 To avoid water leakage outside the dishwasher do not remove the plug from the wall socket until the water tap on the supply line has been turned off Contact your nearest service centre Circulation pump fault F56 Check that the water tap is on Check that the outer filter on the inlet hose is not bl...

Page 33: ...oor lock has not clicked into place and locked Press and hold SmartDry until the display starts counting down Wait until the countdown ends 60 seconds Close the door Check that the door lock clicks into place and locks Press and hold for three seconds if you want to cancel the Delayed start option Check whether the Delayed start option has been selected Check The plug is not plugged into the wall ...

Page 34: ... Care and cleaning Drainage pump stop missing Rinse off these types of food stuffs if not starting the dish washer immediately Consider using 1h 65 with the Speed wash option Some foodstuffs such as mus tard mayonnaise lemon vineg ar salt and dressings can cause spots on stainless steel if left for too long Spots on stainless steel or sil ver In order to avoid marks and tar nishing separate dishes...

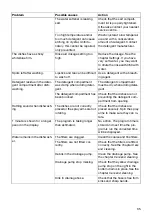
Page 35: ...ent compartment after dish washing Check that the dishes are not preventing the detergent com partment from opening The detergent compartment has been blocked Check that the dishes are placed securely Spin the spray arms to make sure they can ro tate The dishes are not correctly placed or the spray arms are not rotating Rattling sound when dishwash ing No action The program time is stored and next...

Page 36: ...gh temperature to dissolve grease on very dirty dishes such as In tensive 70 Or run a self clean ing program See Self clean in the chapter Using the dishwash er Low temperature programs have been selected for a pro longed period Grease deposits in the dish washer Activate the SmartDry option The SmartDry option is not activated The dishes are not dry enough Fully load the dishwasher The dishwasher...

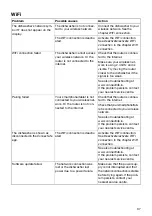
Page 37: ...arest service centre Check that the router is connec ted to the internet Your smartphone tablet is not connected to your wireless net work Or the router is not con nected to the internet Pairing failed Check that your smartphone tab let is connected to your wireless network See also troubleshooting at www connectlife io If the problem persists contact your nearest service centre Activate the WiFi ...

Page 38: ...or beneath the dishwasher to prevent damage from any water leaks Before screwing the dishwasher into place test the dishwasher by running the 1h 65 program with the Speed wash option Check that the dishwasher fills with water and drains Check also that none of the connections leak WARNING The ventilation opening in the lower part of the door must not be blocked by a rug carpet or similar furnishin...

Page 39: ...e than 5 mm Built in 1 Start by measuring the height from the floor to the bottom edge of the worktop 2 Measure the height from the floor to the top edge of the dishwasher 3 Adjust the dishwasher s feet by turning them clockwise to raise or anticlockwise to lower the machine 4 Check that there is an air gap of at least 3 mm between the underside of the worktop and the top edge of the dishwasher 5 ...

Page 40: ...connected to a connection nipple on the sink unit s water trap The connection nipple must have an internal diameter of at least 14 mm The drainage hose may be extended by a maximum of 3 m the total length of the drainage hose must not exceed 4 5 m Any joins and connecting pipes must have an internal diameter of at least 14 mm However the drainage hose should ideally be replaced with a new hose wit...

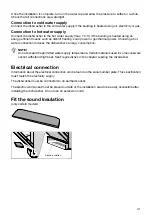
Page 41: ...ng a hot water connection reduces the dishwasher s energy consumption NOTE Do not exceed the permitted water supply temperature Certain materials used in some cookware cannot withstand high heat See Fragile dishes in the chapter Loading the dishwasher Electrical connection Information about the electrical connection can be found on the serial number plate This specification must match the electric...

Page 42: ...Remove dishwasher worktop The dishwasher can be installed in a recess without its worktop If the dishwasher s worktop is removed the dishwasher must be installed under a separate worktop 42 ...

Page 43: ...service centre for professional help see www gorenje com Our website also has information about spare part availability and what you can repair yourself When making contact provide the details on the serial number plate Include the article number 1 and the serial number 2 Please note that non professional repairs may risk user safety and affect the warranty 1 2 43 ...

Page 44: ...el name 3 This appliance contains a light source light sources of energy efficiency class D Light sources are available as spare parts and can be replaced by your nearest service centre or a qualified professional Information for test institute Information about this product can be found in the European Product Database for Energy Labelling EPREL and can also be ordered by e mail dishwashers appli...

Page 45: ...We reserve the right to make changes GORENJE gospodinjski aparati d o o Partizanska 12 3320 Velenje Slovenia Phone 386 0 3 899 10 00 Fax 386 0 3 899 28 00 www gorenje com 875498 a1 ...

Reviews: