21
EN
case the water heater should first be disconnected from the power supply.
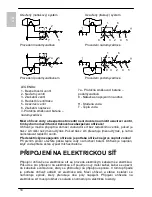
Connecting the heater to the power supply network must take place in accordance
with the standards for electric appliances. To comply with the national installation
regulations, an all poles disconnect switch must be installed between the water
heater and the power supply network.
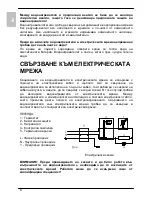
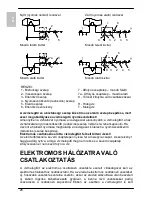
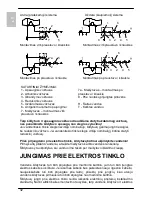
Legend:
1 - Thermostat
2 - Thermal fuse
3 - Heating element
4 - Light indicator
5 - Connection terminal
L - Live conductor
N - Neutral conductor
- Earthing conductor
Electric installation
CAUTION: Before any intervention into the interior of the water heater,
disconnect it from the power supply network! This intervention may only be
performed by a trained professional!
OPERATION AND MAINTENANCE
The water heater is ready for use once it has been connected to water and power. By
turning the thermostat knob on the front side of the protective cover, water
temperature can be set between " " frost protection position and " " approx 75 °C
position. We recommend that the knob be set to position " e " as this ensures the
most economic operation of the water heater. This way the water temperature is
maintained at approx. 35 °C by (GT 10 and GT 15) and and approx 41 °C by (GT 5).
The operation of the heater at this temperature level also results in reduced build-up
of calcium and lime, as well as reduced heat loss than is the case at higher
temperatures. Due to safety reasons you can optionally set the highest temperature
value of water in the heater. Proceed as follows:
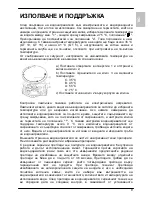
a) Insert screwdriver in slot 1 and remove button cover 2,
b) Set knob limiter 3 to any desired temperature value,
C: 35 °С
B: 45 °С
A: 55 °С
O: 75 °С
c) Replace knob cover 2 to the knob.
The operation of the heating element is indicated by the
light indicator that stays on until the temperature in the tank has reached the set level
or until the heater has been deliberately switched off. When the water heater is not in
use for longer periods of time, it should be protected from freezing by setting the

