background image


10 

Inspection and repairs 


Before use, check the appliance for damaged or defective parts. Check for breakage of parts and any other 

conditions that may affect its operation. 


Do not use the appliance if any part is damaged or defective. 


Have any damaged or defective parts repaired or replaced by an authorised repair agent. 


Never attempt to remove or replace any parts other than those specified in this manual. 

ELECTRICAL SAFETY 


To avoid the risk of short circuiting, do not immerse the appliance or the batteries in water or other liquid. 


Use only the correct type of battery for the appliance (see technical data). 


Never attempt to charge non-rechargeable batteries. 


The electronic components inside the appliance may be affected by other devices used in close proximity, 

such as mobile phones or microwave ovens. If this happens, the display will show erroneous data. 


To remedy this, either switch the interfering device off, or move the appliance away from it. 

USE 

Switching on and off 


Press the on/off/tare button to switch the appliance on. 


In addition, the appliance is fitted with an auto shut-off function, which automatically switches off the 

appliance after approximately two minutes. 


Setting the tare weight 


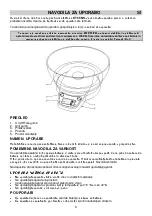
Press the on/off/tare button (1) to set the reading on the display (3) to zero. 


When using the bowl (4), first put the empty bowl on the scales and press the on/off/tare button to set the 

reading on the display to zero. 


Setting the weighing unit 


The weighing unit can be set to (g), (oz), (lb), (kg). 


Press the unit button (2) until the arrow in the display points to the desired unit. 


The weighing unit can be changed at any time while weighing. 


Weighing 


Place the scales on a flat surface. 


Place the object to be weighed on the scales and read off the weight in the display (3). 


When using the bowl (4), first correct the tare as described above. Put the food to be weighed in the bowl, 

place the bowl on the scales and read off the weight. 


-

appliance, immediately remove the weight from the scales. 

CLEANING, MAINTENANCE AND STORAGE 

Before cleaning or maintenance, switch the appliance off. 


To clean the appliance, use only mild soap and a damp cloth. 


Do not use any abrasive or solvent-based cleaner. 


Wash the bowl in hot, soapy water and dry well. 


Do not immerse any part of the appliance in water or any other liquid.


Checking and replacing the batteries 


If the display (3) shows 

 the batteries are too low and must be replaced. 


Periodically open the battery compartment (5) and check the batteries for corrosion. 


To replace the batteries, open the battery compartment and remove the old batteries. 


Place new batteries, as indicated by the diagram inside the compartment. 


When d


Environment 

Do not throw away the appliance with the normal household waste at the end of its life, but hand it in at an 
official collection point for recycling. By doing this, you help to preserve the environment. 


GORENJE WISHES YOU A LOT OF PLEASURE 

WHILE USING YOUR APPLIANCE 


Summary of Contents for KT 05 NS

Page 1: ...Весы кухонные Gorenje KT 05 NS Инструкция пользователя ...

Page 2: ... P P P P P P P P P P P P ...

Page 3: ...it gumb 3 Prikazovalnik 4 Posoda 5 Prostor za baterije NAMEN UPORABE POMEMBNA NAVODILA ZA VARNOST Ko uporabljate aparate Navodila shranite Ne dopustite da neznana oseba ali otroci z nepoznavanjem navodil uporabljajo aparat virov in vnetljivih materialov Ne uporabljajte aparata na prostem Vedno zavarujte aparat pred vodo ali prekomerno vlago Ne uporabljajte aparata v prostoru kjer je temp Ne uporab...

Page 4: ... 1 0 Ko uporabljate posodo najprej postavite prazno posodo na tehtnico in pritisnite on off tare da se vam 0 Nastavljanje merske enote Merska enota je lahko nastavljena na grame g oz libre Lb ali kilograme kg Pritisnite gumb unit eni Tehtanje posode kot je navedeno zgoraj nastavljanje Nato postavite hrano v posodo te nje izklopite aparat Nobenega dela aparata razen posode ne postavljajte v vodo Pr...

Page 5: ...dite intervencije koje u uputama nisu naveden Upute za Ne dopustite da nepoznata osoba ili dijeca koja ne poznaju upute za uporabu upotrebljavaju u blizini izvora toplote i zapaljivih materijala gdje je temperatura ispod ili iz Ne koristite posudu u mikrovalovni nici izvadite baterije iz prostora za baterije suh prostor Prije uporabe pregledajte ure To bi svakako utjecalo na djelovanje Ne Ukoliko ...

Page 6: ...avite praznu posudu na vagu i pritisnite on off tare da bi se prikazalo Jedinicu mjere jednostavno je podesiti na g oz lb kg Pritisnite unit gumb 2 Vaganje Postavite vagu na ravnu u Postavite predmet na vagu Zatim postavite namirnicu u posudu P I ODLAGANJE Posudu operite u mlakoj kupki zatim je osim posude ne uranj Provjera i zamijena baterija zamijeniti stanje baterije otvorite poklopac za bateri...

Page 7: ...e aja Upotreba bilo kog pribora ili dodatka ili izvo enje bilo koje operacije sa ovim ure ajem osim onih koje se preporu uju u ovom Priru niku sa uputstvima mo e da Zadr ite ovaj Priru nik radi daljih preporuka Nemojte da postavljate ure aj na izvor toplote ili u njegovu blizinu Nemojte da koristite ure aj u spoljnoj sredini Uvek za titite ure aj od vode i prevelike vla nosti Nemojte da koristite ...

Page 8: ... Pritisnite dugme UNIT 2 sve dok strelica na displeju ne poka e eljenu jedinicu Jedinicu za merenje te ine mo ete da promenite u bilo kom trenutku tokom merenja Merenje te ine Postavite vagu na ravnu povr inu Stavite na vagu predmet koji treba da izmerite i o itajte njegovu te inu na displeju Kada koristite posudu 4 prvo unesite korekciju za taru kako je gore opisano Stavite u posudu hranu koju tr...

Page 9: ...n using battery powered appliances basic safety precautions including the following should always be followed to reduce the risk of fire leaking batteries personal injury and material damage Read this entire manual carefully before using the appliance The intended use is described in this manual The use of any accessory or attachment or the performance of any operation with this appliance other th...

Page 10: ...n off tare button to set the reading on the display to zero Setting the weighing unit The weighing unit can be set to g oz lb kg Press the unit button 2 until the arrow in the display points to the desired unit The weighing unit can be changed at any time while weighing Weighing Place the scales on a flat surface Place the object to be weighed on the scales and read off the weight in the display 3...

Page 11: ...Directiva prescrie cadrul pentru o PREZENTARE 1 Buton on off tare pornire oprire tara 2 Buton unit unitate 3 4 Vas 5 Compartiment baterie SCOP P P incendiilor scurgerea bateriei accidentele sau deteriorarea aparatului Scopul pentru car viitor Folosirea aparatului C q r s t ...

Page 12: ...12 lichid um ar fi UTILIZARE Ap tare pentru a porni aparatul on off tare 1 on off tare la 0 oz lb kg A i butonul unit tar P l la un punct oficial de gorenje ...

Page 13: ...13 UA P P P q r 1 s On Of Tare t 2 s Unit a 3 r 4 5 s r C C r ...

Page 14: ...14 P on off tare on off tare 1 3 4 on off tare 1 P g oz lb kg unit 2 3 4 O Ld q rst 5 GORENJE ...

Page 15: ...15 kuchynskej KT 05 NS tejto mnoho rokov nie na 2002 96 EC WEEE P 1 On Of Tare vynulovanie 2 Unit jednotka hmotnosti 3 Displej 4 Miska 5 A qrs q rt q zariadenie zariadenia r r q alebo nad 30 r r ...

Page 16: ...zapnete zariadenie Nast a on off tare hmotnosti 1 na displeji 3 hodnotu hmotnosti na nulu 4 on off tare hmotnosti pre nastavenie hodnoty hmotnosti na displeji na nulu Nastavenie jednotky hmotnosti g oz lb kg Unit hmotnosti P 4 KLADOVANIE Ak sa na displeji 3 q GORENJE rs tr s r ZARIADENIA ...

Page 17: ...ktronicznych waste electrical and electronic equipment WEEE OPIS 1 Przycisk On Off Tare 2 Przycisk Unit 3 4 Naczynie z tworzywa sztucznego 5 Miejsce na baterie Waga qr s t r Wszelkie zabieg r q s q r q dla dzieci KONTROLA I KONSERWACJA ...

Page 18: ...off tare 1 na 3 przycisk on off tare 1 3 gotowa jest do pomiaru Ustawienie jednostki pomiarowej masy g oz lb kg Unit 2 3 3 podanymi w punkcie Dopiero po wykonaniu tych Na rtyku MYCIE KONSERWACJA I PRZECHOWYWANIE Kontrola i zamiana baterii B q rst Zastrzegamy sobie prawo do zmian ...

Page 19: ...19 RU P P P P P 1 2 3 4 5 q r r r s rq r t s q q r r s q rq s q r s q r s q r r r r s q r s ...

Page 20: ...20 P P P P P P q rs t P ...

Page 21: ...21 P 080801 ...

Page 22: ...Электрочайники Блендеры Хлебопечки Кофемолки Пароварки Батарейки и аккумуляторы Мясорубки Кофеварки и кофемашины Соковыжималки Тостеры Миксеры Маринаторы Фритюрницы ...

Reviews: