


26
9. To remove the lid, turn it anti-clockwise to unlock it,
then lift it off.
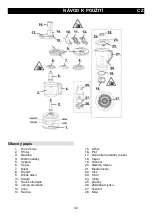
With the Disc
1. Fit the slicer or one of the graters into
the disc.
2. Lower the disc over the top of the
spindle.
3. Hold the lid with the tube slightly behind the jug
handle, set it on the jug, then turn it clockwise, to
lock the tab into the top of the handle.
4. Remove the pusher, and drop the ingredients
down the tube.
5. Replace the pusher, and use it to push the
ingredients gently down the tube.
Don t use fingers or cutlery to push food down
the tube - use pusher only.
6. The blade on top of the disc will slice or grate the
food into the bowl.
7.
DШЧ’tăХОtătСОăЛШаХăРОtЬăЦШЫОătСКЧăКЛШutăСКХПăПuХХ.
8. To remove the lid, turn it anti-clockwise to unlock it,
then lift it off.
9. Turn the disc over, and press one of the metal
ends in and down, to remove the slicer/grater.
Care and Maintenance
1. Switch off and unplug before cleaning.
2. Wipe the outside of the motor unit with a clean
damp cloth.
3. Handwash the removable parts.
4. If you use a dishwasher, the harsh environment
inside the dishwasher will affect the surface
finishes.
Don t put any part of
the appliance in a
dishwasher.
5. The damage should be cosmetic only, and should
not affect the operation of the appliance.
Using the mill
1. Unplug the appliance.
2. Turn the mill upside down.
3. Turn the mill base clockwise, to release it, and lift it
out of the mill.
4. Put the goods to be ground into the bowl. Dry
goods only.
For best results don t fill in more than one third
5. Replace the mill base, inside the mill, and turn it
anti-clockwise, to lock it in place.
6. Turn the mill right way up.
7. Lower the mill onto the motor unit, then turn it
clockwise, to lock it in place.
8. Choose the PULSE function and use short bursts
till you achieve the size of grind you want.
9. After releasing the button PULSE wait till the
blades stop moving.
10. Turn the mill anti-clockwise to unlock it, and lift it off
the motor unit.
11. Turn the mill upside down.
12. Tap the mill a couple of times to move all the
grounds into the bowl.
13. Turn the mill base clockwise, to release it, and lift it
out of the mill.
14. Empty the bowl.
Environment
This marking indicates that this product
should not be disposed of with other
household waste throughout the EU. To
prevent possible harm to the environment
or human health from uncontrolled waste disposal,
recycle it responsibly to promote the sustainable
reuse of material resources. To return your used
device, please use the return and collection
systems or contact the retailer where the product
was purchased. They can take this product for
environmentally safe recycling.
Care and Maintenance
1. Switch off (0) and unplug before cleaning.
2. Wipe the outside of the motor unit and the mill
base with a damp cloth.
3. Handwash the bowl and seal.
4. If you use a dishwasher, the harsh environment
inside the dishwasher will affect the surface
ПТЧТЬСОЬ.ăDШЧ’t
put any part of the appliance
5. in a dishwasher.
6. The damage should be cosmetic only, and should
not affect the operation of the appliance.
Guarantee & service
If you need information or if you have a problem,
please contact the Gorenje Customer Care Centre
in your country (you find its phone number in the
worldwide guarantee leaflet). If there is no
Customer Care Centre in your country, go to your
local Gorenje dealer or contact the Service
department of Gorenje domestic appliances.
For personal use only!
GORENJE
WISHES YOU A LOT OF PLEASURE
WHEN USING YOUR APPLIANCE
We reserve the right to any modifications!
Summary of Contents for SBR800HC
Page 3: ...2...
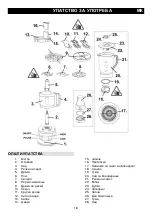
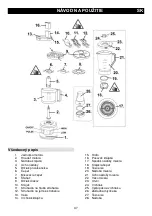
Page 19: ...18 1 2 3 4 5 6 7 8 9 10 11 12 13 14 15 16 17 18 19 20 21 22 23 24 25 26 27 28...
Page 23: ...22 11 12 13 14 1 2 3 4 5...
Page 48: ...47 B 1 2 3 4 5 6 7 8 9 10 11 12 13 14 15 16 17 18 19 20 21 22 23 24 25 26 27 28...
Page 50: ...49 2012 1 EC EEE 1 2 3 4 5 6 1 0 2 1 2 3 1 2 4 0 1 2 3 4 5 6 7 1 6 1 1 2 1 0 2 3 4 5...
Page 51: ...50 1 2 3 4 5 6 7 8 9 10 11 1 2 3 4 1 2 3 4 5 6 7 8 9 1 2 3 4 5 6 7 8 9 1 0 2 3 4 5...
Page 52: ...51 1 2 3 4 5 6 7 8 9 0 10 11 12 13 14 1 0 2 3 4 GORENJE...
Page 58: ...57 UA 1 2 3 4 5 6 7 8 9 10 11 12 13 14 15 16 17 18 19 20 21 22 23 24 25 26 27 28...
Page 62: ...61 13 14 15 1 2 3 4 5 6 RE JE...
Page 63: ...62 RU 1 2 3 4 5 6 7 8 9 10 11 12 13 14 15 16 17 18 19 20 21 22 23 24 25 26 27 28...
Page 64: ...63 3 4 5 6 1 2 3 0 4 0 5 6 7 0 8 9 10 11 12 13 14 2 1 2 15 16 17 18 19 20 21...
Page 66: ...65 5 1 2 3 4 5 6 7 8 9 10 11 1 2 3 4 1 2 3 4 5 6 7 8 9 1 2 3 4 5 6 7 8 9 1 0 2 3 4 5...
Page 67: ...66 1 2 3 4 5 6 7 8 9 0 10 11 12 13 14 1 0 2 3 4 5 www gorenje com GORENJE...