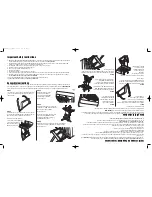
Paso 6
Para colocar las cuatros ruedas, coloque primero los
espaciadores para ruedas(4) en cada eje, luego coloque
la rueda (4) en cada eje y por último coloque las
arandelas (4) e inserte los chavetas de réten (4) en los
orificios en cada extremo de los ejes. Luego doble los
extremos de los chavetas de réten hacia atrás (4) para
mantenerlos en su lugar.
Instrucciones Para Operar
ElMango Giratorio
Paso 1
Quite los sujetadores y los
pasadores partidos.
Paso 2
Gire el mango e inserte el pasador partido.
Asegure el mango en su lugar uniéndolo
con el sujetador.
Paso 3
Utilice el segundo pasador partido para unir
el mango con el enganche para remolque.
Paso 7
Coloque el mango a la horquilla utilizando 1perno M8X60,
1 contratuerca M8, y 1 arandela.
NO EXCEDA LA C
AP
ACID
AD DE CARG
A MÁXIMA DE 272 KG. C
AP
ACID
AD
MÁXIMA DE CARG
A A DESCARG
AR: 136 KG. EL PESO QUE SOPOR
TA SE
CA
LCULA CON LA C
ARGA DISTRIBUID
A EN FORMA UNIF
ORME.
PRECAUCIÓN:
Como Utilizar la Palancade
Descarga
Para operar el mecanismo de descarga, jale hacia
afuera la palanca de descarga para desprender el lecho
de plástico de la traba de sujeción. Levante la palanca
de descarga para girar el carro hacia arriba en posición
de descarga.
Cómo Volver el Lecho de
Plástico a la Posición Baja
Gire el lecho de plástico hacia abajo a la posición baja.
Asegúrese de que el mango de liberación se trabe en su
lugar cuando la carretilla está en la posición baja.
Step 6
Attach the wheels by first placing the wheel spacers
(4pcs) onto each axle, then placing the wheel (4pcs) onto
each axle and finally placing the wheel washers (4pcs).
Insert the cotter pins (4pcs) into the hole at each end of
the axles and bend back the ends of the cotter pins to
keep them in place.
Swivel Handle Instructions
Step 1
Remove clips and cotter pins.
Step 2
Rotate the handle and
insert cotter pin.
Secure by attaching the clip.
Step 3
The second cotter pin
is used to attach the
handle to the trailer hitch.
Step 7
Attach the handle to the yoke using M8x60 bolt (1pc), M8
lock nut (1pc) and M8 washer (1pc).
DO NOT EXCEED MAXIMUM OVERALL LOAD CAPACITY 600 LBS.
MAXIMUM DUMPING LOAD CAPACITY 300 LBS.
WEIGHT RATING BASED ON EVENLY DISTRIBUTED LOAD.
CAUTION
Using the Dumping Feature
To operate the dumping feature, pull the dumping
release handle outward to release the plastic tray from
the locking mechanism. Lift up the release handle to
rotate cart upward into the dumping position.
Returning the Plastic Tray to the
Lowered Position
Rotate the plastic tray back down to the lowered position.
Make sure the dumping release handle is locked into place
when the cart is in the lowered position.
GOR200b-t2_se_manual 2/6/09 2:52 PM Page 7


