background image


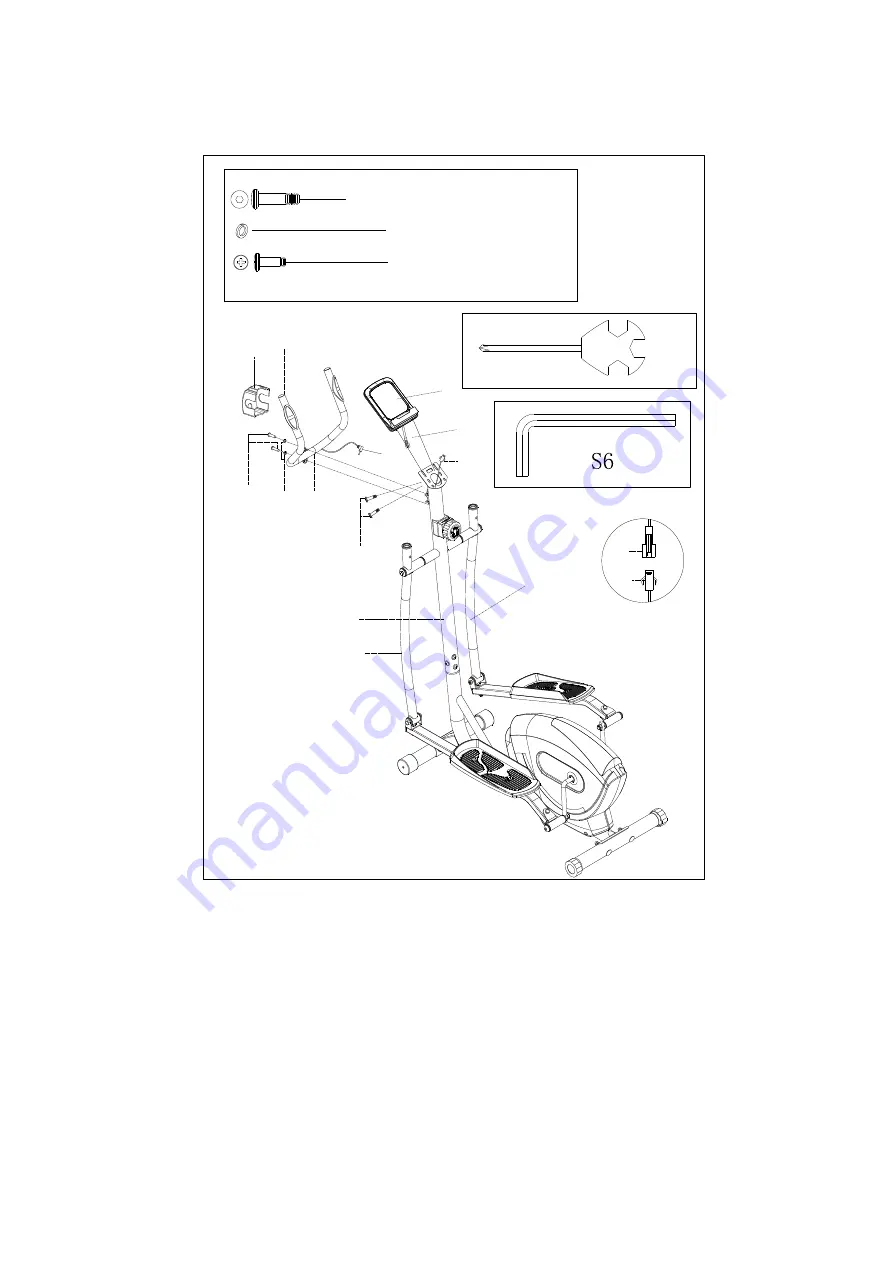
Step 4:


25L

25R

64

1

#15 M5*10 2pcs

2

23

15

8

2

10

9

#23  d8  2pcs

#8 M8*30*S6 2pcs

11

1a

10

1a


a. Secure middle handlebar (2) to the clamp of handlebar post (64) with screw (8) 

and washer (23), then attach clamp cover (11). 

b. Connect trunk wire 1 (10) with computer link wire (1a); then secure computer (1) 

to the bracket of handlebar post (64) with screw (15). 

Insert handle pulse wire (9) into the hole located on the back of computer (1). 

Summary of Contents for 100942

Page 1: ...Elliptical Stepper Bike 100942 IMPORTANT Read all instructions carefully before using this product Retain owner s manual for future reference...

Page 2: ...ldren and pets away from the equipment The equipment is designed for adult use only 4 Use the equipment on a solid flat level surface with a protective cover for your floor or carpet To ensure safety...

Page 3: ...63 43L 28 19 29 26 51 3 44 45 46 47 46 49 50 31 32 33 33 37 38 20 21 24 23 22 21 19 18 17 52 53 29 57 58 59 25R 60 60 41 60 61 30 36 21 60 60 67 39 39 32 33 33 35 25L 41 41 60 61 48 49 46 46 67 40 51...

Page 4: ...r L R 2 41 End cap J40 25 15 4 14 End cap 28 32 50 2 42 Bolt M8 40 20 S14 4 15 Screw M5 10 2 43 Pedal 2 16 Round bushing 32 25 L83 2 44 Bolt M10 50 13 S17 2 17 Bolt M8 40 20 S14 2 45 hinge bolt L 16 8...

Page 5: ...70 Spanner S13 14 15 1 63 Nut M10 H9 5 S17 4 71 Spanner S17 S19 17 1 64 Handlebar post 1 72 Washer d10 20 2 2 Step 1 65 28 28 19 29 29 19 28 M8 73 20 H5 4pcs 29 d8 20 2 R30 4pcs 19 M8 H16 S13 4pcs 19...

Page 6: ...6 53 M8 16 S6 4pcs 29 d8 20 2 R30 4pcs 59 10 58 57 52 a Contact the Tension control 52 and Tension wire 57 and contact the Trunk wire 1 10 and Trunk wire 2 58 b Lock the Handlebar post 64 on the Main...

Page 7: ...2pcs 50 1 2 20 H8 S19 1pc 38 M8 H7 5 S13 4pcs 62 S16 2PCS 62 62 60 60 60 60 47 59 84 a Lock the Swing rod 25L R on the Handlebar post 64 with bolt 24 washer 23 and washer 22 then cover the end cap 60...

Page 8: ...le handlebar 2 to the clamp of handlebar post 64 with screw 8 and washer 23 then attach clamp cover 11 b Connect trunk wire 1 10 with computer link wire 1a then secure computer 1 to the bracket of han...

Page 9: ...tep 5 25L 25R 17 M8 40 20 S14 2pcs 18 d8 20 2 R16 2pcs 19 M8 H16 S13 2pcs 13L 13R 19 18 17 19 18 17 Secure handlebar 13L R to swing rod 25L R with bolt 17 arc washer 18 and nut 19 Assembly is finished...

Page 10: ...rcise start to the end and the range is 0 0 999 9 KCAL 6 TOTAL DISTANCE ODO Count the total distance after installing the batteries 7 PULSE Hold the pulse sensor and read your heart rate per minute Th...

Page 11: ...Total Distance 0 9999 MILE Pulse Rate 40 240BPM Battery Type 2 pcs of SIZE AAAand UM 4 Operating Temperature 0 40 32 104 Storage Temperature 10 60 14 140...

Reviews: