background image

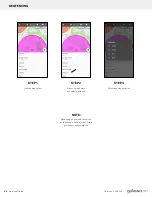
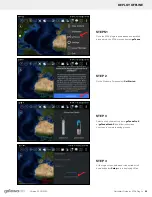
STEPS 1

Once the ATAK plugin is downloaded and installed,
proceed into  the ATAK menu and select 

goTenna

.

STEP 2

On the Welcome Screen select 

Get Started.

STEP 3

Select device you want to pair to: 

goTenna Pro-X

or 

goTenna Mesh-X 

and follow instructions

on screen to complete pairing process.

STEP 4

At the login screen, below user credentials scroll
down and select 

Setup

 next to deploying offline.

DEPLOY OFFLINE

52

Version 2.0 05/2020

Quickstart Guide for ATAK Plug-In

Summary of Contents for PRO 900-00202

Page 1: ...Part Number 900 00202 Part Number 900 00212 Part Number 900 00207 USER GUIDE Version 2 0 05 2020 ...

Page 2: ......

Page 3: ...e Deployment Options goTenna Pro Deployment Kit goTenna Pro Management Portal goTenna Pro App goTenna Pro X Quickstart Guide for ATAK Plug In Support 1 2 3 17 29 49 85 USER GUIDE TABLE OF CONTENTS Version 2 0 05 2020 ...

Page 4: ...o end users This is done either in conjunction with the goTenna Management portal or as a stand alone device without any internet connection goKit Deployment Sync with the Portal When used in conjunction with the online portal your organization s admin can login to the online portal to manage frequency sets and users The goKit then syncs to the portal when an internet connection is available so th...

Page 5: ...oKit Download frequency sets directly to smartphone app and paired goTenna device Create and assign frequency sets to designated user or group accounts Download frequency sets directly to goKit Bring goKit off grid Deployment Kit Options goTenna Deployment Kits or goKits store and charge up to 30 Pro or Pro X devices allowing large teams to deploy more rapidly with the online portal or fully offli...

Page 6: ... Features goKit Onboarding Portal Login Onboarding Offline Mode Onboarding Home Page Mode Hot Spot Settings Frequency Sets Mission Packs Applications Update Firmware 4 6 6 7 7 8 9 13 15 16 Deployment Kit User Guide 3 Version 2 0 05 2020 ...

Page 7: ...ch Touch Screen display for intuitive and rapid operation A C Auxiliary Power Accepts A C Part 900 00202 accepts 110v and Part 900 00212 accepts 110V 240V and 12V DC auxiliary external power sources for operation and long term storage 1 2 4 5 11 10 8 9 7 6 3 Get to know your goKit 1 7 inch touch screen display for intuitive and rapid operation 2 Ethernet Port 3 Water proof power plug cap 3 AC Plug...

Page 8: ... 2 Open the kit and insure all goTenna Pro radios are firmly seated in their charging docks NOTE If goTenna Pro is not fully charged the light indicator will display red when plugged in to power The indicator will turn blue when the unit is fully charged To optimize for longer battery life the unit executes automatic battery conditioning cycles You will notice this during charging when the indicat...

Page 9: ...ork selection page as shown here Please select the WiFi network you want the goKit to be connected enter the password and tap on CONNECT On this screen enter your goKit user credentials from portal rather than regular user as in release 1 0 Note Please make sure to read section about new goKit user creation Page 23 if you have not done so already 6 Deployment Kit User Guide Version 2 0 05 2020 ...

Page 10: ...s will be disabled Home Page The home screen mostly includes general information about the goKit Deployment Mode SSID and network settings Above you can see the legend for the navigation bar for Home page mode HOME PAGE MODE OFFLINE MODE ONBOARDING Deployment Kit User Guide 7 Version 2 0 05 2020 Home Frequency Sets Mission Packs Apps Firmware ...

Page 11: ...EDIT HOTSPOT button to change these settings On the next screen input your SSID and PASSWORD for the Hotspot network Tap on UPDATE button to apply the input Once saved the new Deployment Mode SSID will be displayed on the home page 8 Deployment Kit User Guide Version 2 0 05 2020 ...

Page 12: ... can be previewed by pressing magnification glass Users can save offline copy of the portal frequency by pressing the cloud button on the right side of the portal frequency set row If the selected frequency set is saved to goKit successfully confirmation dialog will be displayed as shown Deployment Kit User Guide 9 Version 2 0 05 2020 ...

Page 13: ...and tap NEXT After this the user has to enter Control and Data channels and press SAVE button If the entered values are valid the goKit will create an offline Frequency Set The created Frequency Set will appear in the bottom section of the Frequency Setlist 10 Deployment Kit User Guide Version 2 0 05 2020 ...

Page 14: ...e frequency set row On this page you can see the existing Name Max Power and Bandwidth These can be modified By tapping NEXT you can get to the following screen On this page you can change Control and Data channels By tapping SAVE Frequency Set can be saved Deployment Kit User Guide 11 Version 2 0 05 2020 ...

Page 15: ...FREQUENCY SET The offline Frequency Set can be deleted by clicking on trash bin icon Users will be prompted with dialog box that will ask user to confirm delete action 12 Deployment Kit User Guide Version 2 0 05 2020 ...

Page 16: ...r else refer to section Edit GoKit Group to add mission pack to a group 3 If gokit user is not created then refer to section gokit User creation to create goKit user on the portal 4 Use goKit user credentials to login to portal from goKit Portal Login page 5 In goKit home page open Mission Packs page and mission packs from portal should be pulled Please follow the steps below to download mission p...

Page 17: ...SD card with mission packs to goKit s micro SD card slot 3 Go to Mission Packs page and tap on SCAN SD CARD FOR MISSION PACKS to load mission packs from SD card as shown left 4 Tap on Save icon to save a mission pack to gokit 5 Saved mission pack is added to mission packs list as shown left 14 Deployment Kit User Guide Version 2 0 05 2020 ...

Page 18: ...ICATION TO PORTAL To use applications on the goKit they needed to be uploaded to the portal Open the Apps page under goKit section of the Portal Once the goKit Apps page is open click on UPLOAD APP button On the next page the file can be uploaded Deployment Kit User Guide 15 Version 2 0 05 2020 ...

Page 19: ...es 2 Any devices connected to your goKit will appear here in a list Select Update to update the firmware of all devices in your goKit 3 Select a Firmware version then select to install the firmware selected This will apply the firmware update to all devices in your goKit 16 Deployment Kit User Guide Version 2 0 05 2020 ...

Page 20: ...TABLE OF CONTENTS USER GUIDE Introduction to Management Portal Frequency Sets Users User Groups goKits 18 20 21 23 25 Management Portal User Guide 17 Version 2 0 05 2020 ...

Page 21: ...dmin or User account creation If you did not receive and invite or you are in need of customer support please contact prosupport gotenna com ACCESSING THE MANAGEMENT PORTAL FOR THE FIRST TIME Provide your goTenna Customer Success Manager with your Organization Name and the Admin user s email The Admin user will then receive an email to confirm their Portal account During this verification process ...

Page 22: ...ING TABLES While using the Management Portal you will mostly be interacting with a series of data tables For very large organizations this can become cumbersome To improve the experience we have provided top level tools for navigating large data sets These include A search input When interacting with the search bar you can search specific columns by appending column_name before the query Example N...

Page 23: ... less range A narrower bandwidth results in a slower data rate but more range One or more Control Channel Control channels are where transmissions originate One or more Data Channel Data channels are where data packets are sent Once each of these values is supplied click the Create button The frequency set will be created and available for assignment to a group More on this later FREQUENCY SETS MA...

Page 24: ...l cover this step in a later section USERS In short bulk upload of users allows you to download a template fill that template out and upload it to the database Allowing for a large number of user accounts to be created at once Click the Bulk Import button to begin From the upload file interface you can download our csv file template by clicking Download Import Template We highly recommend that you...

Page 25: ...screen that informs you of each row that contains validation errors We suggest you keep this window open and Return to your spreadsheet tool and edit the CSV template to resolve errors Save this out as a new file Return to the bulk upload view and click Cancel Repeat the process upload the new file Successful Upload If the upload is successful and no validation errors are detected you can review t...

Page 26: ...he box to apply Service User permission Add users to the Group To do so select their name from the Users picklist on the left then click the right arrow This will move the user into the Group picklist Add Frequency Sets to the Group To do so follow the same steps from before selecting one or more frequency sets from the picklist and moving them into the Group picklist Once the Group has the necess...

Page 27: ...PS CONTINUED Lastly When adding a new user all of your organizations groups will appear to the right where you can select one or more groups to add the user to 24 Management Portal User Guide Version 2 0 05 2020 ...

Page 28: ...ow UPLOADING APPS TO PORTAL Portal and so too goKit can house your organizations applications With the goKit s deployment mode apps stored within Portal can be downloaded offline in the field If App upload is an active feature for your organization you ll see Apps on the Side Menu within the goKit field UPLOADING APPS In order to upload a new App select Apps from the Side Menu Click the Upload App...

Page 29: ...e login access to the goKit MANAGING GOKIT GROUPS Click the Create Group button Name the goKit Group Add a goKit to the Group To do so select the goKit from the picklist on the left then click the right arrow This will move the goKit into the Group picklist Add Frequency Sets to the goKit Group Add Apps to the goKit Group Once the goKit Group has the desired goKits Frequency Sets Apps and or missi...

Page 30: ... Map This will clear all PLI and objects from the map Any actively backhauled PLI nodes will return to the map after the next backhaul interval Center Map This will center the map so that you can view all nodes at once Zoom Select button to zoom in button to zoom out The command map serves as a command center with visibility into your team s location and movements Each team member that is backhaul...

Page 31: ...user s current location Click to locate Select this button to instantly locate the user group of users or map objects on the map Click to hide Select this button to hide this user group or map object from view Select it again to reveal on the map Change user colors Select the user s icon to change the color of their PLI marker You can also change the color of a group in the groups tab This will ch...

Page 32: ... goKit Relay Mode 30 32 33 37 37 38 39 40 41 46 48 APP USER GUIDE TABLE OF CONTENTS TO GET STARTED DOWNLOAD THE PRO APP tinyurl com y85be5sk tinyurl com y7rezlr9 This user guide will take you through using the goTenna Pro device with the native goTenna Pro app You can download the goTenna Pro App from the Google Play or Apple App store App User Guide 29 Version 2 0 05 2020 ...

Page 33: ...e Pro device should be paired at a time Power off all other Pro devices then tap Next STEP 3 Tap Next to allow access to your location and contacts Location access is essential in order to use PLI features STEP 5 Power on the goTenna Pro you intend to pair Once you see the LED light begin to flash on your device tap Next to pair 30 App User Guide Version 2 0 05 2020 ...

Page 34: ... Your call sign will be the name associated to your user that will be used for display STEP 8 Finally if you re a service user you ll get to select a Frequency Set Select your set then tap Tune Finish If you are not a service user you will skip this step and now have access to the goTenna Pro app INITIAL SETUP CONTINUED App User Guide 31 Version 2 0 05 2020 ...

Page 35: ...the contacts menu STEP 3 Select to import contacts STEP 4 Search for or select the contact you d like to import and select Import STEP 5 Ensure the country code phone number and contact name is correct then select save IMPORT CONTACTS 32 App User Guide Version 2 0 05 2020 ...

Page 36: ...ssage STEP 4 Type your message then tap the send icon STEP 5 Your message will be sent Message pending delivery display a gray icon Confirm is blue and an unconfirmed message will display red STEP 6 For Broadcast messages you can immediately craft and send your message Broadcasts are receive by all users within range and tuned to the same frequency BROADCAST CHAT GROUP CHAT 1 TO 1 CHAT App User Gu...

Page 37: ...ys Select Save STEP 4 You may choose to either share your key via broadcast chat or via QR code In order to send the key via broadcast chat please ensure your team is tuned into the same frequency set STEP 5 If sent via broadcast chat your team members will receive a push notification on their device indicating that they have received a new encryption key STEP 6 If QR code is selected a QR code wi...

Page 38: ...y that appears on your team leader s device STEP 7 If PIN is selected a PIN will appear on the screen to be read to all team members for input on their devices Select Done once all team members have validated the key STEP 8 To enable the key toggle Encrypt Broadcasts on and select the encryption key you d like to use BROADCAST CHAT GENERATE KEY CONT BROADCAST CHAT RECEIVE KEY App User Guide 35 Ver...

Page 39: ...e or plaintext PIN If QR code is selected you may scan the QR code STEP 6 If PIN is selected a PIN entry area will appear on the screen to be completed with the PIN your team leader provides STEP 7 Once your key is validated you will see a success screen Select Done to navigate the the encryption menu STEP 8 To enable the key toggle Encrypt Broadcasts on and select the encryption key you d like to...

Page 40: ...messages are sent unencrypted by anyone tuned to your frequency and within range STEP 1 Select Automatic Location Sharing from the main menu STEP 2 Select the interval at which you would like to share your location with your teammate STEP 3 Once you have chosen your interval select Start Automatic Location Sharing to save the setting App User Guide 37 Version 2 0 05 2020 ...

Page 41: ...the screen at your starting point and connect route points OBJECTS Use Map Objects to quickly drop square and circle areas Note If deployed through the portal objects will backhaul to the portal PIN Tap the Pin icon then tap the map to place and name the pin PERIMETER Tap the Perimeter icon to draw a perimeter 38 App User Guide Version 2 0 05 2020 ...

Page 42: ... your selection when goTenna users move in or out of the geofence you will be alerted STEP 1 Create a map object STEP 2 Press on map object and select geofence STEP 3 Select a geofence option App User Guide 39 Version 2 0 05 2020 ...

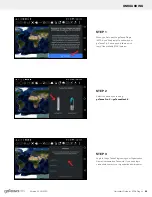
Page 43: ...ose a band to scan STEP 3 Review the activity on your active frequency set SPECTRUM ANALYZER STEP 1 Select Frequency Settings from the Side Menu then select Spectrum Analyzer 40 App User Guide Version 2 0 05 2020 ...

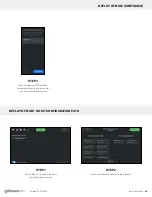
Page 44: ... the goKit wifi hotspot to get configuration or manually enter frequency sets STEP 3 Scan QR code from another user to obtain configuration DEPLOY OFFLINE STEP 4 Once the code is scanned tap next to complete tuning the goTenna Pro STEP 5 Review the Terms of use doc and select Agree to continue STEP 6 Pair to goTenna Pro device App User Guide 41 Version 2 0 05 2020 ...

Page 45: ...e number select desired frequency set to complete offline deployment STEP 1 Select Deploy from the main menu to enter deployment mode STEP 2 Select the frequency sets you d like to deploy DEPLOY OFFLINE GOKIT CONFIGURATION PATH 42 App User Guide Version 2 0 05 2020 ...

Page 46: ...Fi Hotspot is selected a menu is displayed containing the SSID and password along with the frequency sets mission packs and apps available for download STEP 4 Select whether you d like to apply Use Only permissions to your users This means that your users cannot share or edit the frequency sets once downloaded onto their device STEP 6 If QR code is selected a QR code will appear on the goKit scree...

Page 47: ...onnect to goKit Hotspot STEP 5 Once connected tap here to continue on pop up screen STEP 6 Review the terms of use doc and select Agree to continue STEP 7 Follow on screen instructions to pair to goTenna Pro and complete configuration DEPLOY OFFLINE GOKIT CONFIGURATION PATH CONTINUED 44 App User Guide Version 2 0 05 2020 ...

Page 48: ... from 142 00 MHz 175 00 MHz for VHF or 445 00MHz 480 00 MHz for UHF Minimum of 1 channel and a maximum of 3 STEP 4 Enter data channels Select the plus button and enter the frequency Note Valid frequency ranges from 142 00 MHz 175 00 MHz for VHF or 445 00MHz 480 00 MHz for UHF Minimum of 1 channel and a maximum of 13 When finished a notification will alert you that the frequency sets are saved DEPL...

Page 49: ...ing the SSID and password along with the frequency sets mission packs and apps available for download STEP 2 Select the frequency sets you d like to deploy STEP 4 Select whether you d like to apply Use Only permissions to your users This means that your users cannot share or edit the frequency sets once downloaded onto their device INSTALL APPS FROM GOKIT 46 App User Guide Version 2 0 05 2020 ...

Page 50: ...vice STEP 8 From the web browser navigate to any non cached website and the goKit will redirect you to the repository of apps locally stored on the goKit STEP 9 Select desired apps to vinitiate download INSTALL APPS FROM GOKIT CONTINUED App User Guide 47 Version 2 0 05 2020 ...

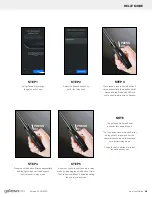
Page 51: ...t indicating the device is now in relay mode STEP 5 A user can check to see if a unit is in relay mode by pressing the on off button 1 time The Pro device will flash 3 times indicating the unit is in relay mode NOTE The goTenna Pro default boot behavior is to search to pair The Pro device can be turned off after being put into relay mode but the user will need to repeat these steps to re initiate ...

Page 52: ...istory Device Settings 9 Line CAS Point Dropper Drawing Tools Share Geofence Object Routes CASEVAC Supported ATAK Features goKit Onboarding Portal Login Onboarding Offline Mode Onboarding Home Page Mode Home Page Hotspot Settings Frequency Sets Create Frequency Set Editing Existing Frequency Set Delete Offline Frequency Set Mission Packs Mission Packs Download via Portal Mission Packs Download via...

Page 53: ...tour of the available ATAK features STEP 3 Login to the goTenna Plugin using your Organization Name Username and Password If you need login credentials contact your organization administrator STEP 2 Select the device you re using goTenna Pro X or goTenna Mesh X ONBOARDING 50 Version 2 0 05 2020 Quickstart Guide for ATAK Plug In ...

Page 54: ...available to you If you re missing frequency sets contact your goTenna Pro Admin user You re now able to explore ATAK STEP 5 You ll now pair your goTenna Pro X Follow the on screen instructions and tap NEXT When your goTenna Pro X is searching to pair tap PAIR Once you re paired you ll move to the next step ONBOARDING CONTINUED 51 Version 2 0 05 2020 Quickstart Guide for ATAK Plug In ...

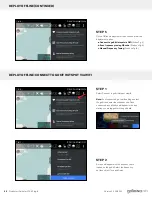
Page 55: ...n select Get Started STEP 3 Select device you want to pair to goTenna Pro X or goTenna Mesh X and follow instructions on screen to complete pairing process STEP 4 At the login screen below user credentials scroll down and select Setup next to deploying offline DEPLOY OFFLINE 52 Version 2 0 05 2020 Quickstart Guide for ATAK Plug In ...

Page 56: ...INE CONNECT TO GOKIT HOTSPOT VIA WIFI STEP 1 Select Connect to goKit Hotspot via wifi Note If not connected go to wifi settings select the goKit and enter the wifi passcode Once connected a notification will appear in the app stating you are logged into the goKit wifi STEP 2 A menu will appear with the frequency sets loaded on the goKit Select the frequency set then select Tune and Finish 53 Versi...

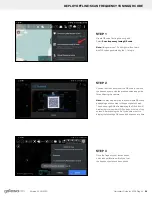
Page 57: ...uide for positioning the camera Note You may be prompted to scan multiple QR codes depending on the number of frequency sets shared The phone or goKit that is displaying the QR code will display the total number of QR codes on the top of the screen After scanning the first code select next to display the followings QR codes and scan one at a time STEP 3 Once the frequency set is scanned an on scre...

Page 58: ...uency ranges from 142 00 MHz 175 00 MHz for VHF or 445 00MHz 480 00 MHz for UHF Minimum of 1 channel and a maximum of 3 STEP 4 Enter data channels Select the plus button and enter the frequency Note Valid frequency ranges from 142 00 MHz 175 00 MHz for VHF or 445 00MHz 480 00 MHz for UHF Minimum of 1 channel and a maximum of 13 When finished a notification will alert you that the frequency sets ar...

Page 59: ...K Then select All Chat Rooms for broadcast or select a user for 1 to 1 messaging STEP 3 When your message is ready tap SEND STEP 2 Tap the text field to type your message You can also use the ATAK automessages 56 Version 2 0 05 2020 Quickstart Guide for ATAK Plug In ...

Page 60: ...ence at which you d like to share your location or you can opt to share your location based on distance traveled STEP 3 Tap Frequency a Select desired Auto update interval STEP 4 Note 5 and 15 second updates will affect network capacity and we recommend a max of 9 nodes in operation while operating with this setting 57 Version 2 0 05 2020 Quickstart Guide for ATAK Plug In ...

Page 61: ...Select Encryption Keys from the Main Menu STEP 3 Name the new encryption key STEP 2 Select an encryption key to share or create a new one To create a new key select Generate new Key 58 Version 2 0 05 2020 Quickstart Guide for ATAK Plug In ...

Page 62: ...their device indicating that they have received a new encryption key STEP 6 You may select to validate the keys via QR code or plaintext PIN If QR code is selected a QR code will appear on the the screen for all team members to scan STEP 5 If QR code is selected a QR code will appear on the screen for all team members to scan Select the arrow to move on to key validation CHAT ENCRYPTION GENERATE K...

Page 63: ...bers for input on their devices Select Done once all team members have validated the key STEP 8 To enable the key toggle Encrypt Broadcasts on and select the encryption key you d like to use CHAT ENCRYPTION GENERATE KEY CONTINUED 60 Version 2 0 05 2020 Quickstart Guide for ATAK Plug In ...

Page 64: ...n alerting you to validate the key To scan a new key from your team leader select Acquire key via QR code STEP 3 You may select to validate your key via QR code or plaintext PIN If QR code is selected you may scan the QR code STEP 2 Scan the key that appears on your team leader s device 61 Version 2 0 05 2020 Quickstart Guide for ATAK Plug In ...

Page 65: ...r provides STEP 6 To enable the key toggle Encrypt Broadcasts on and select the encryption key you d like to use STEP 5 Once your key is validated you will see a success screen Select Done to navigate the encryption menu CHAT ENCRYPTION RECEIVE KEY CONTINUED 62 Version 2 0 05 2020 Quickstart Guide for ATAK Plug In ...

Page 66: ... on the Spectrum Analyzer tool The peak level will show you where the most channel traffic lives Evaluating channel noise will allow you to update frequencies to ensure transmissions if need be STEP 2 Select which band you d like to scan for channel noise 63 Version 2 0 05 2020 Quickstart Guide for ATAK Plug In ...

Page 67: ...3 You can also fetch a new frequency set from the goKit The QR icon will allow you to scan a QR code with an associated frequency in order to tune other teammates in the field STEP 2 Select which frequency set you d like to tune your goTenna Pro device to 64 Version 2 0 05 2020 Quickstart Guide for ATAK Plug In ...

Page 68: ...trict this from being shared with other users STEP 4 Select the frequency sets to share and tap Generate Configuration to create the shareable QR code STEP 1 From the goTenna plugin menu select RF Settings STEP 2 Select the Menu in RF settings 65 Version 2 0 05 2020 Quickstart Guide for ATAK Plug In ...

Page 69: ...u select Diagnostic Logs STEP 2 Navigate Diagnostic Log menu a Clear Logs b Send Logs c Request Bluetooth Statistics This will add the bluetooth statistics to the log d Reset Bluetooth Statistics 66 Version 2 0 05 2020 Quickstart Guide for ATAK Plug In ...

Page 70: ...m the goTenna plugin menu select Location History STEP 2 This feature allows you to visualize successful PLI sharing STEP 3 Clear or Download to CSV from the Location History Menu 67 Version 2 0 05 2020 Quickstart Guide for ATAK Plug In ...

Page 71: ...E SETTINGS STEP 1 From the goTenna plugin menu select Device Settings STEP 2 Toggle the desired function a LED On Off b Listen Only Mode c Relay Mode 68 Version 2 0 05 2020 Quickstart Guide for ATAK Plug In ...

Page 72: ...like to add 9 Line detail you can edit the point You can name the target or point You can also share the point with your team by selecting Send STEP 2 Select which type of point to place In order to use CAS 9 Line select the red diamond This represents enemy points 69 Version 2 0 05 2020 Quickstart Guide for ATAK Plug In ...

Page 73: ...hape Use your finger to continue drawing the shape until it suits your needs STEP 2 Select the shape you d like to draw STEP 4 Now you can edit the shape Update its name and share the shape with your team by selecting Send 70 Version 2 0 05 2020 Quickstart Guide for ATAK Plug In ...

Page 74: ...ect the Radial object and tap the GeoFence icon STEP 3 Tap Send to share GeoFence object STEP 4 Select recipient and send STEP 1 From the ATAK drawing menu create Radial Object 71 Version 2 0 05 2020 Quickstart Guide for ATAK Plug In ...

Page 75: ...u ll also have an option to indicate that this path is for walking driving etc STEP 3 Edit the route in order to give it a distinct name Here you can also share the route with your team STEP 1 To share a call for casualty evacuation select the menu icon CASEVAC 72 Version 2 0 05 2020 Quickstart Guide for ATAK Plug In ...

Page 76: ... Supports direction method type order and up to 5 waypoints CASEVAC Title up to 25 character limit Lines 2 8 fully supported HLZ Terrain and Obstacles Line 9 supports up to 25 characters Remarks are supported up to 25 characters ADDITIONAL CORE ATAK FEATURES SUPPORTED BY GOTENNA PRO 9 Line CAS 1 weapon and timing can be transmitted Line 5 Custom description up to 25 characters Line 7 Marks of oppo...

Page 77: ...selection page as shown here Please select the WiFi network you want the goKit to be connected enter the password and tap on CONNECT On this screen enter your goKit user credentials from portal rather than regular user as in release 1 0 Note Please make sure to read section about new goKit user creation Page 23 if you have not done so already 74 Version 2 0 05 2020 Quickstart Guide for ATAK Plug I...

Page 78: ...l be disabled Home Page The home screen mostly includes general information about the goKit Deployment Mode SSID and network settings Above you can see the legend for the navigation bar for Home page mode HOME PAGE MODE OFFLINE MODE ONBOARDING Home Frequency Sets Mission Packs Apps Firmware 75 Version 2 0 05 2020 Quickstart Guide for ATAK Plug In ...

Page 79: ... HOTSPOT button to change these settings On the next screen input your SSID and PASSWORD for the Hotspot network Tap on UPDATE button to apply the input Once saved the new Deployment Mode SSID will be displayed on the home page 76 Version 2 0 05 2020 Quickstart Guide for ATAK Plug In ...

Page 80: ...be previewed by pressing magnification glass Users can save offline copy of the portal frequency by pressing the cloud button on the right side of the portal frequency set row If the selected frequency set is saved to goKit successfully confirmation dialog will be displayed as shown 77 Version 2 0 05 2020 Quickstart Guide for ATAK Plug In ...

Page 81: ...tap NEXT After this the user has to enter Control and Data channels and press SAVE button If the entered values are valid the goKit will create an offline Frequency Set The created Frequency Set will appear in the bottom section of the Frequency Setlist 78 Version 2 0 05 2020 Quickstart Guide for ATAK Plug In ...

Page 82: ...equency set row On this page you can see the existing Name Max Power and Bandwidth These can be modified By tapping NEXT you can get to the following screen On this page you can change Control and Data channels By tapping SAVE Frequency Set can be saved 79 Version 2 0 05 2020 Quickstart Guide for ATAK Plug In ...

Page 83: ...UENCY SET The offline Frequency Set can be deleted by clicking on trash bin icon Users will be prompted with dialog box that will ask user to confirm delete action 80 Version 2 0 05 2020 Quickstart Guide for ATAK Plug In ...

Page 84: ...se refer to section Edit GoKit Group to add mission pack to a group 3 If gokit user is not created then refer to section gokit User creation to create goKit user on the portal 4 Use goKit user credentials to login to portal from goKit Portal Login page 5 In goKit home page open Mission Packs page and mission packs from portal should be pulled Please follow the steps below to download mission packs...

Page 85: ...ard with mission packs to goKit s micro SD card slot 3 Go to Mission Packs page and tap on SCAN SD CARD FOR MISSION PACKS to load mission packs from SD card as shown left 4 Tap on Save icon to save a mission pack to gokit 5 Saved mission pack is added to mission packs list as shown left 82 Version 2 0 05 2020 Quickstart Guide for ATAK Plug In ...

Page 86: ...ION TO PORTAL To use applications on the goKit they needed to be uploaded to the portal Open the Apps page under goKit section of the Portal Once the goKit Apps page is open click on UPLOAD APP button On the next page the file can be uploaded 83 Version 2 0 05 2020 Quickstart Guide for ATAK Plug In ...

Page 87: ... Any devices connected to your goKit will appear here in a list Select Update to update the firmware of all devices in your goKit 3 Select a Firmware version then select to install the firmware selected This will apply the firmware update to all devices in your goKit 84 Version 2 0 05 2020 Quickstart Guide for ATAK Plug In ...

Page 88: ...s and other general support visit our knowledge base at support gotennapro com Legal Documentation For legal information terms and conditions and license agreements visit our legal page at gotenna com pages legal For additional support inquiries e mail prosupport gotenna com 85 Version 2 0 05 2020 Support ...

Page 89: ... that as between you and goTenna we and or our licensors own all right title and interest in and to the Product including where applicable to the Product the Embedded Software and all intellectual property related thereto Except for the limited license granted in this Section we do not grant you a license to our intellectual property whether express implied by estoppel or otherwise or grant you th...

Page 90: ...ip your returned Product to us via a trackable shipment method goTenna will evaluate your claim typically within 15 business days after receipt of the returned Product and determine whether the returned Product is covered by the Limited Warranty If goTenna determines that the returned Product is not covered by the Limited Warranty then goTenna will ship the returned Product back to you at its expe...

Page 91: ...luding any claims of property damages or personal injury We will provide notice to you of any such claim suit or proceeding and will assist you at your expense in defending any such claim suit or proceeding We reserve the right to assume the exclusive defense and control at your expense of any matter that is subject to indemnification under this section In such case you agree to cooper ate with an...

Page 92: ...05 29 20 prosupport gotenna com gotennapro com ...

Reviews: