background image

Software

HG 71451-A

English, Revision 03, Date: 07.02.2012

21

4.2.1

Programming of a Transponder Type HG 71325

By using 

 enter the desired transponder code hexadecimal or by using 

 decimal. 

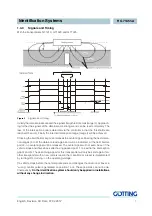
Hold the transponder to the reading device, according to the sketch in Figure 10
Press 

 for starting the programming process. Subsequently the new code will be 

displayed.

Figure 10

Sketch: Details on transponder programming

To achieve best possible results on transponder programming keep it approximately 
5 cm below the antenna. Make sure not to adjust it centrically below the antenna. Here 
the field has a blanking interval, within no programming is possible (see Figure 3 on 
page 7
).

Distance:

non-concentrical

(side doesn’t matter)

approx. 5 cm

Antenne

Transponder HG 71325

Summary of Contents for HG 71451-A

Page 1: ...n Antenna Profibus HG 71451 A English Revision 03 Dev by D F T N W M Date 07 02 2012 Author s RAD A F L S Götting KG Celler Str 5 D 31275 Lehrte Röddensen Germany Tel 49 0 51 36 80 96 0 Fax 49 0 51 36 80 96 80 eMail techdoc goetting de Internet www goetting de ...

Page 2: ...2 2 3 Turn on Characteristics 10 2 2 4 General Information 10 2 2 5 Profibus Interface 10 2 2 6 Profibus Address 13 2 2 7 RS 232 Interface 13 2 2 8 PosiPuls 14 3 Mounting and Setup 15 3 1 Testing a Transponder 15 3 2 Mounting Transponder 15 3 2 1 Mounting in very solid Ground e g concrete 15 3 2 2 Mounting in Tough Material e g tar 16 3 3 Reading Antenna 16 3 3 1 Mounting Drills 16 3 3 2 Connectio...

Page 3: ...n Antenna HG 71451 A 24 6 GSD File Antenna HG 71451 A with Profibus 25 7 List of Pictures 26 8 List of Tables 27 9 Index 28 10 Handbook Conventions 29 11 Copyright and Terms of Liability 30 11 1 Copyright 30 11 2 Exclusion of Liability 30 11 3 Trade Marks and Company Names 30 ...

Page 4: ... and at the manufacturing site 1 1 Application Examples for the Automation Automation can be realized within the following sectors Storage Position fixing of vehicles and containers Production lines Control of material flow Identification of containers Control of loading and unloading processes Positioning of vehicles in industrial engineering Distance control of track guided vehicles Position fix...

Page 5: ...gy available within the tran sponder it starts to attenuate the magnetic field cyclically with its encoder This atten uation is reflected to the antenna and generates an amplitude measurement AM of the transmitting component Inside the receiver the signal will be regained from the AM decoded and the data will be put out serially The transponders HG 71325 can be rediscribed by the magnetic field Re...

Page 6: ...less function of the system is guaranteed if the transponders and the reading antenna move towards each other with the distance specified by S and within the range defined by L and B provided that they are properly aligned The transponder line B will even be detected in case of an offset centre deviation Then the position ing impulse will be output with an offset Figure 2 Length and width of the i...

Page 7: ...sing the next detec tion ranges 5 to 8 the data are read again and will be indicated At the field border point 8 no center signal will be released The center signal will not even be set if the vehicle stops and drives back after having passed point 1 to 4 within the interception gap 4 and 5 The positioning signal for this transponder will only be send again if an other transponder with a new code ...

Page 8: ...stem Thus the system is able to transfer a message to the vehicle by selecting one of 4 codes to choose from Furthermore tran sponder version HG 71370 W is able to change the positioning mode The transponder code provides 16 Bit serially or parallel 2 2 Identifying Antenna HG 71451 A Profibus The antenna system is in a 53 x 31 x 156 5 mm casing polycarbonate The antenna is connected by 5 pole cabl...

Page 9: ... 232 5 GND Data and Supply Table 2 Pin alloc of the 5 pin circular connector ST1 pin HG 71451 A ST2 Pin Allocation 1 Bus 5 V 2 Bus A 3 RTS 4 Bus B 5 Bus GND Table 3 Pin alloc of the 5 pin circular connector ST2 socket HG 71451 A1 ST3 Pin Allocation 1 Bus 5 V 2 Bus A 3 RTS 4 Bus B 5 Bus GND Table 4 Pin alloc of the 5 pin circular connector S13 pin HG 71451 A ...

Page 10: ...c tion 4 2 on page 20 For this antenna the data as well as one status byte will be output via the profibus The programming of transponders can be implemented via the profi bus as well 2 2 5 Profibus Interface By means of the GSD files HG 7145A3 GSD section 6 on page 25 it is possible to project three different configurations LED Signification PWR Indicates operating voltage applied CD Shines stead...

Page 11: ...will be initiated by a rising edge of the CLR bit i e first the status byte should be transferred with a deleted CLR bit The current status will be indi cated in the status byte see Table 11 on page 12 Byte Length Type Sequence Signification 1 2 Byte unsigned int Lo Byte read transponder code 2 Hi Byte 3 1 Byte unsigned char Status according to Table 11 below Table 6 Structure of the 3 Profibus In...

Page 12: ...3 1 Byte unsigned char Instruction bit according to Table 12 below Table 10 Structure of the 3 Profibus Input Bytes Priority Name Significance Comment 0x01 Currently not allocated By means of status bit DATA and CD can be determined if a transponder is located below the antenna If both bits are set transponder data will be received at a sufficient level The bits are not set within the blank ing in...

Page 13: ...rectly and is available for the input bytes 2 2 6 Profibus Address 2 Hex rotary switches under 2 blind plugs are available for the adjustment of the pro fibus address q v Figure 4 on page 8 Set the address in area 0 to 7E with a screw driver and seal the plugs accordingly A readjusted address will only be accepted after the antenna has been turned off and on again 2 2 7 RS 232 Interface Here the t...

Page 14: ... a so called CSV file Those data files can be easiliy modified with calculation programms like Excel By entering the monitor programm is started 2 2 8 PosiPuls The postitiong impluse is triggered as soon as the middle is crossed His duration is 100 ms With triggering this impluse 24 V are switched to the corresponding output with a current limiting of 20mA NOTE Refer to chapter 1 4 3 Signals and T...

Page 15: ...ing Mounting Instructions for Transponder G 71325 have to be observed Keep a minimum distance of 500 mm between the transponders Keep a minimum distance to the metal parts see figure Figure 5 on page 16 The interference on positioning accuracy and range depends on the size and the range of the metal parts The minimum distance between conductors with a diameter smaller than 6 mm has to be 2 mm Whic...

Page 16: ...imately 1 cm The drill hole mouth should be wide enough so that the cover cannot press on the transponder Figure 5 Metal free area around the transponder HG 71325 3 3 Reading Antenna 3 3 1 Mounting Drills Figure 6 Mounting of the identifying antenna Position and size of the drilling To achieve a maximum range 50 mm of the reading distance it is recommendable to mount a 10 mm plastic plate or a 10 ...

Page 17: ...part of the scope of supply The needed kind of cables are commercially obtainable at many manufacturers e g Binder 79 3444 32 05 M12 line 2 m PUR 5 x 025 Accessory parts as an elbow jack with different cable lengths available standard 2 m If a high interference level is expected shielded wires ought to be used 3 4 Maintenance The system is largely maintenance free Generally maintenance is restrict...

Page 18: ...single reading antenna 7145x zip 7145xxxx ht However it is possible to apply any other terminal program provided that it implies ANSI emulation Should you use a different program please consider the documen tation enclosed to this program and adjust it to the values indicated in section 4 1 2 Please continue on Seite 19 then 4 1 1 Locate HyperTerminal Add it to the system First make sure that Hype...

Page 19: ...x96 ht at 9600 baud 7145x192 ht at 19200 baud and 7145x384 ht at 38400 baud If necessary adjust the COM Port accordingly If you are using a different port than COM1 with HyperTerminal then adjust the port as follows 1 Select properties from the menu file or click the icon The following window will open 2 Choose the respective port via the direct connection in Connect using in the submenu Confirm w...

Page 20: ...djustment of the serial parameters Additionally the profibus address set by the Hex rotary switch will be indicated 0 to 127 see section 2 2 6 on page 13 Below the code of the latest transponder received will be displayed in hex or decimal By input of or by switch off switch on of the antenna the monitor mode will be terminated HG71451 Monitor System 409kHz Profibus address 1 Current Transponder C...

Page 21: ... starting the programming process Subsequently the new code will be displayed Figure 10 Sketch Details on transponder programming To achieve best possible results on transponder programming keep it approximately 5 cm below the antenna Make sure not to adjust it centrically below the antenna Here the field has a blanking interval within no programming is possible see Figure 3 on page 7 Distance non...

Page 22: ... the loading version will be displayed After input of the old firmware will be deleted The screen will show an R if this process is finished Figure 12 Upload prompt for ASCII upload Transponder Reader G71450 Version 1 10 c Goetting KG 71450A11 10B 30 01 03 Modul Date X39300W5 300103 I39300W5 060103 S39300W5 060103 T39300W5 060103 H39300W5 060103 GETEDIT 061095 MONITOR 300103 PROGNAGEL 220802 DOWNL...

Page 23: ...e downloaded files are stored and choose the corresponding firmware file e g 71450A11 10H 3 Click on The file will be transferred The Upload will be indicated by a sequence of dots and a terminating O Subsequent ly call the main menu of the monitor programme by entering and check the new ver sion of the Firmware with By pressing any key you will get back to the main menu Should the programming be ...

Page 24: ...ght 50 mm Datafree area D see Figure 2 on page 6 25 to 30 mm at nominal reading height Field width B see Figure 2 on page 6 25 mm at nominal reading height Field width L see Figure 2 on page 6 Casing length at nominal reading height Crossing speed at nominal reading height ZA 409 kHz YA 125 kHz with function positioning accuracy 1 5 m s without function positioning accuracy 2 m s with function pos...

Page 25: ... Date 07 02 2012 25 6 GSD File Antenna HG 71451 A with Profibus You can download the latest version of the GSD files from our internet server http www goetting de en download As a search item you have to enter 71451 to down load only the GSD file for the antenna HG 71451 A ...

Page 26: ...51 A 8 Figure 5 Metal free area around the transponder HG 71325 16 Figure 6 Mounting of the identifying antenna Position and size of the drilling16 Figure 7 Nominal reading distance position of the antenna ferrite rod 17 Figure 8 Adding HyperTerminal to your system 18 Figure 9 Basic menu of the monitor program 20 Figure 10 Sketch Details on transponder programming 21 Figure 11 Output of firmware v...

Page 27: ... pin HG 71451 A 9 Table 5 Significance of the 5 LEDs HG 71451 A 10 Table 6 Structure of the 3 Profibus Input Bytes 11 Table 7 Structure of the 3 Profibus Input Bytes 11 Table 8 Structure of the Profibus Output bytes 11 Table 9 Structure of the 3 Profibus Input Bytes 12 Table 10 Structure of the 3 Profibus Input Bytes 12 Table 11 Significance of the status byte 12 Table 12 Significance of the instr...

Page 28: ... 8 71370 4 8 71451 8 24 25 I Identifying Antenna 8 technical data 24 induction loop 15 M maintenance 17 monitor program terminal settings 19 mounting drill holes 16 P Profibus 8 25 R range 15 reading antenna 16 registration gap 6 S system components 4 system configuration 5 T technical data 24 terminal program 18 trade marks 30 transmission areas 6 transponder programming 21 transponder spacing 15...

Page 29: ...document In addition each document has an index listed behind the front page including pages and whenever the document has more than 10 pages following the actual system description a figure and table index in the back In certain cases for long and or complicated documents a subject index is added Each document provides a table block with metainformation on the front page indicating the system des...

Page 30: ...are used according to the description This instruction manual has been drawn up to the best of our knowledge Installation setup and operation of the device will be on the customer s own risk Liability for con sequential defects is excluded We reserve the right for changes encouraging techni cal improvements We also reserve the right to change the contents of this manual without having to give noti...

Reviews: