background image

19

EN -

8.3  Electronic lock

This food processor has an electronic lock that is connected when the mixing bowl lid 

5

 or the deep steaming tray 

3

 are correctly installed. This is a safety function so the lid 

cannot be opened easily when the blade 

29

 is turning.

 - This lock is always activated when the appliance cooking program is in use.

 - After the appliance stops, the lock still remains activated for 1-2 seconds.

 - An audio signal sounds and the mixing bowl lid 

34

 or the deep steaming tray 

3

can be opened.

 - The higher the speed the longer the lock stays active, since the blade 

29

 and the 

food keep turning longer.
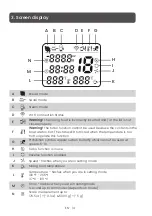
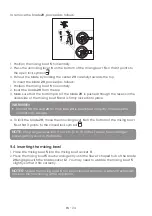
8.4 Screen

  The screen 

26

 shows all settings and operating values.

  After approximately 5 minutes without any user interaction, the illumination of the 

screen 

26

 goes into sleep mode. As soon as any button is pressed or a dial is turned, 

the illumination of the screen 

26

 is switched on again for 5 minutes.

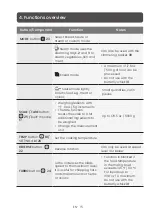
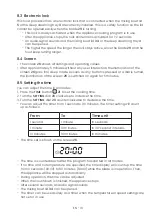
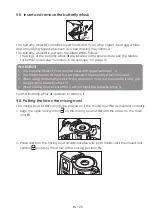
8.5  Setting the time

You can adjust the time in all modes.

1.  Press the 

TIME

 button 


21

 to set the cooking time.

2.  Turn the 

SETTING

 dial 

20

 clockwise to increase the time.

3.  Turn the 

SETTING

 dial 

20

 counterclockwise to decrease the time.

 - You can adjust the timer from 1 second to 90 minutes. The timer setting will count 

up as follows:

From

To

Time unit

1 second

1 minute

In seconds

1 minute

10 minutes

In 30-second intervals

10 minutes

90 minutes

In minutes


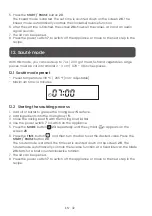
- The time set is shown on the screen 

26

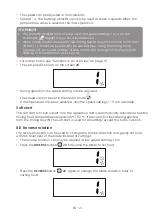
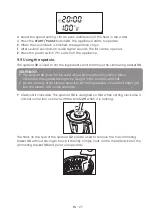
 - The time is counted down after the program has started in all modes.

 - If no time and no temperature are specified, the time display will count up the time


from 0 seconds (00:00) to 90 minutes (90:00) while the blade is in operation. Then, 

the appliance will be stopped automatically.

 - During operation, the time can be adjusted.

 - When the countdown is finished, the appliance stops.

 - After several seconds, an audio signal sounds.

 - The mixing bowl lid 

34

 can be opened. 

 - The timer can be used solely as a timer when the temperature or speed settings are 

not set or in use.

Summary of Contents for GM-CM-128W

Page 1: ...Item No GM CM 128W Model No SPM 128CSL Smart Cooking Machine Manual en español disponible en línea www mygourmate com Manuel en français disponible en ligne www mygourmate com ...

Page 2: ...product Appliance symbols The appliance is made from food safe materials that will not affect the taste or smell of food Warning The appliance may become extremely hot during operation Do not touch hot surfaces Warning The appliance may release hot steam during operation Intended purpose Your appliance is used to cook chop mix blend knead weigh boil steam grind sauté whisk emulsify These user inst...

Page 3: ...low 22 22 8 11 Starting and stopping the appliance 22 9 Using the mixing bowl 22 9 1 Remove the mixing bowl 23 9 2 Markings inside the mixing bowl 23 9 3 Using and removing the blade 23 9 4 Inserting the mixing bowl Insert and remove the butterfly whisk 24 9 5 25 9 6 Putting the lid on the mixing bowl 25 9 7 Using the measuring cup 26 9 8 Cooking and steaming with the simmering basket 26 9 9 Using...

Page 4: ...ing the main unit 33 13 2 Cleaning in the dishwasher 33 13 3 Cleaning the accessories 34 13 4 Cleaning checking and replacing seals 34 13 5 Cleaning checking and replacing the spatula 35 13 6 Descaling 35 13 7 Storage 36 13 8 Replacing the blade socket 36 14 Troubleshooting 37 14 1 Malfunctions during operation 37 14 2 Error messages on the screen 39 15 Disposal Technical specifications 40 16 40 ...

Page 5: ...zardous situation which if not avoided could result in death or serious injury NOTE Used to address best practices to avoid damage to your appliance its accessories and potential injury 1 3 Hazards and Safety Instructions Risk of Electric Shock If water penetrates the electrical components you could receive an electric shock Clean the main unit only with a dry or damp cloth Do not pour water over ...

Page 6: ...er cord and accessories for potential damage Ensure that the power cord does not touch hot surfaces external heat sources or sharp objects Do not allow the power cord to be damaged by sharp objects such as knives scissors or the blade Do not use the main unit if it is dropped or damaged in any manner If the power cord on the main unit has been damaged it must be replaced by the manufacturer or an ...

Page 7: ...o not touch the controls Scalding Risk Hot liquid or hot food may splash and cause scalding if it contacts the users skin or clothing Do not fill the mixing bowl above the maximum fill line 2 3 QT 2 2 L Ensure that the hole in the mixing bowl lid remains free of food Use only the included original accessories according to the accompanying user manual instructions measuring cup simmering basket ste...

Page 8: ...ior to usage Follow the instructions on the display Scalding Risk If the mixing bowl lid is not correctly positioned on the mixing bowl hot contents can escape and lead to scalding Never try to open the mixing bowl lid or the locking mechanism using force Only open the lid when the cooking process is paused or completed Inspect the steamer seal regularly for possible damage In case of damage or le...

Page 9: ...ll over and cause injury Place the main unit on a clean solid and flat horizontal surface Ensure that there is sufficient distance between the appliance and the edge of the work surface Never leave the appliance unattended while it is running Injury Risk If accessories get caught in the blade when the appliance is running small splinters and sharp edges could cause injury If any accessories are da...

Page 10: ...e of the manufacturing process residues of oil or other contaminants may be on the components of the appliance Those contaminants are not suitable for consumption and pose a health risk Thoroughly wash all components and accessories that could come into contact with food with warm water and dish soap before using the appliance for the first time Make sure to thoroughly dry all washed components an...

Page 11: ...mixing bowl to dry completely before inserting it into the base unit Damage Risk If the blade is not correctly inserted and locked into place or the sealing ring is damaged moisture can penetrate the appliance and damage the main unit Ensure that the blade seal of the blade is fitted to the blade bearing Ensure that the sealing ring on the blade shows no signs of damage Ensure that the blade is co...

Page 12: ...SE g oz 1 27 26 25 24 23 22 21 20 19 18 17 16 15 14 13 12 11 2 3 4 5 7 8 9 10 6 35 34 33 32 31 30 29 28 REVERSE MODE TURBO TARE SCALE SPEED TIME TEMP START PAUSE g oz 1 27 26 25 24 23 22 21 20 19 18 17 16 15 14 13 12 11 2 3 4 5 7 8 9 10 6 35 34 33 32 31 30 29 28 ...

Page 13: ...ocket 12 Blade socket 13 Rubber feet 14 Overflow hole 15 Main unit 16 Locking position 17 Built in scale 18 TEMP button 19 SPEED button 20 START PAUSE START PAUSE button and SETTING dial 21 TIME button 22 REVERSE button 23 MODE button 24 TURBO button 25 SCALE TARE button 26 Screen 27 Status LED 28 Blade seal 29 Blade 30 Simmering basket 31 Butterfly whisk 32 Spatula 33 Lid seal 34 Mixing bowl lid ...

Page 14: ...The status LED turns red when the temperature is too hot to operate this function G Prohibition symbol appears when butterfly whisk cannot be used at speeds 5 10 H Turbo function is in use I Reverse function enabled J Speed flashes when you are in setting mode K Mixing bowl temperature L Temperature flashes when you are in setting mode 100 F 265 F 37 C 130 C M Timer flashes when you are in setting...

Page 15: ...E button 25 Built in scale 17 Weigh ingredients with 0 1oz 5g increments The tare function resets the scale to 0 for additional ingredients to be weighed Change the measurement unit Up to 176 5 oz 5000 g TEMP button 18 SETTING dial 20 Set the cooking temperature REVERSE button 22 Reverse rotation Can only be used at speed level 3 or below TURBO button 24 Turbo increases the blade speed to the maxi...

Page 16: ...om 1 to 4 Must not be used with the turbo function Simmering basket 30 To cook and stew Fill the mixing bowl with at least 16 8 oz 500 ml of water 5 Items supplied 1 Cooking Machine main unit 15 1 mixing bowl 5 with blade 29 mixing bowl lid 34 measuring cup 35 1 simmering basket 30 1 spatula 32 1 steamer comprising deep steaming tray 3 shallow steaming tray 2 steamer lid 1 1 copy of the user instr...

Page 17: ...re place the appliance on a waterproof surface 7 Built in scale The installed kitchen scale allows accurate weighing with 0 1 oz or 5 g increments and weighs up to 176 5 oz 5000 g The scale 17 is easy to operate and ready for use unless another mode is in operation Easy weighing NOTE the bowl needs to be properly installed in the main unit The lid doesn t need to be locked in for the weighing func...

Page 18: ...the weighing function NOTE If the weight exceeds 176 5 oz 5000 g appears on the screen Changing the measurement unit In the custom mode press and hold the SCALE TARE button 25 to change the measurement unit from grams to ounces or vice versa 8 Operating the appliance For safety reasons the settings described in this chapter can only be selected when the mixing bowl is properly installed in the mai...

Page 19: ...s switched on again for 5 minutes 8 5 Setting the time You can adjust the time in all modes 1 Press the TIME button 21 to set the cooking time 2 Turn the SETTING dial 20 clockwise to increase the time 3 Turn the SETTING dial 20 counterclockwise to decrease the time You can adjust the timer from 1 second to 90 minutes The timer setting will count up as follows From To Time unit 1 second 1 minute In...

Page 20: ...90 195 205 212 220 230 240 250 255 265 F The set temperature is shown on the screen 26 To start the heating process a speed and time setting must be entered During the heating process the mixing bowl temperature may vary substantially The set temperature appears on the bottom left of the screen while the current temperature appears on the bottom right of the screen During operation the set tempera...

Page 21: ...s shown on the screen26 During operation the speed setting can be adjusted The speed cannot be set in the Steam mode If a temperature has been selected only the speed settings 1 3 are available Soft start The soft start function is built in to the appliance and is automatically activated when the mixing bowl temperature exceeds 145 F 60 C It prevents hot liquid being ejected from the mixing bowl 5...

Page 22: ... an alert will sound Press and hold theTURBO button 24 for as long as you need the turbo function In the bottom of the main unit 15 there is an overflow hole 14 Should liquid spill out of the mixing bowl 5 it can escape via the overflow hole 14 onto the kitchen countertop 8 11 Starting and stopping the appliance When you selected your settings press the START PAUSE button 20 to turn on the applian...

Page 23: ...8 oz 1 L otherwise liquid may be ejected For speed settings of less than 10 the mixing bowl 5 may be filled up to a maximum of 2 2 L or 2 3 QT NOTE For some modes the mixing bowl 5 should contain a sufficient amount of liquid so that the appliance can function properly For whipping cream you should use at least 6 7 oz 200 ml and when beating egg whites use at least two eggs 9 3 Using and removing ...

Page 24: ... Ensure that the seal 28 for the blade 29 is positioned correctly otherwise the content may escape 4 To lock the blade 29 move the unlocking lever 6 on the bottom of the mixing bowl 5 so that it points to the closed lock symbol NOTE Chop large pieces into 3 to 4 cm 1 1 to 1 5 inches cubes to avoid larger pieces getting stuck in the blades 9 4 Inserting the mixing bowl 1 Place the mixing bowl 5 int...

Page 25: ...he TURBO button 24 must not be pressed if the butterfly whisk 31 is used When using the butterfly whisk 31 the spatula 32 must not be used as it may get caught in the butterfly whisk 31 When adding food ensure that it will not block the butterfly whisk 31 Pull the butterfly whisk 31 upwards to remove it 9 6 Putting the lid on the mixing bowl The mixing bowl lid 34 can only be placed on if the mixi...

Page 26: ...in place WARNING Prior to removing the measuring cup 35 you must reduce the speed setting 1 2 or 3 so that no food can spill out To add ingredients the measuring cup 35 can be removed briefly To measure ingredients turn the measuring cup 35 upside down and add the food The values can be read in ml or oz from the outside 9 8 Cooking and steaming with the simmering basket 1 Fill at least 16 8 oz 500...

Page 27: ...asket 30 WARNING The spatula 32 must not be used when the butterfly whisk 31 is in place Otherwise the spatula 32 might be caught in the butterfly whisk 31 Do not use any other kitchen utensil to stir the ingredients The utensil might get into the blades and cause damage Always stir clockwise The spatula 32 is designed so that when stirring clockwise it cannot come into contact with the blade 29 w...

Page 28: ...ress the START PAUSE button 20 If the mixing bowl 5 temperaturereaches 205 F 95 C it will automatically activate and start the steamer countdown 10 2 Setting up the steamer 1 Place the mixing bowl 5 onto the main unit 15 2 Fill 33 8 oz 1 L of water into the mixing bowl 5 This corresponds with the second marking from the bottom I I 3 Check that the seal 4 of the deep steaming tray 3 has been instal...

Page 29: ...he filled shallow steaming tray 2 on deep steaming tray 3 8 Close the steamer with the lid 1 10 3 Starting the steaming process 1 Use the power switch 7 to switch on the appliance 2 Press the MODE button 23 repeatedly until the symbol appears on the screen26 3 Press the START PAUSE button 20 to begin pre heating the appliance During this time There is no countdown of the time on the screen 26 PrE ...

Page 30: ...hen opening the lid 1 during operation hot steam may escape To check the condition of the food to be cooked from time to time proceed as follows 1 Carefully open the steamer lid 1 to let the steam escape 2 Remove the lid 1 completely 3 Check the food condition with a knife or fork When the food is cooked press the START PAUSEbutton 20 and then the power switch 7 to turn off the appliance or press ...

Page 31: ...sed without the deep steaming tray 3 10 8 One pot recipes If you prepare a whole menu and are using both steaming strays please make sure that Meat and fish are in the deep steaming tray 3 so that dripping juice will not come into contact with other food Denser food generally takes the longest to cook and should be placed in the deep steaming tray 3 11 Knead mode The appliance can be used to proce...

Page 32: ...130 C 265 F non adjustable Maximum time 14 minutes 12 2 Starting the sautéing process 1 Add oil or butter to grease the mixing bowl 5 surface 2 Add ingredients into the mixing bowl 5 3 Close the mixing bowl 5 with the mixing bowl lid 34 4 Use the power switch 7 to switch on the appliance 5 Press the MODE button 23 repeatedly until the symbol appears on the screen 26 6 Press the TIME button and the...

Page 33: ...oid injuries caused by the very sharp blades WARNING Never use any abrasive corrosive or scratching cleaning agents These might damage the appliance 13 1 Cleaning the main unit 1 Clean the outside of the main unit 15 with a damp cloth You can also use soft detergent 2 Use clear water and wipe with a clean cloth 3 Do not use the main unit 15 until it is completely dry again 13 2 Cleaning in the dis...

Page 34: ...nce again reinsert the blade 29 13 4 Cleaning checking and replacing seals Remove seals 28 33 and 4 for cleaning and check them for damage Pay attention to changes e g porous material or tears The removed seals 28 33 and 4 can be cleaned in the dishwasher Damaged seals 28 33 and 4 must be replaced with new ones WARNING Prior to the next use damaged seals 28 33 and 4 must be inserted again or repla...

Page 35: ...the parts used especially in the mixing bowl 5 Normal cleaning In most cases the limescale deposits can be removed by cleaning in the dishwasher or by hand Slight limescale deposits 1 Remove slight limescale deposits which cannot be removed with normal cleaning by hand or in the dishwasher with a cloth on which you put some household vinegar 2 Rinse with clear water Major limescale deposits WARNIN...

Page 36: ...e so worn out that the blade 29 no longer turns correctly If this happens replace the blade socket 12 with a new one Comply the specified maximum quantities in future Removing the old blade socket 1 Press your thumb down on the silicone cover 9 and simultaneously reach under the rim of the old blade socket 12 Pull the old blade socket 12 out upwards You may need to wobble it a bit before the blade...

Page 37: ...Appliance does not start Mixing bowl 5 is not positioned correctly Insert mixing bowl 5 correctly see Inserting mixing bowl on page 24 The mixing bowl lid 34 or deep steaming tray 3 have not been placed correctly onto the mixing bowl 5 Place the mixing bowl lid 34 or deep steaming tray 3 correctly No power supply Check the main plug 8 the power switch 7 and possibly the fuse Blade 29 not turning T...

Page 38: ...g bowl 5 Seal 33 has not been inserted correctly Insert seal 33 correctly see Cleaning checking and replacing seals on page 34 Seal 33 is defective Insert new seal 33 see Cleaning checking and replacing seals on page 34 No temperature can be set User is not in a custom mode and is using a preset mode Press the MODE button 23 until the appliance returns to custom mode Parts of the appliance are dis...

Page 39: ...ss up to max 16 7 oz 500 g of flour Let the appliance cool down completely for at least 10 minutes before next use Afterwards it is ready for use again The mixing bowl lid 34 or deep steaming tray 3 have not been placed correctly onto the mixing bowl 5 Close the mixing bowl lid 34 correctly see Put the lid on the mixing bowl on page 25 Or close steaming tray 3 correctly see Preparation of the stea...

Page 40: ...iances This recycling symbol marks e g an object or parts of the material as valuable for recycling Recycling helps to reduce the consumption of raw materials and protect the environment Packaging When disposing of the packaging make sure you comply with the environmental regulations applicable in your country 16 Technical specifications Model GM CM 128W SPM 128CSL Mains voltage 220V 240V or 120V ...

Page 41: ...this warranty Repair service adjustment and calibration due to misuse abuse or negligence are not covered by this warranty Unauthorized service or modification to this product or of any f urnished components will void this warranty in its entirety This warranty does not include reimbursement for inconvenience installation set up time loss of use postage unauthorized service or other products used i...

Reviews: