36
EN -
NOTE:
more extended reaction periods do not improve the limescale deposits but
may damage the parts permanently.
4. Rinse with clear water.
5. Allow the parts to dry completely before using them again.
13.7 Storage
•
Store the appliance protected against dust and dirt and out of the reach of children.
13.8 Replacing the blade socket
If you process larger quantities than those specified in these instructions (e.g. dough
with more than 17.6 oz / 500 g of flour), the blade socket
12
can become so worn out
that the blade
29
no longer turns correctly.
If this happens, replace the blade socket
12
with a new one. Comply the specified
maximum quantities in future.
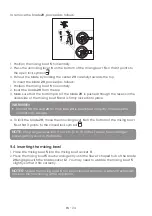
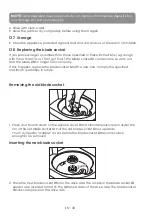
Removing the old blade socket
1. Press your thumb down on the silicone cover
9
and simultaneously reach under the
rim of the old blade socket
12
. Pull the old blade socket
12
out upwards.
You may need to “wobble” it a bit before the blade socket
12
becomes loose
enough to be removed.
Inserting the new blade socket
2. Place the new blade socket
10
onto the drive axle. The recess in the blade socket
10
needs to be inserted to match the flattened sides of the drive axle. The blade socket
10
clicks into place on the drive axle.

