These instructions and the images herein are proprietary. Any unauthorized reproduction is prohibited.
EURO-HITCH
2” Receiver Hitch [93-03 Eurovan]
Page 1 of 2
GoWesty Camper Products
•
1119 Los Olivos Ave, Los Osos, CA 93402
•
888-469-3789
•
www.gowesty.com
1)
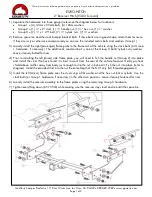
Separate the hardware into three groups (reference the diagram below for locations):
•
Group 1 = (4) 12mm x 35mm bolts, (4) 12mm washers.
•
Group 2 = (1) ½” x 2” stud, (1) ½” handle nut, (1) ½” hex nut, (1) ½” washer.
•
Group 3 = (7) ½” x 1.25” bolt, (7) ½” nylock nuts, (7) ½” washers.
2)
Remove spare tire and the stock bumper bracket bolts. If these bolts are in good shape, retain them for reuse.
If they are rusty or otherwise compromised you can use the included metric bolts and washers (Group 1).
3)
Loosely install the right (passenger) frame plate to the frame rail of the vehicle using the stock bolts (or Group
1 hardware, if necessary). The additional, rear-most bolt is one of the Group 3 bolts/nylock nuts/washers.
Leave it loosely bolted for now.
4)
Prior to installing the left (driver) side frame plate, you will need to fish the handle nut (Group 2) into place
and install the stud. We have found it is best to work from the rear of the vehicle forward. Gently pry heat
shield above muffler away from body just enough to slip the nut in behind it. Fish the nut into place (refer to
diagram). Install the provided stud into the nut the entire depth of the NUT only (full thread engagement).
5)
Install the left (driver) frame plate over the stud using a flat washer and the hex nut (not a nylock). Use the
stock bolts (or Group 1 hardware, if necessary) in the other two positions. Leave it loosely fastened for now.
6)
Loosely install the receiver assembly to the frame plates using the remaining Group 3 hardware.
7)
Tighten everything down (65-75 ft-lb) while making sure the receiver stays level and reinstall the spare tire.


