background image

Slimline High Definition Digital Advertising Display User’s Manual                                    

Page 30 


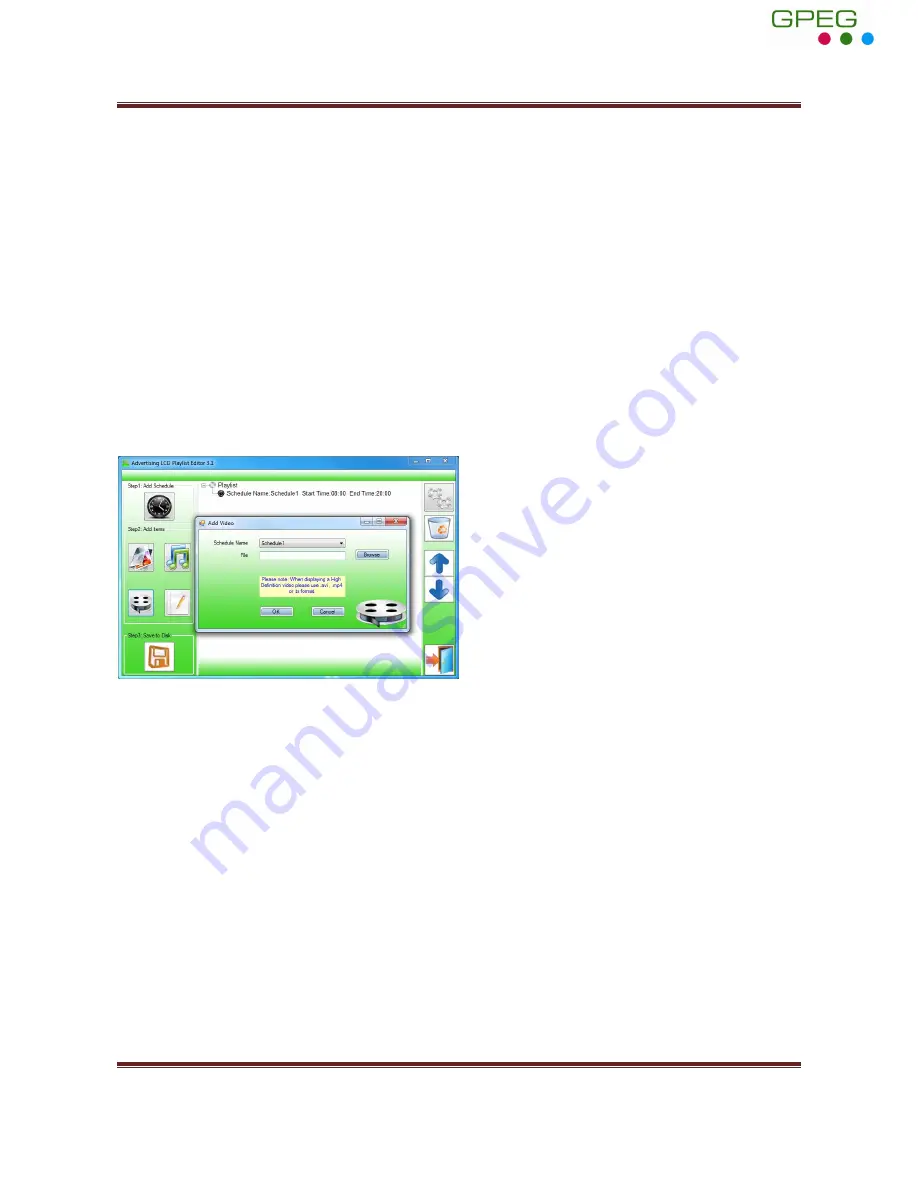
Adding Video 
 

Note: Before adding video files please ensure that it has a file name of 11 characters or less and 
contain no special characters (!”£$%^&* etc.).


Click the “Add Video” button 
> Select Schedule   
> Click “Browse” and locate Video file   
> Enter preferred repeat   
> Enter preferred volume   
> Click “OK”   
> Video appears in playlist.   
 
Note: You cannot add Videos and MP3 audio files in the same schedule. 


Adding Scrolling Text 

 
Note: you must ensure that the scrolling text function is activated on your display, you can do this 
by accessing the System Settings of the Main Menu (see 1.5.1 System Settings) 
 
Click the “Add Scroll Message” button 
>Enter the message you would like to run across the bottom of the screen 
Or if you have a pre-existing .txt document containing your message: 
>Highlight the “Import from file” checkbox and click “Browse” 
>Locate .txt file and highlight 
>Click “OK” 
>Message appears at the bottom of the playlist. 


GPEG International Ltd, 

Gunnery Terrace, Royal Arsenal, Woolwich, London SE18 S6W 

www.gpegint.com

      Tel: 0870 493 1433    

sales@gpegint.com

Summary of Contents for Slimline High Definition Digital Advertising Display

Page 1: ...igh Definition Digital Advertising Display User s Manual Manual Version PFHD2 0 GPEG International Ltd Gunnery Terrace Royal Arsenal Woolwich London SE18 S6W www gpegint com Tel 0870 493 1433 sales gp...

Page 2: ...Definition Digital Advertising Display User s Manual Page 1 Our Full Product Range GPEG International Ltd Gunnery Terrace Royal Arsenal Woolwich London SE18 S6W www gpegint com Tel 0870 493 1433 sale...

Page 3: ...re you use the display Shut off the power supply before cleaning Use a soft lint free cloth instead of a tissue to wipe the screen You may use a glass cleaner to clean the product as required However...

Page 4: ...re they are supported by the unit see Section 2 1 4 On a PC copy the files you want to play onto an empty USB drive These should be in the root directory without putting them into a folder Remove USB...

Page 5: ...l ID 17 1 5 6 Screen Mode 17 1 5 7 File Management 18 1 5 8 Exit 19 1 6 Display Settings 20 2 System Operation 23 2 1 Supported Media Files 23 2 2 Steps to Load Media Files 24 2 3 Inputs 24 3 Installa...

Page 6: ...cting screen to PC 38 5 6 My media file does not fit properly on the screen 38 5 7 My media file will not display or is missing from the playlist 39 5 8 My media files will not update 39 5 9 My moving...

Page 7: ...enience a number of operations can be performed through the remote control Attention 1 Do not change any default setting when it is unnecessary 2 Keep the product far away from water during installati...

Page 8: ...gh Definition Digital Advertising Display User s Manual Page 7 1 3Remote Control GPEG International Ltd Gunnery Terrace Royal Arsenal Woolwich London SE18 S6W www gpegint com Tel 0870 493 1433 sales g...

Page 9: ...1 Slide the battery cover off as shown below 2 Remove the used batteries 4 Insert the two new AAA batteries with their terminals corresponding to the indicators 5 Put the cover back on GPEG Internatio...

Page 10: ...ng up the Main Menu by pressing SETUP Figure 3 Home Screen Main Menu includes following sub menus System Settings Playback Control Date Time ON OFF Timer Local ID Screen Mode File Management and Exit...

Page 11: ...l menu operation press to select the right item press PLAY to confirm selection Clock Display There are 5 options as pictured below Top Left The time will be displayed on top left of the screen Bottom...

Page 12: ...ff The screen doesn t display scrolling text On The screen will display scrolling text from the txt file in the playlist if there is no playlist or txt file the screen doesn t display scrolling text G...

Page 13: ...en must be turned off and back on by the mains or reset button pressed once media has loaded and media cannot be loaded on home screen Restore To Factory Settings Highlight Yes and press PLAY to resto...

Page 14: ...are 3 options as pictured below Free The user copies the media files into USB stick and the screen will read it Encrypted N A function please DO NOT select None Encrypted N A function please DO NOT se...

Page 15: ...ual Page 14 Play Time This is used to set the display time for image files under the Free Playback Mode without using a playlist file GPEG International Ltd Gunnery Terrace Royal Arsenal Woolwich Lond...

Page 16: ...hich value you wish to modify Now you can change the setting by pressing Finally highlight Update Date Time and pres PLAY The date and time have been updated you can now select Return to the Main Menu...

Page 17: ...Mode then the three Timer items become selectable Choose the Status of Timer 1 to be ON then make the On Time to be 06 00 Off Time to be 11 00 3 Choose Save New Settings to finish the setting Then hi...

Page 18: ...screen Please ensure that the ID is set to 000000 as pictured below once set highlight and select Save and then Return to Main Menu 1 5 6 Screen Mode You can change the orientation of the Home Screen...

Page 19: ...ts back to the Home Screen your OSD should be in the correct orientation 1 5 7 File Management Here you can check storage information such as memory capacity used space and free space You can also for...

Page 20: ...sing Display User s Manual Page 19 1 5 8 Exit Highlighting and selecting this section will exit the main menu GPEG International Ltd Gunnery Terrace Royal Arsenal Woolwich London SE18 S6W www gpegint...

Page 21: ...lect which video signal the screen displays As a default it is set to Digital Signage as this plays from the internal media player You can also select HDMI and VGA to do so navigate to your desired in...

Page 22: ...e and use the left and right navigation buttons to adjust the value accordingly You can also alter the colour balance of your screen by highlighting ColourTemp selecting User and then adjusting Red Gr...

Page 23: ...t To exit from this Display Settings menu navigate to Exit and press PLAY If inactive for more than 10 seconds you will automatically exit this menu GPEG International Ltd Gunnery Terrace Royal Arsena...

Page 24: ...PG AVI MOV MP4 TS Audio MP3 WMA 1 This unit does NOT support WMV or FLV video file types 2 This unit does NOT support Sony ATRAC3 DTS or Dobly HD audio file types Note Video and image files should be...

Page 25: ...the USB drive 6 The unit will now restart if it doesn t please turn off and back on via the mains or press the reset button and play the stored files in a loop 2 3Inputs Reset Button Restarts power to...

Page 26: ...ounting plate Figure 5 Mark out the mounting plate 3 Mark out the plates hole positions on the wall for drilling you can drill your own holes in the mounting plate if required Figure 6 Drill holes 4 O...

Page 27: ...lay on the bracket and connect to the mains 6 For an extra security measure open the Lockable Input Compartment and secure the display to the wall bracket using the security screw provided Figure 8 Se...

Page 28: ...existing 4 1Main Menu On opening the application you will be greeted by the main menu screen giving you the options of Create New Playlist and Load Existing Playlist 4 2Creating Playlists Once you ha...

Page 29: ...d end time Click OK Schedule will appear in the playlist To add more schedules simply follow the whole process again for the preferred number of schedules ensuring you select unique schedule names and...

Page 30: ...arrow buttons on the right hand side Adding Audio Note Before adding audio files please ensure that it has a file name of 11 characters or less and contain no special characters etc Click the Add MP3...

Page 31: ...e Adding Scrolling Text Note you must ensure that the scrolling text function is activated on your display you can do this by accessing the System Settings of the Main Menu see 1 5 1 System Settings C...

Page 32: ...aving please ensure location drive is empty Click Save to Disk Click Browse and select the top level of the USB drive as the location of the playlist and files Click Save GPEG International Ltd Gunner...

Page 33: ...Edit button located on the top right hand side of the application Note You can also add items to the playlist and add further schedules 4 3 1 Deleting Items To delete items within a playlist select th...

Page 34: ...the screen as your media is playing if it is not you have not turned this function on If your media is playing begin by pressing STOP on your remote control to return to the Home Screen Now press SET...

Page 35: ...ge will appear asking if you would like to save all slides as JPEG s 7 Once you have selected your option The JPEG images will be saved and are ready to use within a playlist or to upload to a storage...

Page 36: ...possible tools for converting video 5 4 1 Format Factory This is a free multipurpose convertor that can be used for normal definition Standard Definition 1 Download a free convertor Windows called Fo...

Page 37: ...nd modify it to look like the image shown below A number of important settings have been highlighted 7 Select OK to save these changes and then Press OK button to goto main screen GPEG International L...

Page 38: ...om hd video converter deluxe This software is not free MP4 gives the best display quality Please follow the following steps 1 Select to HD MP4 tab 2 Change audio quality to 448 kbps and change video q...

Page 39: ...screen as well this can be achieved by using a male to male 3 5mm audio jack cable To change the input source of your screen press the SOURCE button located on the top right hand corner of your remot...

Page 40: ...ise unsupported file types 5 8My media files will not update If you are have problems updating your display follow these steps to ensure it is not a technical issue 1 Ensure that there are no addition...

Page 41: ...future first press STOP to return to the home screen Next press SETUP to bring up the Main Menu Access the System Settings and navigate to USB Port Change this to ON and return to main menu This shoul...

Reviews: