background image

PC

AUDIO

USB 

DRIVE

AC IN

R

L

A

UDIO IN 1

VIDEO 1

Pr

Pb

Y

VIDEO INPUT 1

TV ANTENNA

R

L

A

UDIO IN 2

Pr

Pb

Y

VIDEO INPUT 2

VIDEO 2

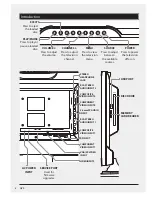
Introduction

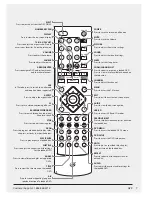
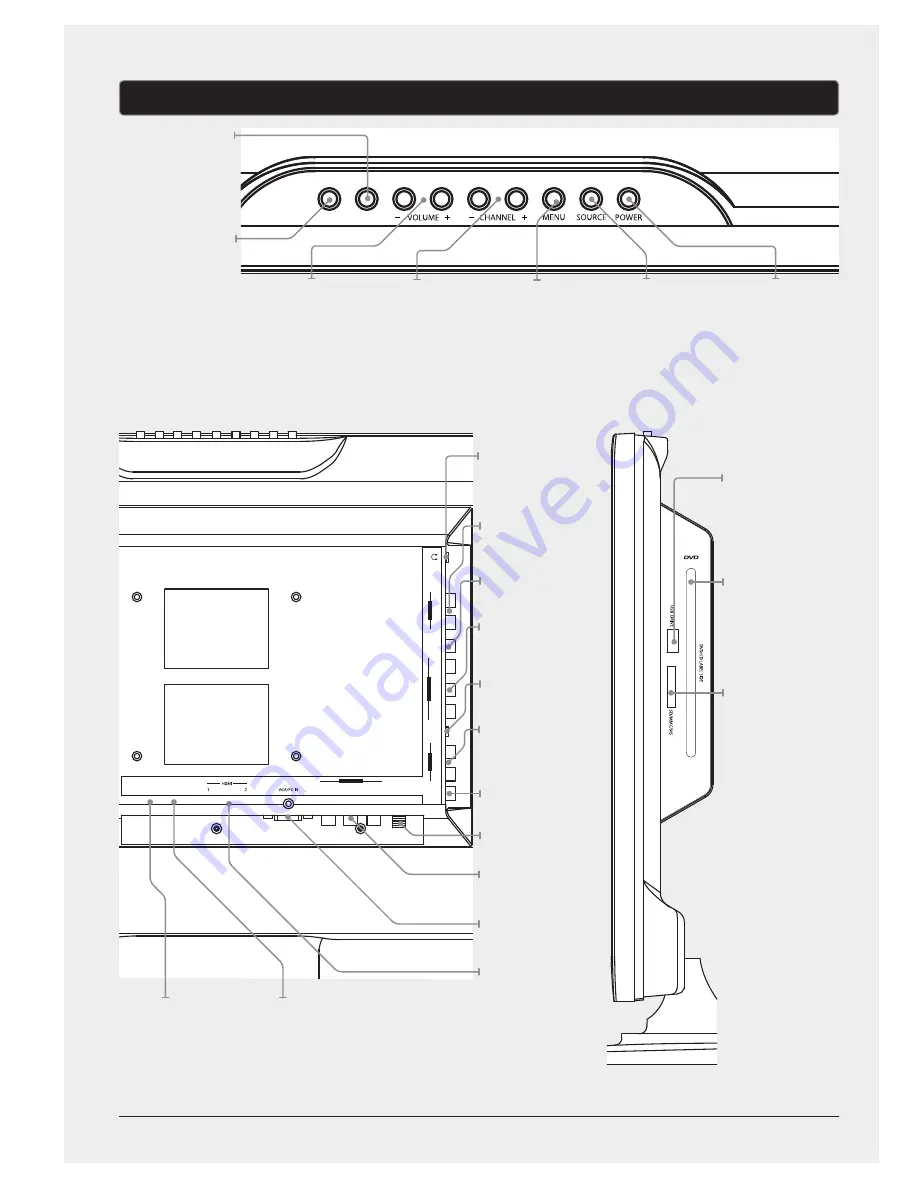
PLAY/PAUSE EJECT

VOLUME ±

Press to adjust 

the volume.

SERVICE PORT

Used for 

firmware 

upgrades.

AC POWER 

INPUT

EJECT

Press to eject 

the loaded 

disc.

PLAY/PAUSE

Press to play or 

pause a loaded 

disc.

USB PORT

DISC DRIVE

MEMORY 

CARD READER

STEREO 

HEADPHONE 

JACK

RCA STEREO 

AUDIO INPUT  2

COMPOSITE 

VIDEO INPUT 2

COMPONENT 

VIDEO INPUT 2

3.5mm PC AUDIO 

INPUT

RCA STEREO 

AUDIO INPUT 1

COMPOSITE 

VIDEO INPUT 1

RF INPUT

COMPONENT 

VIDEO INPUT 1

VGA/PC VIDEO 

INPUT

HDMI INPUTS

SOURCE

Press to adjust 

between 

the available 

sources.

POWER

Press to power 

the television 

off or on.

CHANNEL ±

Press to adjust 

the television 

channel.

MENU

Press to view 

the television 

menu.

GPX

6

Summary of Contents for TDE2480

Page 1: ...USER S GUIDE V 1153 1008 10 For the most up to date version of this User s Guide go to www gpx com TDE2480 24 Class TV DVD Combo ...

Page 2: ...otective barrier between the unit and surface to protect the surface WARNING Use of this unit near fluorescent lighting may cause interference regarding use of the remote If the unit is displaying erratic behavior move away from any fluorescent lighting as it may be the cause CAUTION Danger of explosion if battery is incorrectly replaced Replace only with the same or equivalent type PRÉCAUTION Dan...

Page 3: ...he mains socket outlet completely La prise du secteur ne doit pas être obstruée ou doit être facilement accessible pendant son utilisation Pour être complètement déconnecté de l alimentation d entrée la prise doit être débranchée du secteur Battery shall not be exposed to excessive heat such as sunshine fire or the like Les piles ne doivent pas être exposées à de forte chaleur tel qu à la lumière ...

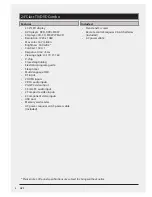
Page 4: ...guide Sleep timer Multi language OSD RF input 2 HDMI inputs 2 RCA audio inputs VGA PC video input 3 5mm PC audio input 2 Composite video inputs 2 Component video inputs USB port Memory card reader AC power requires an AC power cable included Stand and 3 screws Remote control requires 2 AAA batteries included AC power cable Please note LCD panel specifications are subject to change without notice F...

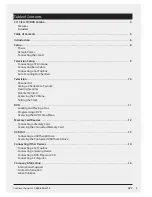
Page 5: ... a Favorite Viewing Favorites Parental Controls Accessing the TV Menu Setting the Clock DVD 11 Loading and Playing a Disc Programming a DVD Accessing the DVD Setup Menu Memory Card Reader 12 Connecting a Memory Card Accessing the Connected Memory Card USB Port 13 Connecting a USB Thumb Drive Accessing the Connected USB Thumb Drive Connecting Other Devices 14 Connecting a Set Top Box Connecting a G...

Page 6: ...Press to play or pause a loaded disc USB PORT DISC DRIVE MEMORY CARD READER STEREO HEADPHONE JACK RCA STEREO AUDIO INPUT 2 COMPOSITE VIDEO INPUT 2 COMPONENT VIDEO INPUT 2 3 5mm PC AUDIO INPUT RCA STEREO AUDIO INPUT 1 COMPOSITE VIDEO INPUT 1 RF INPUT COMPONENT VIDEO INPUT 1 VGA PC VIDEO INPUT HDMI INPUTS SOURCE Press to adjust between the available sources POWER Press to power the television off or...

Page 7: ...ified order PLAY PAUSE Press to play or pause a loaded disc SUBTITLE Press to adjust the current subtitle settings for the loaded DVD ANGLE Press to view alternate angles on supported DVDs TITLE Press to view the title menu on the loaded DVD A B Press to create a repeating loop on a specified section of a loaded DVD POWER Press to turn the television off and on MUTE Press to mute the volume PICTUR...

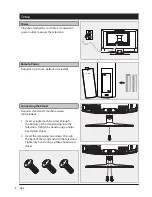
Page 8: ...IO IN 2 Pr Pb Y VIDEO INPUT 2 VIDEO 2 OPEN Setup Power Remote Power Requires stand and 3 machine screws all included 1 Insert a single machine screw through the bottom of the stand and up into the television Tighten by hand using a philips head screw driver 2 Insert the remaining two screws through the back of the stand and into the television Tighten by hand using a philips head screw driver Conn...

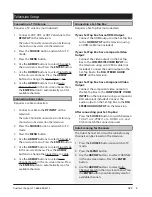
Page 9: ...earch in the on screen menu Press the ENTER button to automatically scan for available channels The Auto Channel Scan must be run before any channels can be viewed on the television 1 Press the SOURCE button and switch to TV mode 2 Press the MENU button 3 Use the ARROW buttons to select CHANNEL in the on screen menu Press the ENTER button 4 Use the ARROW buttons to select Auto Channel Search in th...

Page 10: ...0 From the V CHIP settings you can lock TV and movies that have specific ratings Use the Front Panel Lock to lock the buttons on the television The remote will still work if the Front Panel Lock is checked 1 In TV mode press the FAVORITES LIST button on the remote to access your favorites list on the television 2 Use the ARROW ENTER buttons to highlight and select a channel from the favorites list...

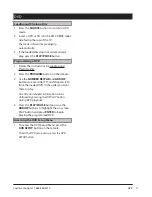
Page 11: ...ote 3 Use the NUMBER KEYPAD and ARROW buttons to enter title TT and chapters CH from the loaded DVD in the order you want them to play Disc title and chapter information can be obtained by pressing the DISPLAY button during DVD playback 4 Press the PLAY PAUSE button or use the ARROW buttons to highlight the on screen PLAY button and press ENTER to begin playing the programmed DVD 1 To access the D...

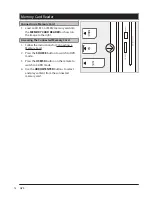
Page 12: ...uctions for Connecting a Memory Card 2 Press the SOURCE button to switch to DVD mode 3 Press the USB SD button on the remote to switch to CARD mode 4 Use the ARROW ENTER buttons to select and play content from the connected memory card Memory Card Reader Connecting a Memory Card Accessing the Connected Memory Card SD MMC MS ...

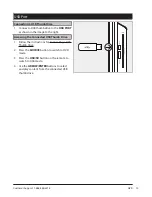
Page 13: ...the instructions for Connecting a USB Thumb Drive 2 Press the SOURCE button to switch to DVD mode 3 Press the USB SD button on the remote to switch to USB mode 4 Use the ARROW ENTER buttons to select and play content from the connected USB thumb drive USB Port Connecting a USB Thumb Drive Accessing the Connected USB Thumb Drive ...

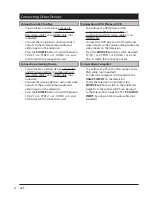
Page 14: ... 2 YPbPr 1 or 2 HDMI 1 or 2 and VGA to match the connection used You will need a gaming device composite and RCA stereo cables or component and RCA stereo cables or an HDMI cable not included Connect the gaming device s audio and video outputs to the corresponding audio and video inputs on the television Press the SOURCE button to switch between TV AV 1 or 2 YPbPr 1 or 2 HDMI 1 or 2 and VGA to mat...

Page 15: ...Customer Support 1 888 999 4215 GPX 15 ...

Page 16: ...eatures and structuring green office procedures other initial program efforts include Reduction of all packaging sizes Recyclable plastics for clamshell packages with a plan to eventually replace plastic with recyclable paper Recycled fiber board in place of the polyfoam in packing boxes Recycled plastics in place of the virgin material in product construction To download this User s Guide in Engl...

Reviews: