background image

8

9

HDMI

HDMI

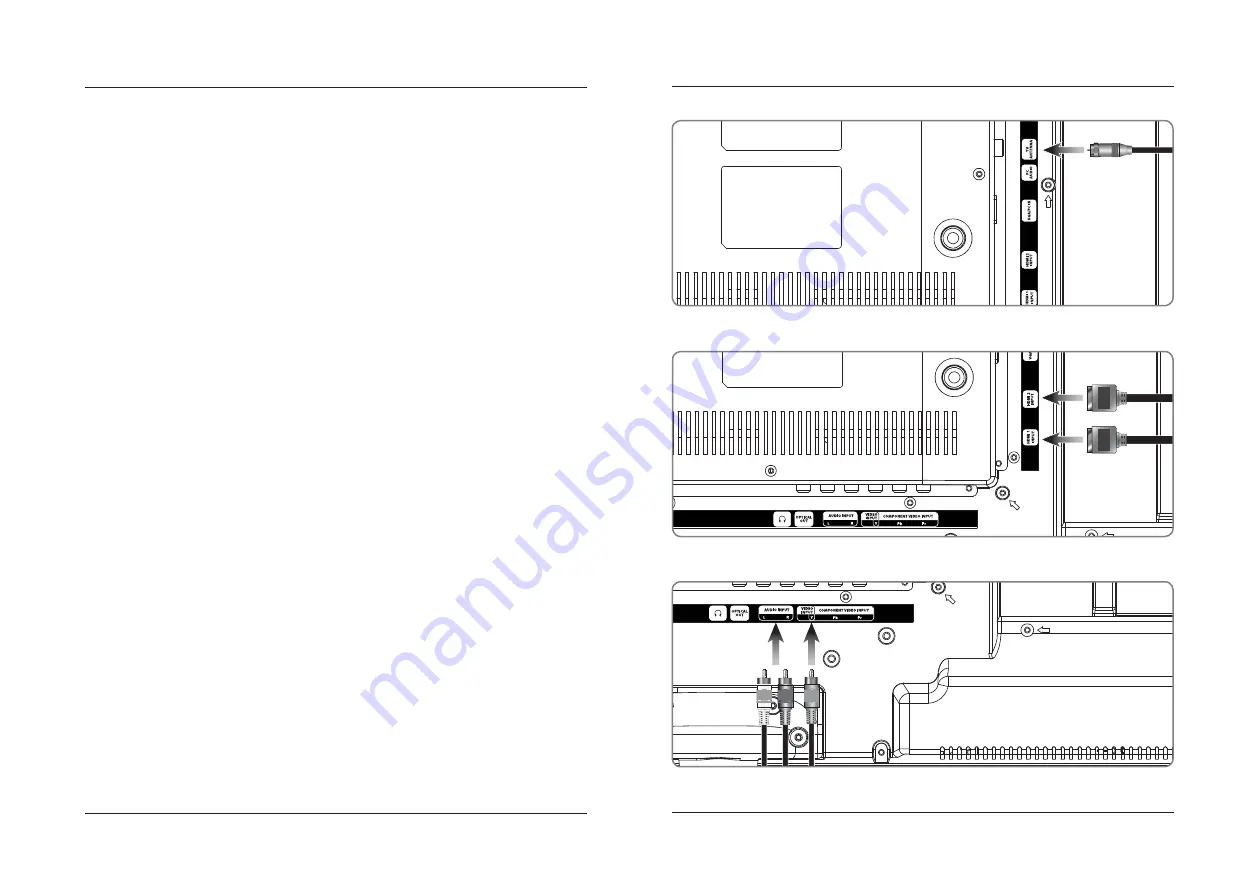
Connecting Cable TV or a TV Antenna

Requires a cable TV hookup or TV antenna cable (not included).

1.  Connect the Cable/Antenna wire to the input on the television. 

2.  Press the Source button to switch to TV mode.

3.  Press the Setup button to access the setup menu.

4.  Press the Arrow (



) buttons to highlight the Channel icon, and press the Enter button.

5.  Press the Arrow (



) buttons to highlight Air/Cable. Press the Arrow (



) buttons  

to select AIR or Cable.

6.  Press the Arrow (



) buttons to highlight Auto Scan. Press the Enter button to begin scanning  

for available channels.

Connecting HDMI 

HDMI offers superior sound and picture quality when compared to Composite or other connection types, and is the 
easiest way to connect your media devices to the television. 

Requires a device that supports HDMI and a HDMI cable (not included).

1.  Connect the device’s HDMI output to the HDMI input on the television. 

2.  Press the Source button to switch to the connected input HDMI.

Connecting Cable TV or a TV Antenna - Rear View

Connecting HDMI - Rear View

Connecting Devices to Your TV

Connecting Composite Audio/Video 

Requires composite video (yellow) and RCA stereo (red,white) cables (not included).

1.  Connect the video output on your media device to the corresponding color coded video inputs on the television 

with a Composite Video cable

2.  Connect the audio output on your media device to the corresponding color coded audio input on the television 

with stereo RCA cables.

3.  Press the Source button to switch to the connected input AV Composite.

Connecting Composite Audio/Video- Rear View


Summary of Contents for TDE3274-v1508-01

Page 1: ...32 LED HDTV DVD User s Guide for Model TDE3274 v1508 01 For the most up to date version of this User s Guide go to www gpx com...

Page 2: ...atteries Completely replace all old batteries with new ones Remplacer compl tement toutes les piles par des neuves Do not mix alkaline standard carbon zinc or rechargeable ni cad ni mh etc batteries N...

Page 3: ...nu USB SD MMC MS Memory Card 15 Using a USB Thumb Drive Using a Memory Card Settings 16 Auto Scanning for Channels Parental Controls V Chip Setting Favorites Viewing Favorites Setting the Clock Mounti...

Page 4: ...or track during play Skip Back Forward Press to skip between chapters or tracks Reverse Fast Fwd Press to search through an individual chapter or track Eject Press to eject a loaded disc Mute Press t...

Page 5: ...s and is the easiest way to connect your media devices to the television Requires a device that supports HDMI and a HDMI cable not included 1 Connect the device s HDMI output to the HDMI input on the...

Page 6: ...Digital Optical Out source differently such as PCM or Digital Audio Input Please consult your home theater system s user manual in order to select the correct input source If there is no sound be sur...

Page 7: ...ource to the correct audio input used in step one 3 Audio played through the unit will now be heard through the connected stereo system Connecting the Stereo Audio Output Rear View IMPORTANT The Stere...

Page 8: ...load disc drive with the label side facing the rear of the television Once a DVD or CD is loaded into the television the TV will automatically switch to DVD mode 2 Press the Play Pause button on the...

Page 9: ...e icon and press the Enter button 3 Press the Arrow buttons to highlight Time Zone and press the Arrow buttons to select your current time zone 4 Press the Arrow buttons to highlight Auto Clock and pr...

Page 10: ...18 19 Notes...

Page 11: ...s espagnol ou fran ais ou pour obtenir des r ponses des questions fr quemment pos es consultez la rubrique d assistance sur www gpx com Contact Information Website www gpx com Email Support prodinfo d...

Reviews: