21
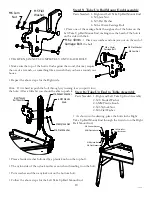
(ID: 040708)
Right Fabric Layers Rail
Mount End Assembly
1-1/4" Fender Washer
1/4" Plastic Knob
1/4" Flat Washer
1/4" Nylock Nut
Left Fabric Layers Rail
Mount End Assembly
1/4" Plastic Knob
1-1/4" Fender Washer
1/4" Nylock Nut
1/4" Flat Washer
1/4" X 1-1/2"
Carriage Bolt
3/16" Flat Washer
1/4" Jam Nut
1/4" X 1-1/2"
Carrriage Bolt
3/16" Flat Washer
1/4" Jam Nut
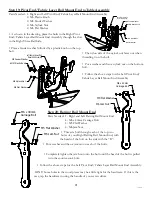
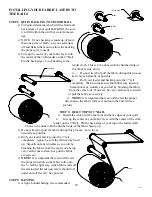
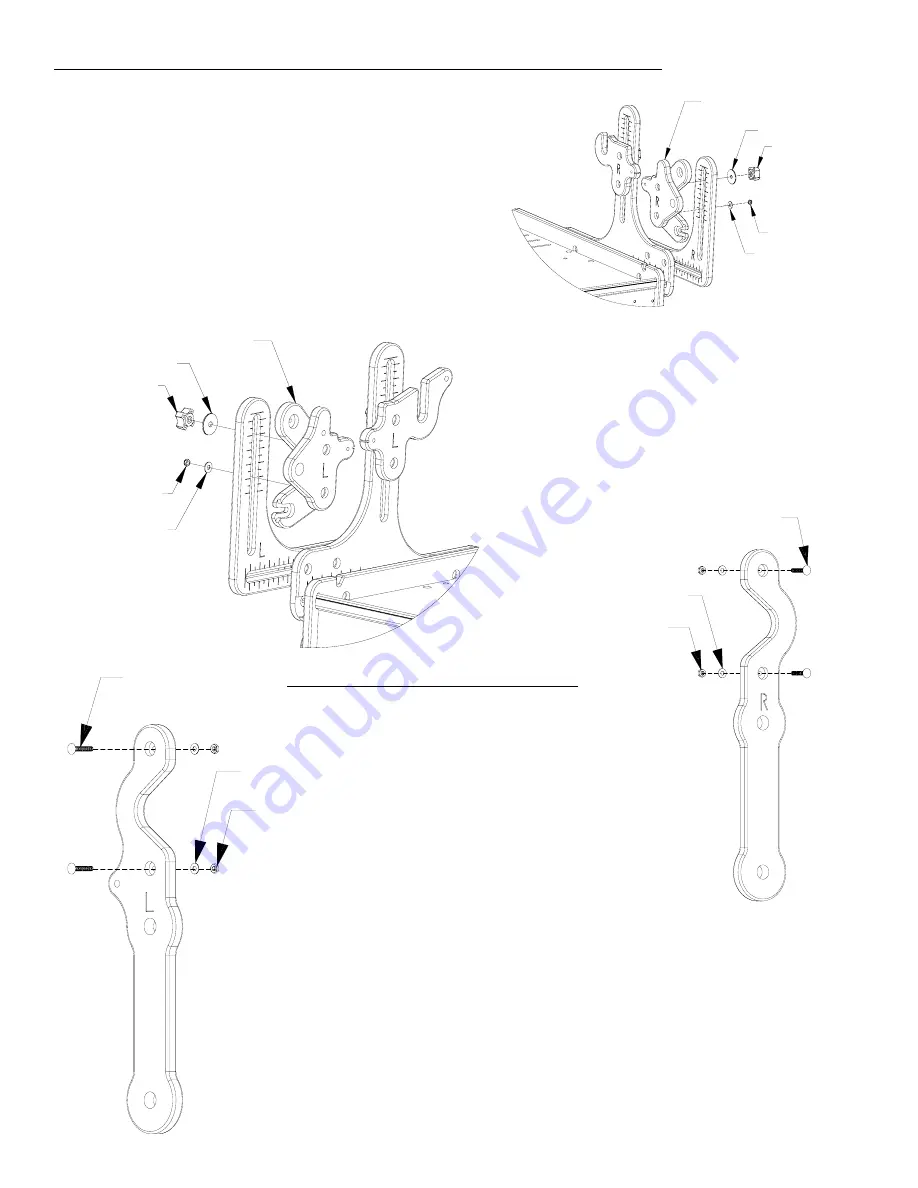
Step 19: Pivot End/ Fabric Layer Rail Mount End to Table Assembly
Parts Needed: 1- Right and Left Pivot end/ Fabric Layer Rail Mount end Assembly
2- M6 Plastic Knob
2- M8 Fender Washer
2- M6 Nylock Nut
2- M6 Flat Washer
• As shown in the drawing, place the bolts in the Right Pivot
end/ Fabric Layer Rail Mount end Assembly through the slots
in the Right Three Rail Side.
• Place a fender washer followed by a plastic knob on the top
bolt.
• The nylon side of the nylock nut faces out when
threading it on the bolt.
• Put a washer and then a nylock nut on the bottom
bolt.
• Follow the above steps for the Left Pivot end/
Fabric Layer Rail Mount end Assembly.
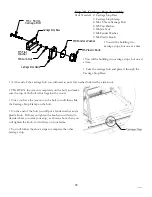
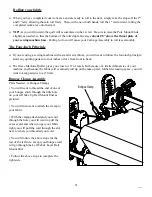
Step 20: Batting Rail Mount End
Parts Needed: 1- Right and Left Batting Rail Mount end
4- M6 x 40mm Carriage Bolt
4- M5 Flat Washer
4- M6 Jam Nut
• Put a washer and then a jam nut on each of the bolts.
• Completely tighten the jamb nut onto the bolt until the head
of the bolt is pulled
into the counter-sunk hole.
• Follow the above steps for the Left Pivot end/ Fabric Layer Rail Mount end Assembly.
HINT: Some holes in the wood pieces may be a little tight for the hardware. If this is the
case, tap the hardware in using the handle of your screw driver.
• Thread a bolt through each of the top two
holes of your Right Batting Rail Mount end, with
the heads of the bolt on the side with the “R”.
M6 x 40mm
Carriage Bolt
M6 Nylock Nut
M6 Flat Washer
6MM Plastic Knob
M8 Fender Washer
M5 Flat Washer
M6 Jam Nut
M6 x 40mm
Carriage Bolt
M5 Flat Washer
M6 Jam Nut
M8 Fender Washer
6MM Plastic Knob
M6 Nylock Nut
M6 Flat Washer


