background image

306–586

Rev. D

Supercedes B

Warnings

2

. . . . . . . . . . . . . . . . . . . . . . . . . . . . . . . . . 

Installation

4

. . . . . . . . . . . . . . . . . . . . . . . . . . . . . . . 

Operation

5

. . . . . . . . . . . . . . . . . . . . . . . . . . . . . . . . 

Service

6

. . . . . . . . . . . . . . . . . . . . . . . . . . . . . . . . . . 

Parts Drawings

7

. . . . . . . . . . . . . . . . . . . . . . . . . . . 

Parts List

7

. . . . . . . . . . . . . . . . . . . . . . . . . . . . . . . . . 

Technical Data

7

. . . . . . . . . . . . . . . . . . . . . . . . . . . . 

Graco Warranty

8

. . . . . . . . . . . . . . . . . . . . . . . . . . . 

Graco Phone Number

8

. . . . . . . . . . . . . . . . . . . . . . 

INSTRUCTIONS-PARTS LIST

INSTRUCTIONS

This manual contains important
warnings and information.
READ AND KEEP FOR REFERENCE.

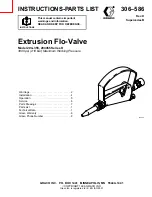
Extrusion Flo-Valve

Model 204–355, 

204355 

Series K

3000 psi (210 bar) Maximum Working Pressure

GRACO INC.

P.O. BOX 1441

MINNEAPOLIS, MN

55440–1441

COPYRIGHT 1996, GRACO INC.

Graco Inc. is registered to I.S. EN ISO 9001

Summary of Contents for 204355 K Series

Page 1: ...Phone Number 8 INSTRUCTIONS PARTS LIST INSTRUCTIONS This manual contains important warnings and information READ AND KEEP FOR REFERENCE Extrusion Flo Valve Model 204 355 204355 Series K 3000 psi 210 b...

Page 2: ...or rag D Do not blow back fluid this is not an air spray system D Always have the trigger guard on the valve when dispensing D Be sure the valve trigger safety operates before dispensing D Lock the va...

Page 3: ...safety regulations FIRE AND EXPLOSION HAZARD Improper grounding poor ventilation open flames or sparks can cause a hazardous condition and re sult in a fire or explosion and serious injury D Ground t...

Page 4: ...the hose supplier or manufacturer for the maximum resistance limits If the hose resistance exceeds the recommended limits replace it immediately 3 Air compressors and hydraulic power supplies ground...

Page 5: ...service any of the system equipment D or install or clean the nozzle 1 Fully release the valve trigger and turn the valve trigger safety 22 fully clockwise 2 Shut off the fluid supply pump 3 Hold a me...

Page 6: ...dle end play To adjust remove the safety assembly 22 and squeeze the handle to move the adjusting nut out of the housing Loosen the cap screw in the adjusting nut and unscrew the nut a few turns Push...

Page 7: ...674 GLAND packing female 1 12 165 675 GLAND packing male 1 13 165 676 NUT adjusting 1 14 165 677 SCREW packing 1 15 165 678 TRIGGER 1 16 165 679 HOUSING valve 1 17 168 845 GASKET copper 2 18 224 707...

Page 8: ...medy for any breach of warranty shall be as set forth above The buyer agrees that no other remedy including but not limited to incidental or consequential damages for lost profits lost sales injury to...

Reviews: