background image

Basic Operation

309584H

5

Basic Operation

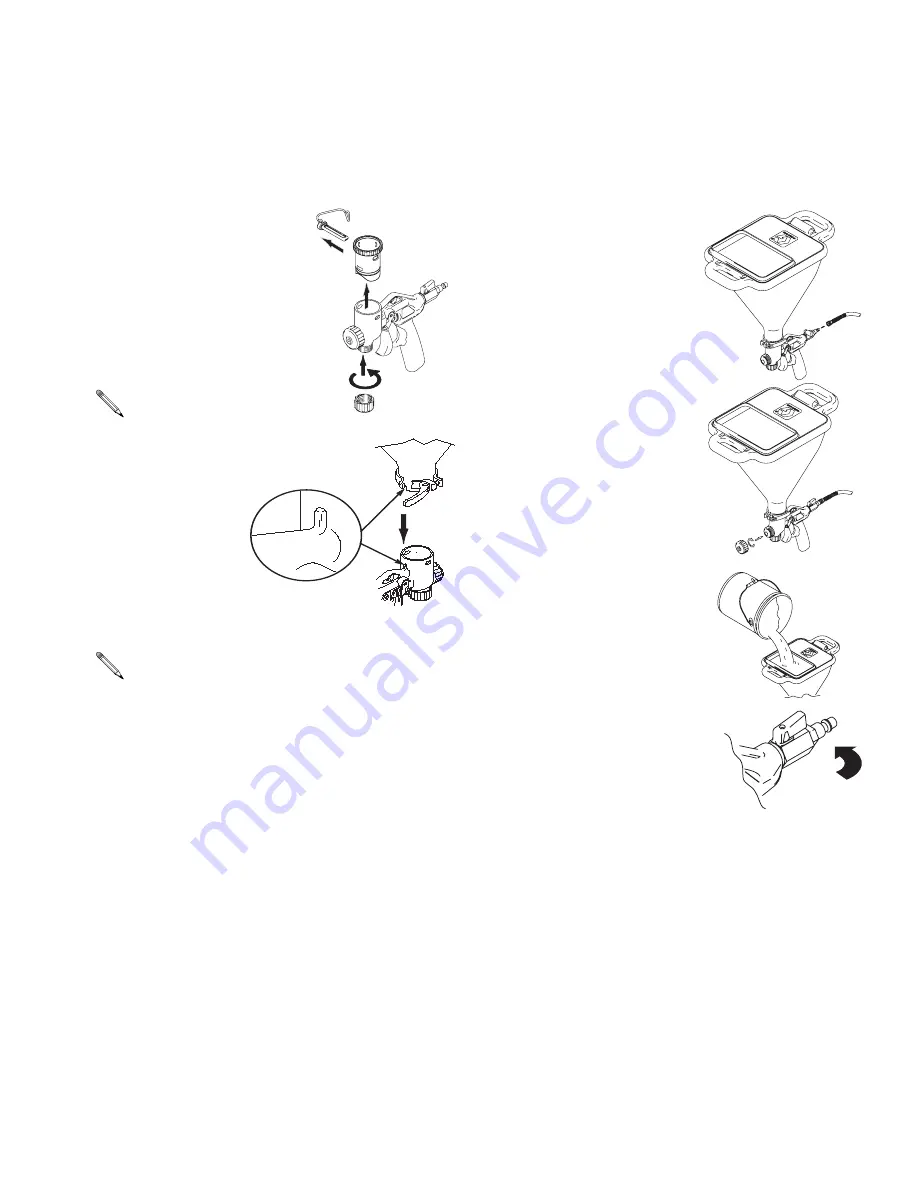
Hopper Installation

1.

The Hose Plug must be 
securely fastened to bot-
tom of gun when using the 
Hopper. Gun Plug must be 
removed from top of gun.

.

2.

Align notched 
opening in base 
of hopper to 
raised notch on 
hopper port of 
gun body.

3.

Push hopper down, over hopper port as far as it will 
go.

4.

Fasten clamp.

5.

Connect air hose to gun.

6.

Install spray nozzle, page 
7.

7.

Fill hopper with texture 
mix.

8.

Open air valve.

9.

Turn compressor ON. 
Close air valve. Adjust air pressure starting at 30-40 
psi.

It is easier to remove plug if you first trigger gun.

For overhead applications and high walls, position 
the hopper on the gun with the material fill open-
ing facing toward the nozzle (front) of the gun. For 
all other applications, material fill opening should 
face the air valve (back) of the gun.

ti2699b

ti2644a

ti2449

ti2621a

ti2476

ti2448a

Summary of Contents for 245924 A Series

Page 1: ...Operation and Parts Texture Gun Hopper For Water Based Materials Only Model 245924 Series A B and C 100 psi 7 bar 0 7 MPa Maximum Working Air Pressure 60 psi 4 1 bar 0 41 MPa Maximum Working Fluid Pr...

Page 2: ...yes follow Pressure Relief Procedure page 3 before servicing the unit Do not use hoses to pull equipment Route hoses away from traffic areas sharp edges moving parts and hot surfaces Do not expose Gra...

Page 3: ...point where they could fail Such failure could cause serious injury or property damage See Technical Data on page of this instruction manual and in all other equipment manuals Read fluid and solvent m...

Page 4: ...terial fill opening should face toward the air valve A back of gun F Handles Provided for operator comfort and relieve operator fatigue during long jobs G Hopper Holds material H Gun Plug Must be in p...

Page 5: ...asten clamp 5 Connect air hose to gun 6 Install spray nozzle page 7 7 Fill hopper with texture mix 8 Open air valve 9 Turn compressor ON Close air valve Adjust air pressure starting at 30 40 psi It is...

Page 6: ...llow ceiling texture to set for at least 15 minutes Then remix prior to use Premix 1 Slowly add approxi mately 2 to 4 qts 1 9 to 3 8 liters of water to a 5 gallon 18 9 liter bucket of premix 2 Agitate...

Page 7: ...urn gun flow adjustment nut to decrease flow counter clockwise Use smaller nozzle To Get More Material Try any one or a combination of these methods Close air valve Turn gun flow adjustment nut to inc...

Page 8: ...clean 5 Remove hopper from gun and finish cleaning all components A soft brush may be used to help loosen any dried on material from surface 6 Connect air line to gun Turn on compressor Open gun air...

Page 9: ...erial Open gun air valve more Replace nozzle with smaller size Gun will not shut off Worn nozzle or needle Nozzle not on all the way Debris in needle passage Relieve Pressure page 3 Replace worn parts...

Page 10: ...G 3d NUT flow adjustment 3e O RING 3f O RING 4 234153 KIT nozzle includes 4a 4b 4c 4d 1 4a 234538 NOZZLE fine beige 4b 234277 NOZZLE small white 4c 234278 NOZZLE medium gray 4d 234279 NOZZLE large bla...

Page 11: ...Notes 309584H 11 Notes...

Page 12: ...ING BUT NOT LIMITED TO WARRANTY OF MERCHANTABILITY OR WARRANTY OF FITNESS FOR A PARTICULAR PURPOSE Graco s sole obligation and buyer s sole remedy for any breach of warranty shall be as set forth abov...

Reviews: