background image

Warranty

311737B

31

Warranty

Graco warrants all equipment referenced in this document which is manufactured by Graco and bearing its name to be free from defects in 
material and workmanship on the date of sale to the original purchaser for use. With the exception of any special, extended, or limited warranty 
published by Graco, Graco will, for a period of twelve months from the date of sale, repair or replace any part of the equipment determined by 
Graco to be defective. This warranty applies only when the equipment is installed, operated and maintained in accordance with Graco’s written 
recommendations.

This warranty does not cover, and Graco shall not be liable for general wear and tear, or any malfunction, damage or wear caused by faulty 
installation, misapplication, abrasion, corrosion, inadequate or improper maintenance, negligence, accident, tampering, or substitution of 
non-Graco component parts. Nor shall Graco be liable for malfunction, damage or wear caused by the incompatibility of Graco equipment with 
structures, accessories, equipment or materials not supplied by Graco, or the improper design, manufacture, installation, operation or 
maintenance of structures, accessories, equipment or materials not supplied by Graco.

This warranty is conditioned upon the prepaid return of the equipment claimed to be defective to an authorized Graco distributor for verification of 
the claimed defect. If the claimed defect is verified, Graco will repair or replace free of charge any defective parts. The equipment will be returned 
to the original purchaser transportation prepaid. If inspection of the equipment does not disclose any defect in material or workmanship, repairs will 
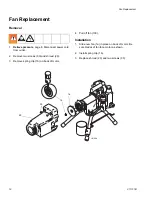
be made at a reasonable charge, which charges may include the costs of parts, labor, and transportation.

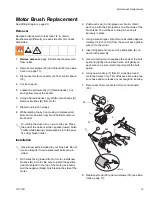
THIS WARRANTY IS EXCLUSIVE, AND IS IN LIEU OF ANY OTHER WARRANTIES, EXPRESS OR IMPLIED, INCLUDING BUT NOT LIMITED 
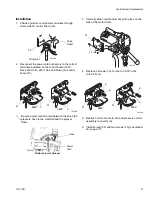
TO WARRANTY OF MERCHANTABILITY OR WARRANTY OF FITNESS FOR A PARTICULAR PURPOSE

Graco’s sole obligation and buyer’s sole remedy for any breach of warranty shall be as set forth above. The buyer agrees that no other remedy 
(including, but not limited to, incidental or consequential damages for lost profits, lost sales, injury to person or property, or any other incidental or 
consequential loss) shall be available. Any action for breach of warranty must be brought within two (2) years of the date of sale.

GRACO MAKES NO WARRANTY, AND DISCLAIMS ALL IMPLIED WARRANTIES OF MERCHANTABILITY AND FITNESS FOR A 
PARTICULAR PURPOSE, IN CONNECTION WITH ACCESSORIES, EQUIPMENT, MATERIALS OR COMPONENTS SOLD BUT NOT 
MANUFACTURED BY GRACO

. These items sold, but not manufactured by Graco (such as electric motors, switches, hose, etc.), are subject to 

the warranty, if any, of their manufacturer. Graco will provide purchaser with reasonable assistance in making any claim for breach of these 
warranties.

In no event will Graco be liable for indirect, incidental, special or consequential damages resulting from Graco supplying equipment hereunder, or 
the furnishing, performance, or use of any products or other goods sold hereto, whether due to a breach of contract, breach of warranty, the 
negligence of Graco, or otherwise.

FOR GRACO CANADA CUSTOMERS

The Parties acknowledge that they have required that the present document, as well as all documents, notices and legal proceedings entered into, 
given or instituted pursuant hereto or relating directly or indirectly hereto, be drawn up in English. Les parties reconnaissent avoir convenu que la 
rédaction du présente document sera en Anglais, ainsi que tous documents, avis et procédures judiciaires exécutés, donnés ou intentés, à la suite 
de ou en rapport, directement ou indirectement, avec les procédures concernées.

POUR LES CLIENTS DE GRACO PARLANT FRANCAIS

Les parties reconnaissent avoir convenu que la rédaction du présent document ainsi que de tous les documents, avis et procédures judiciaires 
exécutés, donnés ou intentés à la suite de ou en rapport, directement ou indirectement, avec les procédures concernées, sera en anglais.

FÜR GRACO-KUNDEN IN DEUTSCHLAND/ÖSTERREICH/SCHWEIZ

Die Parteien bestätigen hiermit die festgelegte Vereinbarung, daß das vorliegende Dokument sowie alle anderen Dokumente, Mitteilungen und 
Gerichtsverfahren, die im Zusammenhang damit erstellt, verteilt oder eingeleitet werden, oder sich direkt oder indirekt darauf beziehen, in 
englischer Sprache verfaßt sein sollen.

PARA LOS CLIENTES DE GRACO QUE HABLAN ESPAÑOL

Las partes reconocen haber convenido que el presente documento, así como todos los documentos, notificaciones y procedimientos judiciales 
emprendidos, presentados o establecidos que tengan que ver con estas garantías directa o indirectamente, estarán redactados en inglés.

PER I CLIENTI GRACO ITALIANI

Le controparti riconoscono di aver richiesto che il presente documento, e tutti gli altri documenti, avvisi e informazioni di natura legale sottoscritti, 
conferiti o istituiti direttamente o indirettamente, siano redatti in lingua inglese.

VOOR GRACO-KLANTEN IN NEDERLAND

De partijen zijn zich ervan bewust dat zij hebben geëist dat het onderhavige document, evenals alle documenten, berichtgevingen en wettelijke 
procedures die worden aangegaan, overhandigd of in gang gezet hetzij als gevolg van hetzij rechtstreeks hetzij indirect in relatie tot het 
onderhavige worden opgesteld in de Engelse taal.

ADDITIONAL WARRANTY COVERAGE 

Graco does provide extended warranty and wear warranty for products described in the “Graco Contractor Equipment Warranty Program”.

Summary of Contents for 390 253958

Page 1: ...62019 254968 254969 254998 253961 Maximum Working Pressure 3300 psi 227 bar 22 7 MPa IMPORTANT SAFETY INSTRUCTIONS Read all warnings and instructions Save these instructions Contact Graco Customer Ser...

Page 2: ...Models 2 311737B Models VAC Model 120 390 253358 262019 230 CCE 254968 230 Europe 254969 110 UK 253961 230 Asia 254988...

Page 3: ...s on or off when flammable fumes are present Ground equipment and conductive objects in work area Read Grounding instructions If there is static sparking or you feel a shock stop operation immediately...

Page 4: ...containing such solvents in pressurized aluminum equipment Such use can cause serious chemical reaction and equipment rupture and result in death serious injury and property damage BURN HAZARD Equipm...

Page 5: ...M N S P R U ti5636c Item Component A Pressure Control B ON OFF switch C Pressure Gauge not on all models D Power Cord E Fluid Outlet F Prime Valve G Cord Wrap H Pump J Suction Hose K Drain Hose M Flui...

Page 6: ...K M N S P R U ti11629a Item Component A Pressure Control B ON OFF switch D Power Cord E Fluid Outlet F Prime Valve G Cord Wrap H Pump J Suction Hose K Drain Hose M Fluid Hose N Gun P Tip R Guard S Tr...

Page 7: ...0 m maximum length 240V 3 wire 16 AWG 1 0 mm2 minimum 300 ft 90 m maximum length Spray gun ground through connection to a properly grounded fluid hose and pump Fluid supply container follow local code...

Page 8: ...old gun against side of grounded metal flushing pail Trigger gun to relieve pressure 3 Turn prime valve down If you suspect the spray tip or hose is clogged or that pressure has not been fully relieve...

Page 9: ...d on hot bare motor could cause fire or explosion To reduce risk of burns fire or explosion do not operate sprayer with cover removed To reduce risk of serious injury including electric shock Do not t...

Page 10: ...chanical 1 Pump frozen or hardened paint Thaw sprayer if water or water based paint has frozen in sprayer Place sprayer in warm area to thaw Do not start sprayer until thawed com pletely If paint hard...

Page 11: ...nals Securely recon nect leads 6 Motor thermal switch Yellow motor leads must have continuity through thermal switch Replace motor See page 27 Motor Replace ment 7 Brush cap missing or loose brush lea...

Page 12: ...sion cord See page 7 Grounding and Electric Requirements 8 Leads from motor to circuit board for damaged or loose wire con nectors Inspect wiring insulation and terminals for signs of over heating Be...

Page 13: ...acement 2 Connecting rod assembly for damage Replace connecting rod assembly See page 14 Displacement Pump Replacement 3 Gears or drive housing Inspect drive housing assembly and gears for damage and...

Page 14: ...0 and rotate cover 44 3 Loosen nut A and remove suction hose 35 Loosen nut B and remove the high pressure hose 14 4 Cycle pump until pin 32 is in position to be removed 5 Disconnect power cord from ou...

Page 15: ...t 11 up onto pump until nut stops Tighten jam nut by hand then tap 1 8 to 1 4 turn with a 20 oz maximum hammer to approximately 75 ft lb 102 N m 8 Install suction tube 35 and high pressure hose 14 Tig...

Page 16: ...n 1 Apply a liberal coat of grease to gears and needle bearing surfaces Install thrust bearing 4 and gears 2 and 3 in front endbell housing 2 Push drive housing into front endbell housing Insert gear...

Page 17: ...omplete stop there are no electrical shorts If motor does not spin freely armature is shorted Replace motor page 27 Armature Brushes and Motor Wiring Open Circuit Test Continuity 1 Connect red and bla...

Page 18: ...rd from outlet 2 Remove two screws 30 and shroud 29 3 Remove spring clip 1b on back of motor 4 Pull off fan 100 Installation 1 Slide new fan 1a in place on back of motor Be sure blades of fan face mot...

Page 19: ...e motor 2 Push each cap A into place over brush Orient each cap with the 2 projections on either side of the brush lead You will hear a snap when cap is securely in place 3 Using a wire stripper strip...

Page 20: ...3 5 Remove 3 screws 30 securing control board to housing 2 are located on the front and one on the back next to the power cord 6 Pull control board out slightly and then slide it back and off of frame...

Page 21: ...ntrol board back into place on the side of the motor frame 4 Replace 3 screws 30 Torque to 30 35 in lbs 3 4 3 9 N m 5 Reattach motor connector B and pressure control assembly connector A 6 Install shr...

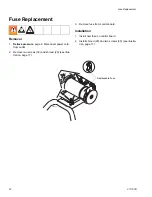
Page 22: ...page 8 Disconnect power cord from outlet 2 Remove two screws 30 and shroud 29 see illus tration page 17 3 Remove fuse from control board Installation 1 Install new fuse on control board 2 Install shro...

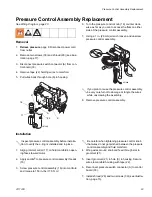
Page 23: ...collar 17 on fluid manifold so open ing faces toward motor 2 Apply Loctite to pressure control assembly threads 16 3 Screw pressure control assembly 16 into manifold and torque to 150 in lbs 17 0 N m...

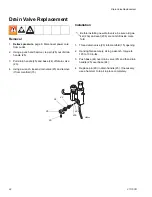
Page 24: ...ain valve 23 and remove it from manifold 15 Installation 1 Thread drain valve 23 into manifold 15 opening 2 Hand tighten securely Using a wrench torque to 120 to 130 in lbs 3 Push base 24 over drain v...

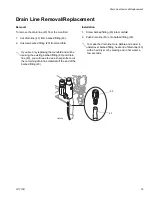
Page 25: ...manifold 2 Push drain line 40 onto barbed fitting 20 If you are only replacing the manifold and will be reusing the existing barbed fitting 20 and drain line 40 you will need to use a sharp knife to...

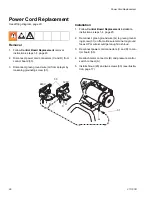
Page 26: ...oosening grounding screw 31 Installation 1 Follow Control Board Replacement installation instructions steps 1 4 page 20 2 Reconnect green ground wire G to green ground ing screw 31 on frame Be sure te...

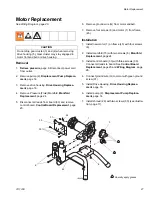
Page 27: ...ation 1 Install new motor 1 on frame 45 with four screws 6 2 Install manifold 15 with two screws 6 Manifold Replacement page 24 3 Install control board 33 with three screws 30 Connect all leads to boa...

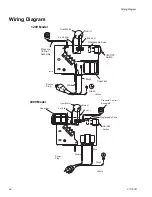
Page 28: ...y Power Plug White Green Black from Motor 2 x Yellow ON OFF Switch ti5643a Capacitor Replaceable Fuse Black Power Plug Blue Green Brown ON OFF Switch Pressure Control Assembly Red from Motor 2 x Yello...

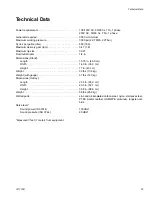
Page 29: ...pm 0 47 1 8 Maximum tip size 0 021 Fluid outlet npsm 1 4 in Dimensions Stand Length 15 75 in 40 0 cm Width 14 0 in 36 0 cm Height 17 in 43 cm Weight 30 lbs 13 6 kg Weight with gauge 31 lbs 14 0 kg Dim...

Page 30: ...Notes 30 311737B Notes...
Page 31: ...by Graco such as electric motors switches hose etc are subject to the warranty if any of their manufacturer Graco will provide purchaser with reasonable assistance in making any claim for breach of th...

Page 32: ...ained in this document reflects the latest product information available at the time of publication Graco reserves the right to make changes at any time without notice mm 311737 This manual contains E...

Reviews: