background image

Maintenance

Check

Check

Check Oil

Oil

Oil Level

Level

Level

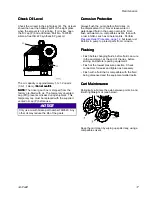
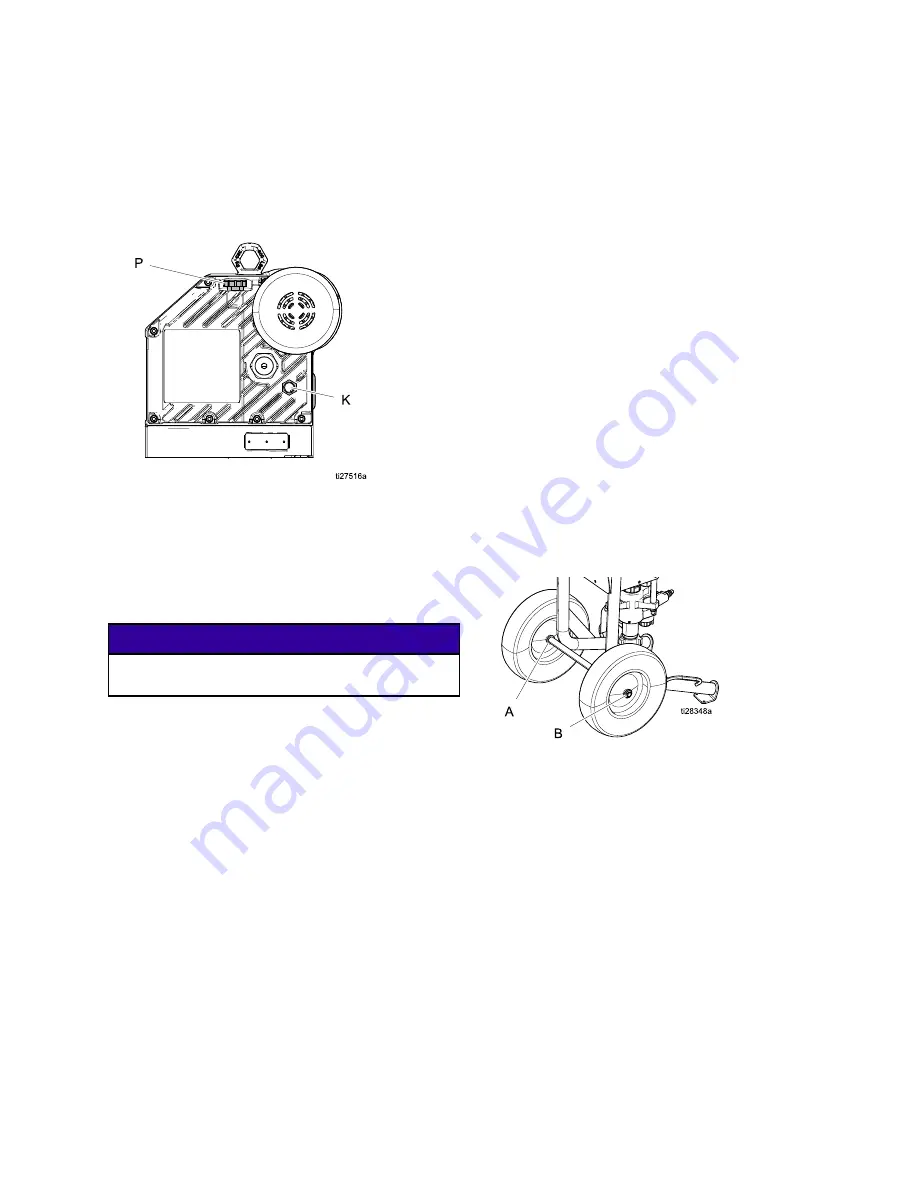
Check the oil level in the sight glass (K). The oil level
should be near the halfway point of the sight glass
when the sprayer is not running. If oil is low, open
the fill cap (P) and add Graco Part No. 16W645
silicone-free ISO 220 synthetic EP gear oil.

The oil capacity is approximately 1.0–1.2 quarts
(0.9–1.1 liters). Do

Do

Do not

not

not overfill.

overfill.

overfill.

NOTE:

NOTE:

NOTE: The driver gear box is shipped from the
factory pre-filled with oil. The temporary unvented
cap (PX) prevents oil leaks during shipment. This
temporary cap must be replaced with the supplied
vented oil cap (P) before use.

NOTICE

NOTICE

NOTICE

Only use oil with Graco part number 16W645. Any
other oil may reduce the life of the gears.

Corrosion

Corrosion

Corrosion Protection

Protection

Protection

Always flush the pump before fluid dries on
the displacement rod. Never leave water or
water-based fluid in the pump overnight. First,
flush with water or a compatible solvent, then with
a rust inhibitor, such as mineral spirits. Perform

Pressure Relief Procedure, page 12

, but leave rust

inhibitor in pump to protect parts from corrosion.

Flushing

Flushing

Flushing

• Flush before changing fluids, before fluid can cure

in the equipment, at the end of the day, before
storing, and before repairing equipment.

• Flush at the lowest pressure possible. Check

connectors for leaks and tighten as necessary.

• Flush with a fluid that is compatible with the fluid

being dispensed and the equipment wetted parts.

Cart

Cart

Cart Maintenance

Maintenance

Maintenance

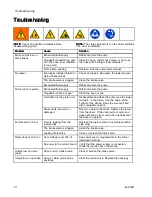
Periodically lubricate the axle between points A and
B with lightweight oil (see below).

Keep the cart clean by wiping up spills daily, using a
compatible solvent.

3A3164D

17

Summary of Contents for e-Xtreme

Page 1: ...e coatings coatings coatings For For For professional professional professional use use use only only only Important Important Important Safety Safety Safety Instructions Instructions Instructions Read all warnings and instructions in this manual and in the e Xtreme Driver manuals Save Save Save all all all instructions instructions instructions See page 3 for model information See Technical Speci...

Page 2: ...ck Oil Level 17 Corrosion Protection 17 Flushing 17 Cart Maintenance 17 Troubleshooting 18 Error Code Troubleshooting 20 Standby Mode 20 Error Codes Table 20 Repair 22 Xtreme Lower Removal 22 Disconnect and Reconnect Lower 22 Outlet Check Valves 23 Parts 24 Parts Drawing 24 Outlet Check Valves Parts 27 Dimensions 29 Technical Specifications 32 Graco Standard Warranty 34 Related Related Related Man...

Page 3: ... e Xtreme Ex45 Cart with Hopper 24Y907 e Xtreme Ex45 Cart with Hopper 24Y908 e Xtreme Ex45 Cart with Hopper 24Y909 e Xtreme Ex45 Wall Mount 24Y910 e Xtreme Ex45 Wall Mount 24Y911 e Xtreme Ex45 Wall Mount 24Y912 e Xtreme Ex45 Wall Mount 145cc 24Z901 e Xtreme Ex35 Cart 24Z902 e Xtreme Ex35 Cart 24Z903 e Xtreme Ex35 Cart 24Z904 e Xtreme Ex35 Cart 24Z905 e Xtreme Ex35 Cart with Hopper 24Z906 e Xtreme ...

Page 4: ...not plug or unplug power cords or turn power or light switches on or off when flammable fumes are present Use only grounded hoses Hold gun firmly to side of grounded pail when triggering into pail Do not use pail liners unless they are antistatic or conductive Stop Stop Stop operation operation operation immediately immediately immediately if static sparking occurs or you feel a shock Do not use e...

Page 5: ...rigger guard installed Engage trigger lock when not spraying Do not point gun at anyone or at any part of the body Do not put your hand over the spray tip Do not stop or deflect leaks with your hand body glove or rag Follow the Pressure Pressure Pressure Relief Relief Relief Procedure Procedure Procedure when you stop spraying and before cleaning checking or servicing equipment Tighten all fluid c...

Page 6: ...the lowest rated system component See Technical Technical Technical Data Data Data in all equipment manuals Use fluids and solvents that are compatible with equipment wetted parts See Technical Technical Technical Data Data Data in all equipment manuals Read fluid and solvent manufacturer s warnings For complete information about your material request Safety Data Sheets SDSs from distributor or re...

Page 7: ...p Lower C Fluid Drain Purge Valve D Packing Nut E Power Switch F Fluid Outlet G Junction Box Cover H Pressure Adjustment Knob J Outlet Check Valve L Status Indicator Light LED P Oil Fill Cap vented S Junction Box T Filter Cap models equipped with integrated filter only NOTE NOTE NOTE See the e Xtreme Driver Operation Repair manual for warning label information 3A3164D 7 ...

Page 8: ...and pump Fluid Fluid Fluid supply supply supply container container container Follow local code Object Object Object being being being sprayed sprayed sprayed Follow local code Solvent Solvent Solvent pails pails pails used used used when when when flushing flushing flushing Follow local code Use only conductive metal pails placed on a grounded surface Do not place the pail on a non conductive sur...

Page 9: ... leaks during shipment This temporary cap must be replaced with the supplied vented oil cap P before use PX P ti31010a Flush Flush Flush Before Before Before Using Using Using Equipment Equipment Equipment The pump fluid section was tested with lightweight oil which is left in the fluid passages to protect parts To avoid contaminating your fluid with oil flush the equipment with a compatible solve...

Page 10: ... with Throat Seal Liquid TSLTM 4 Attach electrically conductive fluid hose to pump lower outlet via outlet check valve and tighten NOTICE NOTICE NOTICE Attaching the hose directly to the lower pump can result in damage to the sprayer during cavitation or when the sprayer runs out of material Use an outlet check valve between the lower pump and hose to avoid damage NOTICE NOTICE NOTICE The minimum ...

Page 11: ...ft 1 8 m minimum suggested inner diameter is 1 in 2 5 cm 7 Check oil level NOTICE NOTICE NOTICE Only use oil with Graco part number 16W645 Any other oil may not lubricate properly and can cause damage to the drive train 8 Always flush and prime sprayer before each use see Prime Flush page 13 3A3164D 11 ...

Page 12: ...r switch E OFF OFF 4 Disengage gun trigger lock 5 Hold gun firmly against a grounded metal pail Trigger the gun 6 Engage gun trigger lock 7 Drain Drain Drain fluid fluid fluid Place the drain tube in a grounded waste pail Slowly open fluid drain purge valve C and drain fluid into a waste pail 8 If you suspect the spray tip or hose is completely clogged or that pressure has not been fully relieved ...

Page 13: ...n 3 Place material supply suction hose into compatible fluid if priming or solvent if flushing 4 Close drain valve 5 Turn power switch E ON ON 6 Prime or flush hose and gun a Disengage gun trigger lock b Trigger gun into grounded pail Pull out pressure adjustment knob H and turn clockwise slowly to increase pressure until a steady stream flows from gun Push knob in to lock If flushing flushing flu...

Page 14: ... E ON 10 To start pump pull out pressure adjustment knob H and turn clockwise slowly to increase pressure until a steady stream flows from drain valve Push knob in to lock NOTE NOTE NOTE To determine the proper amount of solvent and flushing time remove the inlet valve housing to verify it has been fully cleaned especially when spraying a new material for the first time 11 Wait for clean solvent t...

Page 15: ...ncrease the spray pressure until the spray pattern fully develops This will reduce the pressure surge when the pump is stalled and minimize over spray Dynamic Dynamic Dynamic Pump Pump Pump Outlet Outlet Outlet Pressure Pressure Pressure Ex35 Ex35 Ex35 Ex45 Ex45 Ex45 Pressure Pressure Pressure Adjust Adjust Adjust ment ment ment Knob Knob Knob Setting Setting Setting PSI PSI PSI Bar Bar Bar MPa MP...

Page 16: ...e oil once a year 1 Place a minimum 2 quart 1 9 liter container under the oil drain port Remove the oil drain plug Allow all oil to drain from the driver 2 Reinstall the oil drain plug Torque to 18 23 ft lb 25 30 N m NOTICE NOTICE NOTICE Do not over torque The drain plug can become stripped and damaged 3 Open the oil fill cap P and add Graco Part No 16W645 silicone free ISO 220 synthetic EP gear o...

Page 17: ...rosion Corrosion Corrosion Protection Protection Protection Always flush the pump before fluid dries on the displacement rod Never leave water or water based fluid in the pump overnight First flush with water or a compatible solvent then with a rust inhibitor such as mineral spirits Perform Pressure Relief Procedure page 12 but leave rust inhibitor in pump to protect parts from corrosion Flushing ...

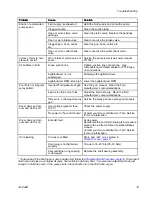
Page 18: ...ean the hose or gun Fluid dried on the piston rod Disassemble and clean the pump see the lower manual In the future stop the pump at the bottom of the stroke Keep the wet cup filled with compatible solvent Pump will not operate Driver parts are worn or damaged Repair or replace the driver Remove the lower from the driver If the driver will not cycle and does not blink an error code then troublesho...

Page 19: ...o thin or too thick Adjust the fluid viscosity Read the fluid manufacturer s recommendations Poor finish or irregular spray pattern Dirty worn or damaged spray gun Service the spray gun see spray gun manual Over voltage greater than 300 V Check the power supply Driver does not turn over and LED is off No power to the control board Contact your Graco distributor or Tech Service for more information...

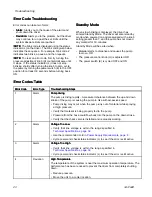
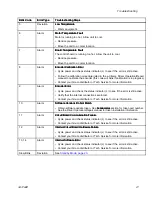
Page 20: ... OR The power switch E is cycled OFF and ON Error Error Error Codes Codes Codes Table Table Table Blink Blink Blink Code Code Code Error Error Error Type Type Type Troubleshooting Troubleshooting Troubleshooting Steps Steps Steps 1 Alarm Pump Pump Pump diving diving diving The pump is diving rapidly A pressure imbalance between the up and down stroke of the pump is causing the pump to dive with ex...

Page 21: ...tus indicator L to see if the error is still active Verify that the internal connections are intact Contact your Graco distributor or Tech Service for more information 10 Alarm Software Software Software Versions Versions Versions Do Do Do Not Not Not Match Match Match Obtain software update token See Accessories Accessories Accessories section for token part number See the Driver Operation Repair...

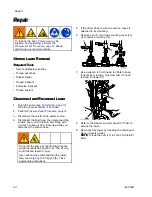
Page 22: ...ce 4 Disconnect the fluid hose then disconnect the suction hose Hold the fluid inlet fitting with a wrench to keep it from loosening while you disconnect the suction hose Do not lift the pump by the lift ring when the weight exceeds 360 kg 800 lb The lift ring could fail and result in injury Use caution when disconnecting the lower they can weigh up to 25 kg 55 lb Take appropriate precautions 5 If...

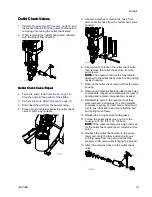
Page 23: ... lower NOTE NOTE NOTE The pressure drain valve may remain attached to the outlet check valve housing during repair if needed 7 Remove the outlet check valve nut from the valve housing 8 Remove and clean all internal outlet check valve components Inspect all components for wear or damage and replace components as needed 9 Reassemble parts in the reverse order they were removed ball guides 3 spring ...

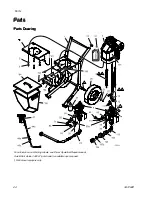
Page 24: ...ts Parts Parts Parts Parts Drawing Drawing Drawing For information on Warning Labels see Driver Operation Repair manual Quick Start Guide 3A3067 not shown is available upon request Wall mount sprayers only 24 3A3164D ...

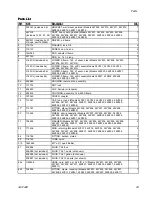
Page 25: ...1 12 244819 COUPLING assembly 145 290 Xtreme 1 13 197340 COVER coupler 1 14 113361 CAP tube round Models 24Y901 24Y902 24Y903 24Y904 24Y905 24Y906 24Y907 24Y908 24Z901 24Z902 24Z903 24Z904 24Z905 24Z906 24Z907 24Z908 2 17 17L151 FITTING elbow Models 24Y905 24Y906 24Y907 24Y908 24Z905 24Z906 24Z907 24Z908 1 20 113362 WHEEL semi pneumatic Models 24Y901 24Y902 24Y903 24Y904 24Y905 24Y906 24Y907 24Y90...

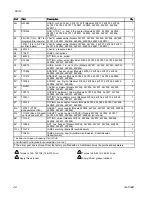
Page 26: ... Models 24Y905 24Y906 24Y907 24Y908 24Z905 24Z906 24Z907 24Z908 4 84 16U537 COVER complete Models 24Y905 24Y906 24Y907 24Y908 24Z905 24Z906 24Z907 24Z908 1 85 17E114 HOPPER weldment Xtreme Models 24Y905 24Y906 24Y907 24Y908 24Z905 24Z906 24Z907 24Z908 1 86 120307 FITTING hose adapter male Models 24Y905 24Y906 24Y907 24Y908 24Z905 24Z906 24Z907 24Z908 1 87 120308 FITTING hose adapter female Models ...

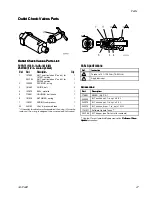
Page 27: ...ll check 1 6 181535 RETAINER spring 1 7 108361 SPRING compressor 1 23 245143 VALVE pressure bleed 1 If the outlet check valve is disassembled the o ring 2 must be replaced The o ring is designed to be crushed and not reused Parts Parts Parts Specifications Specifications Specifications Ref Ref Ref Instruction Instruction Instruction 1 Torque to 101 108 N m 75 80 ft lb 2 Apply lubricant Accessories...

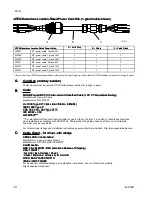
Page 28: ...d Listed File File File No No No E85994 E85994 E85994 IEEE IEEE IEEE 1580 1580 1580 Type Type Type P P P CSA CSA CSA C22 2 C22 2 C22 2 No No No 245 245 245 Type Type Type X110 X110 X110 IEC IEC IEC 60092 60092 60092 350 350 350 API API API RP14F RP14F RP14F Per manufacturer General Cable suitable for use in Class I Division 1 and Zone 1 Hazardous Locations when installed in accordance with API RP1...

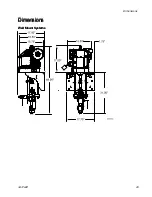
Page 29: ...Dimensions Dimensions Dimensions Dimensions Wall Wall Wall Mount Mount Mount Systems Systems Systems 3A3164D 29 ...

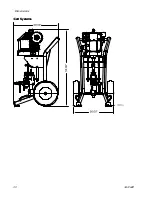
Page 30: ...Dimensions Cart Cart Cart Systems Systems Systems 30 3A3164D ...

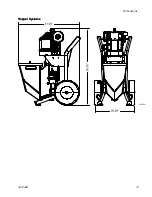
Page 31: ...Dimensions Hopper Hopper Hopper Systems Systems Systems 3A3164D 31 ...

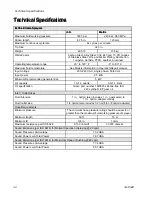
Page 32: ...nput power 2 5 kVA Minimum Recommended generator size 5 kW Oil capacity 1 0 1 2 quarts 0 9 1 1 liters Oil specification Graco part number 16W645 silicone free ISO 220 synthetic EP gear oil Inlet Outlet Sizes Fluid inlet size 1 in npt m also includes 1 in nps swivel to 1 in npt m adapter elbow Fluid outlet size 1 2 npt m also includes 1 2 npt f to 3 8 npt m adapter Hose Requirements Minimum pressur...

Page 33: ...d generator size 5 kW Oil capacity 1 0 1 2 quarts 0 9 1 1 liters Oil specification Graco part number 16W645 silicone free ISO 220 synthetic EP gear oil Inlet Outlet Sizes Fluid inlet size 1 in npt m also includes 1 in nps swivel to 1 in npt m adapter elbow Fluid outlet size 1 2 npt m also includes 1 2 npt f to 3 8 npt m adapter Hose Requirements Minimum pressure The minimum hose pressure rating sh...

Page 34: ...LITY AND AND AND FITNESS FITNESS FITNESS FOR FOR FOR A A A PARTICULAR PARTICULAR PARTICULAR PURPOSE PURPOSE PURPOSE IN IN IN CONNECTION CONNECTION CONNECTION WITH WITH WITH ACCESSORIES ACCESSORIES ACCESSORIES EQUIPMENT EQUIPMENT EQUIPMENT MATERIALS MATERIALS MATERIALS OR OR OR COMPONENTS COMPONENTS COMPONENTS SOLD SOLD SOLD BUT BUT BUT NOT NOT NOT MANUFACTURED MANUFACTURED MANUFACTURED BY BY BY GR...

Reviews: