

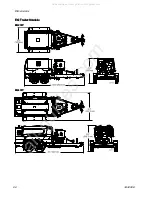
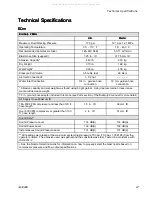

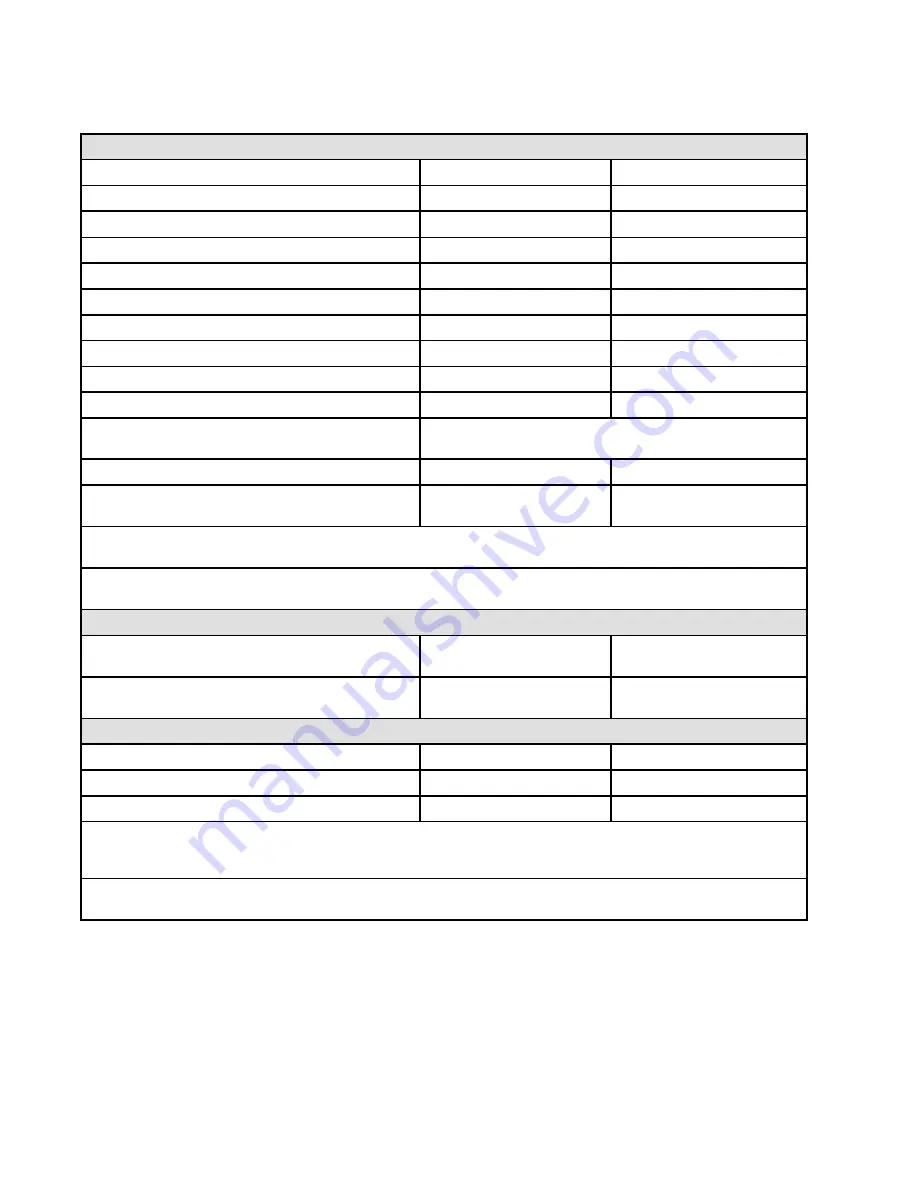
Technical Specifications
EQc
EQc
EQc and
and
and EQc
EQc
EQc Elite
Elite
Elite
EcoQuip
EcoQuip
EcoQuip 2
2
2 EQc
EQc
EQc and
and
and EQc
EQc
EQc Elite
Elite
Elite
U.S.
U.S.
U.S.
Metric
Metric
Metric
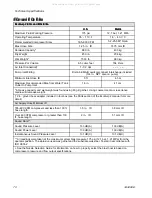
Maximum Fluid Working Pressure
175 psi
12.1 bar, 1.21 MPa
Operating Temperature
35˚ - 110˚ F
1.6˚ - 43.3˚ C
Recommended Compressor Size+
185–900 CFM
5.2–25.5 M^3/min
Blast Hose Size
1.25 in. ID
31.75 mm ID
Abrasive Capacity*
880 lb.
400 kg
Dry Weight
450 lb.
204 kg
Wet Weight*
1500 lb.
680 kg
Pressure Pot Volume
6.5 cubic feet
184 liters
Air Inlet Connection†
1–1/2 npt
– – – – –
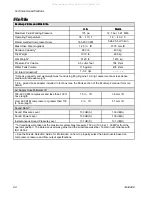
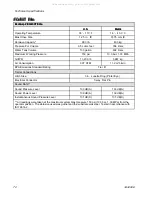
Pump Inlet Fitting
Dixon 6EM6–B quick disconnect interchange included
(3/4 in. NPT also on pump)
Minimum Inlet Hose ID
5 ft
4.5 m
Maximum Recommended Rise from Water Tank
Outlet to Pump Inlet
16 in.
41 cm
* Abrasive capacity and wet weight was found using 80 grit garnet. Using coarser media or less dense
media will decrease weight.
† 2 in. ground boss adapter included in tool box (see the Parts section of the EcoQuip 2 manual for more
detail)
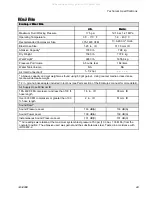
Air Supply Hose Minimum ID
185–600 CFM compressor and less than 100 ft.
hose length
1.5 in. ID
38 mm ID
Over 600 CFM compressor or greater than 100
ft. hose length
2 in. ID
51 mm ID
Sound Data**
Sound Pressure Level
133 dB(A)
133 dB(A)
Sound Power Level
139 dB(A)
139 dB(A)
Instantaneous Sound Pressure Level
131 dB(C)
131 dB(C)
** All readings were taken at the maximum system blast pressure 175 psi (12.1 bar, 1.21 MPa) from the
operator position. The abrasive used was garnet and the substrate was steel. Tested in accordance with
ISO 9614-2.
+ See the Nozzle Selection Guide for information on how to properly select the blast nozzle based on
compressor pressure and flow output specifications.
70
3A3489E
All manuals and user guides at all-guides.com


