background image

How to Spray

3A5097D

17

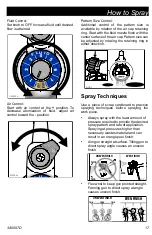
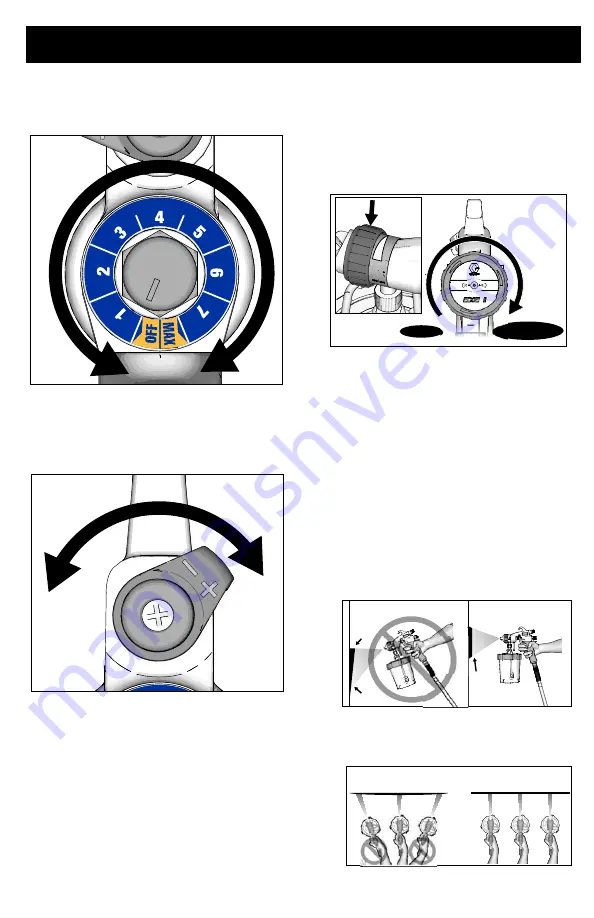
Fluid Control:

Set knob to OFF. Increase fluid until desired 

flow is attained.

Air Control:

Start  with  air  control  at  the 

+

  position.  To

decrease  atomization  of  fluid,  adjust  air

control toward the 

-

 position.

Pattern Size Control:

Additional  control  of  the  pattern  size  is

available by rotation of the air cap retaining

ring. Start with the fluid nozzle flush with the

center surface of the air cap. Pattern size can

be adjusted by rotating the retaining ring in

either direction. 

Spray Techniques

Use a piece of scrap cardboard to practice

spraying  techniques  before  spraying  the

work piece.

Always spray with the least amount of 
pressure required to provide the desired 

spray pattern and rate of application. 

Spraying at pressures higher than 

necessary wastes material and can 

result in an orange peel finish.

Aim gun straight at surface. Tilting gun to 
direct spray angle causes an uneven 

finish.

Flex wrist to keep gun pointed straight. 
Fanning gun to direct spray at angle 

causes uneven finish.

F L

U I D

ti30980b

L U I

ti30980a

ti30981a

THICK

UNEVEN FINISH

EVEN FINISH

THIN

EVEN

ti30761a

UNEVEN FINISH

EVEN FINISH

THICK

THIN

THIN

ti30762a

Summary of Contents for Edge II 17R236

Page 1: ... use only Models 17R236 17R351 17P655 17P483 10 psi 0 07 MPa 0 7 bar Maximum Air Working Pressure 50 psi 0 35 MPa 3 5 bar Maximum Fluid Working Pressure Important Safety Instructions Read all warnings and instructions in this manual and your sprayer instruction manual Be familiar with the controls and the proper usage of the equipment Save these instructions Related Manuals 3A5085 HVLP Sprayer ti3...

Page 2: ...exLiner System 12 Fill Siphon Cup 14 How to Spray 16 Adjust Spray Pattern 16 Adjust Flow and Pattern Size 16 Spray Techniques 17 Triggering Gun 18 Aiming Gun 18 Refilling FlexLiner 18 Refilling Siphon Cup 18 Cleanup 19 Troubleshooting 24 Parts 28 EDGE II 28 Parts List EDGE II 29 Parts 30 EDGE II Plus 30 Parts List EDGE II Plus 31 Parts 32 FlexLiner System Siphon Cup Assembly 32 Parts List 33 FlexL...

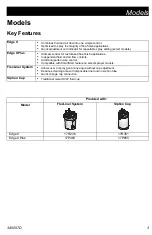
Page 3: ...e finish applications Independent fluid and air flow controls Additional pattern size control Compatible with SmartStart feature on select sprayer models FlexLiner System Allows user to spray gun at any angle without cup adjustment Reduces cleaning time with disposable liner and no siphon tube Quick change cup connection Siphon Cup Traditional metal HVLP fluid cup Provided with Model FlexLiner Sys...

Page 4: ... outlet and use grounded extensions cords Do not use a 3 to 2 adapter Do not use a paint or a solvent containing halogenated hydrocarbons Do not spray flammable or combustible liquids in a confined area Keep spray area well ventilated Keep a good supply of fresh air moving through the area Do not smoke in the spray area or spray where sparks or flame is present Do not operate light switches engine...

Page 5: ...quipment rupture Failure to follow this warning can result in death serious injury or property damage Do not use 1 1 1 trichloroethane methylene chloride other halogenated hydrocarbon solvents or fluids containing such solvents Do not use chlorine bleach Many other fluids may contain chemicals that can react with aluminum Contact your material supplier for compatibility TOXIC FLUID OR FUMES HAZARD...

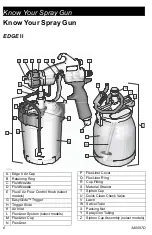
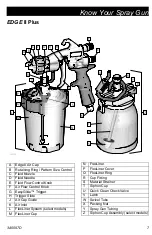
Page 6: ... D Fluid Needle E Fluid Air Flow Control Knob select models G EasyGlide Trigger H Trigger Slide K Air Inlet L FlexLiner System select models M FlexLiner Cup N FlexLiner P FlexLiner Cover Q FlexLiner Ring R Cup Fitting S Material Strainer T Siphon Cup U Quick Clean Check Valve V Latch W Swivel Tube X Packing Nut Y Spray Gun Tubing Z Siphon Cup Assembly select models ...

Page 7: ...id Needle E Fluid Flow Control Knob F Air Flow Control Knob G EasyGlide Trigger H Trigger Slide J Air Cap Guide K Air Inlet L FlexLiner System select models M FlexLiner Cup N FlexLiner P FlexLiner Cover Q FlexLiner Ring R Cup Fitting S Material Strainer T Siphon Cup U Quick Clean Check Valve V Latch W Swivel Tube X Packing Nut Y Spray Gun Tubing Z Siphon Cup Assembly select models ...

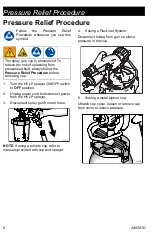
Page 8: ...ay gun from air hose NOTE If using a remote cup refer to manuals provided with cup and sprayer 4 If using a FlexLiner System Disconnect tubing from gun to relieve pressure in the cup 5 If using a metal siphon cup Unlatch cup cover loosen or remove cup from cover to relieve pressure The spray gun cup is pressurized To reduce the risk of splashing from pressurized fluid always follow the Pressure Re...

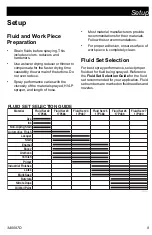
Page 9: ...ecommendations For proper adhesion ensure surface of work piece is completely clean Fluid Set Selection For best spray performance select proper fluid set for fluid being sprayed Reference the Fluid Set Selection Guide for the fluid set recommended for your application Fluid set numbers are marked on fluid needles and nozzles FLUID SET SELECTION GUIDE Material Fluid Set 2 Fluid Set 3 Fluid Set 4 F...

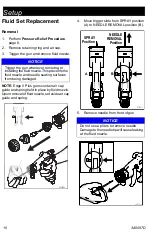
Page 10: ... nozzle set aside air cap guide and spring 4 Move trigger slide from SPRAY position A to NEEDLE REMOVAL position B 5 Remove needle from front of gun NOTICE Trigger the gun whenever removing or installing the fluid nozzle This prevents the fluid nozzle and needle seating surfaces from being damaged ti30850a NOTICE Do not use a pliers to remove needle Damage to the needle tip will cause leaking at t...

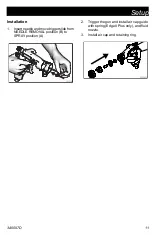
Page 11: ... 1 Insertneedleandmovetriggerslidefrom NEEDLE REMOVAL position B to SPRAY position A 2 Trigger the gun and install air cap guide with spring Edge II Plus only and fluid nozzle 3 Install air cap and retaining ring ti30939a ti30940a ...

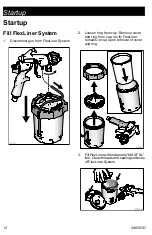
Page 12: ...from FlexLiner System 2 Loosen ring from cup Remove cover and ring from cup Verify FlexLiner remains in cup upon removal of cover and ring 3 Fill FlexLiner with material to MAX FILL line Clean threads and sealing surfaces of FlexLiner System ti30706a ti30707a ti30708a ...

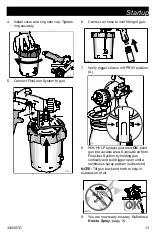
Page 13: ...e is in SPRAY position A 8 With HVLP sprayer powered ON point gun into a waste area Evacuate air from FlexLiner System by holding gun vertically and pull trigger open until a continuous spray pattern is observed NOTE Tilt gun back and forth to help in evacuation of air 9 You are now ready to spray Reference How to Spray page 16 ti30709a ti30681a ti30683a ti30945a ti30687a ...

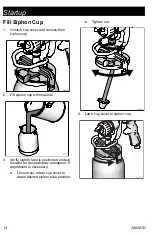
Page 14: ...ll siphon cup with material 3 Verify siphon tube is positioned in ideal location for desired spray orientation If adjustment is necessary a Loosen nut rotate cup cover to attain desired siphon tube position b Tighten nut 4 Latch cup cover to siphon cup ti30628a ti30941a ti30942a ti30943a ...

Page 15: ...Startup 3A5097D 15 5 Connect sprayer air hose to air inlet of gun 6 Verify trigger slide is in SPRAY position A 7 You are now ready to spray Reference How to Spray page 16 ti30944a ti30945a ...

Page 16: ...Fluid Air Control Flow and pattern size is determined by adjustment to the Fluid Air control knob Set knob to OFF Increase flow until desired finish is attained Edge II Plus Flow and pattern size is determined by adjustment to the Fluid Air and Pattern Size controls The turbine motor generates sparks These sparks can ignite flammable fumes Keep sprayer in a well ventilated area Keep sprayer at lea...

Page 17: ... either direction Spray Techniques Use a piece of scrap cardboard to practice spraying techniques before spraying the work piece Always spray with the least amount of pressure required to provide the desired spray pattern and rate of application Spraying at pressures higher than necessary wastes material and can result in an orange peel finish Aim gun straight at surface Tilting gun to direct spra...

Page 18: ...nd stroke off of work piece surface Aiming Gun Aim center of spray gun at bottom edge of previous stroke overlapping each stroke by half If gun does not spray reference Troubleshooting page 24 Refilling FlexLiner 1 Perform Pressure Relief Procedure page 8 2 Reference Fill FlexLiner System page 12 Refilling Siphon Cup 1 Perform Pressure Relief Procedure page 8 2 Reference Fill Siphon Cup page 14 ti...

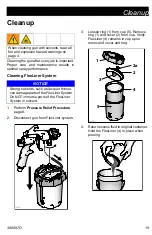
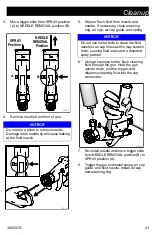
Page 19: ...om cup 5 Remove ring 1 and cover 2 from cup Verify FlexLiner 4 remains in cup upon removal of cover and ring 4 Return excess fluid to original container Hold the FlexLiner 4 in place when pouring When cleaning gun with solvents read all fire and explosion hazard warnings on page 4 NOTICE Strong solvents such as lacquer thinner can damage parts of the FlexLiner System Do NOT immerse parts of the Fl...

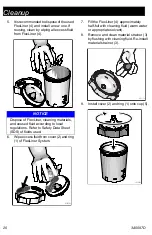
Page 20: ... Fill the FlexLiner 4 approximately half full with cleaning fluid warm water or appropriate solvent 8 Remove and clean material strainer 3 by flushing with cleaning fluid Re install material strainer 3 9 Install cover 2 and ring 1 onto cup 5 NOTICE Dispose of FlexLiner cleaning materials and unused fluid according to local regulations Refer to Safety Data Sheet SDS of fluids used ti30776a ti30900a...

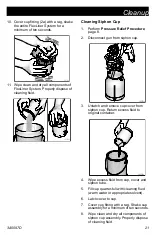
Page 21: ...isconnect gun from siphon cup 3 Unlatch and remove cup cover from siphon cup Return excess fluid to original container 4 Wipe excess fluid from cup cover and siphon tube 5 Fill cup quarter full with cleaning fluid warm water or appropriate solvent 6 Latch cover to cup 7 Cover cup fitting with a rag Shake cup assembly for a minimum of ten seconds 8 Wipe clean and dry all components of siphon cup as...

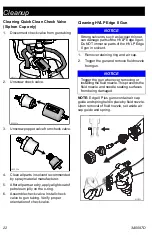
Page 22: ...of check valve Cleaning HVLP Edge II Gun 1 Remove retaining ring and air cap 2 Trigger the gun and remove fluid nozzle from gun NOTE Edge II Plus guns contain air cap guide and spring held in place by fluid nozzle Upon removal of fluid nozzle set aside air cap guide and spring ti30991a ti30992a ti30993a NOTICE Strong solvents such as lacquer thinner can damage parts of the HVLPEdge II gun Do NOT i...

Page 23: ...aning fluid into the cup connection 7 Re install needle and move trigger slide from NEEDLE REMOVAL position B to SPRAY position A 8 Trigger the gun and install spring air cap guide and fluid nozzle Install air cap and retaining ring NOTICE Do not use a pliers to remove needle Damage to the needle tip will cause leaking at the fluid nozzle ti30851a SPRAY Position NEEDLE REMOVAL Position A B ti30852...

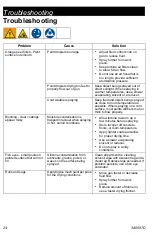
Page 24: ... become too thick to flow properly Blushing clear coatings appear milky Moisture condensation is trapped in lacquer when spraying in hot humid conditions Allow turbine to warm up a few minutes before spraying Store lacquer off concrete floors at room temperature Apply lighter coats and allow for proper drying time Use a slower evaporating solvent or reducer Do not spray in windy conditions Fish ey...

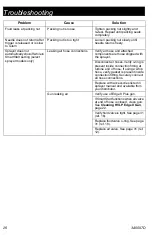
Page 25: ...plicable Check for obstructions in gun tubing Clean or replace gun tubing if necessary Air flow to cup blocked Siphon cup Remove cup leave cover connected Trigger gun and check air flow out of check valve If air is not flowing freely clean or replace check valve Fluid in the check valve siphon cup only Clean check valve Reference Cleaning Quick Clean Check Valve Siphon Cup only page 22 Plugged mat...

Page 26: ...ed components are those shipped with the sprayer Disconnect air hoses Verify o ring is present inside connection fitting at turbine end of hose If using a whip hose verify gasket is present inside connection fitting Securely connect all hose connections Replace with accessories listed in sprayer manual and available from your distributor Gun leaking air Verify use of Edge II Plus gun If SmartStart...

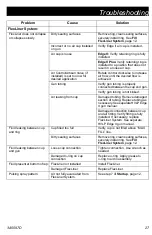
Page 27: ... Air leaking from cup Damaged tubing Remove damaged section of tubing Replace tubing as necessary See separate HVLPEdge II gun manual Damaged connection between cup and air fitting Verify fitting is fully installed If necessary replace FlexLiner System See separate HVLP Edge II gun manual Fluid leaking between cup and ring Cup filled too full Verify cup is not filled above MAX FILL line Dirty seal...

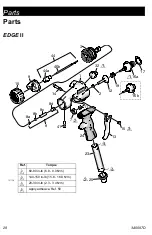
Page 28: ...GE II 10 1 2 12 19 16a 16b 32 17 14 13 23 24 25 11 7 3 8 8a 8b 8c 8d 41 15 44a 44 46b 9 ti31145a Ref Torque 60 80 in lb 6 8 9 0 N m 140 150 in lb 15 8 16 9 N m 20 30 in lb 2 3 3 4 N m Apply adhesive Ref 50 1 2 3 4 1 3 4 2 1 4 2 ...

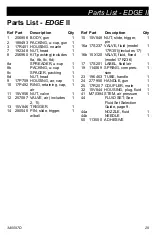
Page 29: ...856 NUT valve 1 12 257087 VALVE air includes 2 11 1 13 15V846 TRIGGER 1 14 280545 PIN slide trigger w ball 1 15 15V848 NUT slide trigger pin 1 16a 17S237 VALVE fluid model 17R351 includes 17 1 16b 15X120 VALVE fluid fixed model 17R236 1 17 17S201 LABEL fluid air 1 19 114069 SPRING compres sion 1 23 196463 TUBE handle 1 24 277950 HANDLE gun 1 25 17R207 COUPLER male 1 32 15V844 HOUSING plug fluid 1 ...

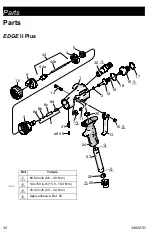
Page 30: ... 10 1 2 12 19 18 16 32 17 14 13 23 24 26 26 25 11 7 3 8a 8 41 8b 8c 8d 15 44a 44b 44 4 5 9 ti30996a ref 49 Ref Torque 60 80 in lb 6 8 9 0 N m 140 150 in lb 15 8 16 9 N m 20 30 in lb 2 3 3 4 N m Apply adhesive Ref 50 1 2 3 4 1 3 4 2 1 4 2 ...

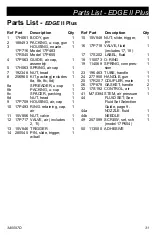
Page 31: ...1 10 17P493 RING retaining cap air 1 11 15V856 NUT valve 1 12 17P717 VALVE air includes 2 11 1 13 15V846 TRIGGER 1 14 280545 PIN slide trigger w ball 1 15 15V848 NUT slide trigger pin 1 16 17P718 VALVE fluid includes 17 18 1 17 17S202 LABEL fluid 1 18 110073 O RING 1 19 114069 SPRING compres sion 1 23 196463 TUBE handle 1 24 277950 HANDLE gun 1 25 17R207 COUPLER male 1 26 17P879 GASKET handle 2 32...

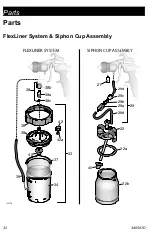
Page 32: ...Parts 32 3A5097D Parts FlexLiner System Siphon Cup Assembly ti30998a 39 40 40 37 34 22b 22a 22 29d 29a 29b 29c 29d 29 42 42a 33 36 21 35 38b 38 38a 38c FLEXLINER SYSTEM SIPHON CUP ASSEMBLY ...

Page 33: ... adapter 1 38c 113137 PACKING o ring 1 39 17S108 TUBE air cup 1 40 193218 STRAINER 1 42 17S166 CAP sold sepa rately includes 42a 1 42a 111507 ORING sold sepa rately 1 Ref Part Description Qty 21 196468 FITTING adapter 1 22 244130 CUP 1qt under includes 22a 22b 29 1 22a M70424 CUP gasket 1 22b 244132 CUP bottom 1 29 256957 CHECK VALVE com plete includes 29a 29b 29c 29d 1 29a FITTING adapter 1 29b P...

Page 34: ...Notes 34 3A5097D Notes ...

Page 35: ...y 20 oz 570 g FlexLiner System 15 oz 425 g Siphon Cup Assembly 17 oz 480 g Noise Sound pressure 65 0 dBa Sound power 65 0 dBa Wetted Materials of Construction Edge II Edge II Plus gun only stainless steel aluminum ultra high molecular weight polyethylene UHMWPE acetal fluoroelastomer FlexLiner System stainless steel Grilamid polyethylene low density polyethylene LDPE Siphon Cup stainless steel bra...

Page 36: ... the time of publication The manufacturer reserves the right to make changes at any time without notice Original instructions This manual contains English MM 3A5097 For patent information see www graco com patents Copyright 2017 All manufacturing locations are registered to ISO 9001 Revision D December 2018 ...

Reviews: