4. Cleaning a Clogged Tip
-------WARNING-----
To reduce the risk of serious bodily injury from in
jection, use extreme caution when cleaning or
changing spray tips. If the spray tip clogs while
spraying, engage the gun safety latch immediate-
ly. Then follow the procedure below.
NEVER wipe off build-up around the spray tip until
pressure is fully relieved and the gun safety latch is
engaged.
a. Clean the front of the tip frequently during the
day's operation.
First,
follow the
Pressure
Relief Procedure Warning
on page 10. Then
use a solvent-soaked brush to keep fluid from
building up and clogging the tip.
b. If the spray tip does clog, release the gun trig
ger, and engage the gun safety latch.
c.
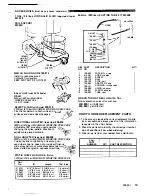
Model 226-333 and 226-336 only
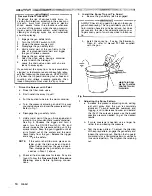
Rotate the RAC IV handle 180
°
. See Fig 6.
Disengage the gun safety and trigger the gun
into a grounded waste container. Engage the
gun safety again. Return the handle to the
original position.
Model 23 7-003 only
VERY SLOWLY loosen the tip guard retaining
nut or hose end coupling, and relieve pressure
gradually, then loosen completely. Clear the tip
or hose, then reassemble.
d. Disengage the gun safety, and resume spraying.
e.
If the tip is still clogged,
engage the gun safety,
shutoff and unplug the sprayer, and open the
drain valve to relieve pressure. Remove the
spray tip and clean it.
Model 226-333 and 226-336 only
Instructions for cleaning the RAV IV are given
in manual 307-848.
MAINTENANCE
1.
Check the packing nut/wet-cup daily.
First
follow the
Pressure Relief Procedure Warning
·on page 10. Be sure the wet-cup is 1/3 full of TSL
at all times to help prevent fluid buildup on the
piston rod and premature wear of packings. The
packing nut should be tight enough to stop
leakage, but no tighter. Overtightening may cause
binding and excessive packing wear. Use a 1/4 in.
diameter rod to adjust the nut.
NOTE:
Normal seepage of hydraulic fluid past the
hydraulic motor piston rod wiper will
gradually fill the wet-cup. Check the wet
cup every eight hours to prevent overflow.
2.
Clean the fluid filter often
and whenever the
sprayer is stored. First follow the
Pressure Relief
Procedure Warning
on page 10. Refer to manual
307-273, supplied, for the cleaning procedure.
3.
Flush the sprayer at the end of each work day
and fill it with mineral spirits to help prevent pump
corrosion and freezing. See "Flushing Guidelines"
on page 9.
-------CAUTION------.....
To help prevent pump corrosion and to avoid
freezing, never leave water in the sprayer. Freez
ing can seriously damage the pump.
4. For very short shutoff periods,
leave the suction
tube in the paint, follow the
Pressure Relief Pro
cedure Warning
on page 10, and clean the spray
tip.
5.
Coil the hose
around the hose brackets when stor
ing the sprayer, even for overnight, to help protect
hose from damage.
.-------WARNING------
To reduce the risk of component rupture which
can cause serious bodily injury, NEVER use worn
or damaged hoses. Refer to the
Hose Safety
Warning
on page 3.
Fig 6------------------
6.
Check the hydraulic fluid level
occasionally.
Add fluid as necessary to keep the fluid level be
tween the ADD and FULL rnarks on the dipstick.
Refer to page 8.
7.
Change the hydraulic fluid
every 2000 hours of
operation or every 12 months, whichever comes
first. Also clean the hydraulic pump intake filter and
replace the disposable filter in the return line.
First,
follow the
Pressure Relief Procedure Warning
on page 10, then remove the sprayer shield and
follow the instructions under "Replacing the Elec
tric Motor", page 14, to get at the filters, remove
the old hydraulic fluid and clean the sump.
8. Relieve fluid pressure when not using the sprayer to
avoid the pump stalling out at the top of its stroke.
If the pump stalls, follow the
Pressure Relief Pro
cedure Warning
on page 10, remove the plug
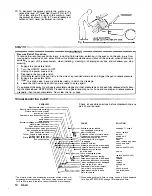
from the top of the hydraulic motor and push the
spool all the way down. See Fig 7. Replace the plug
and restart the sprayer.
Fig 7-----------------
9. Periodically, or if electric motor is overheating,
unplug unit, follow
Pressure Relief Procedure
Warning,
page 10, remove shield and clean all
paint, dirt, dust, etc., off the shield, fan blades,
motor and cooling fin�.
306-941
11


