On/Off Switch Replacement
333126A
25
On/Off Switch Replacement
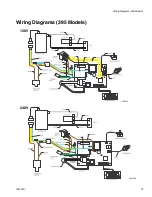
See
Wiring Diagram
, page 37.
Removal
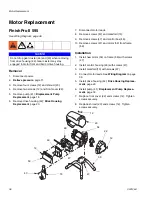
1. Disconnect power.
2.
Relieve pressure
, page 11.
3. Remove four screws (12) and pressure control
cover (50).
NOTE:
Tag wires before removing to ensure wires are
identifiable when assembling.
4. Disconnect three wires (A) from ON/OFF switch (58).
5. Remove toggle boot/nut (30) (120V models only).
6. Remove two yellow wires (B) from ON/OFF switch.
Remove ON/OFF switch.
Installation
1. Connect two yellow wires (B) to ON/OFF switch (58)
2. Install new ON/OFF switch (58). Install toggle
boot/nut (30).
3. Connect three wires (A) to ON/OFF switch.
4. Install pressure control cover (50) with four screws (12).
B
A
ti22705a
B
A
30
50
12
58
ti22704a
FinishPro II 595
FinishPro II 395 (120V model)
Summary of Contents for FinishPro II 395
Page 7: ...Notes 333126A 7 Notes ...
Page 41: ...Notes 333126A 41 Notes ...


