background image

10

307–633

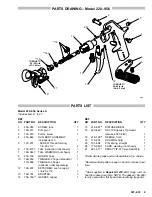
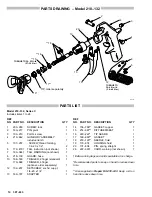
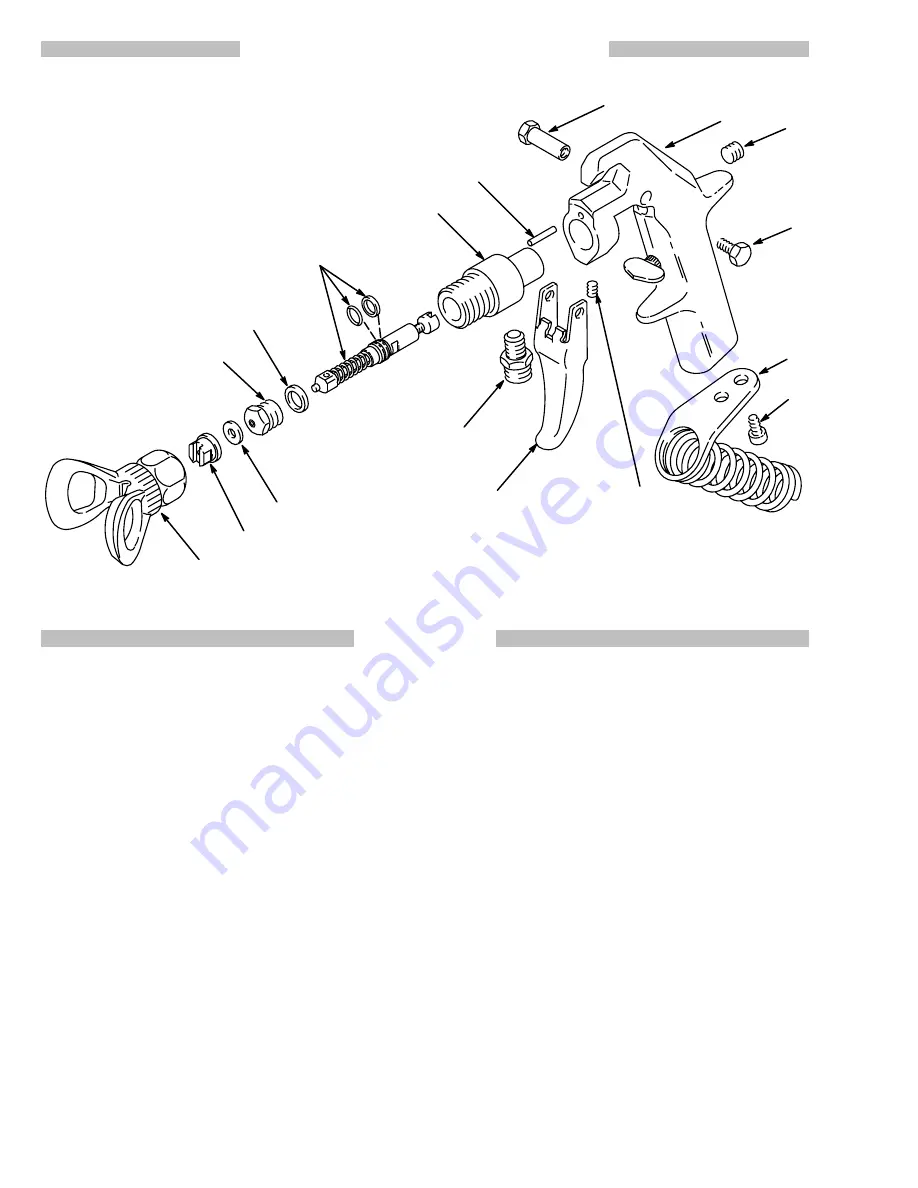
PARTS DRAWING  – Model 218–132

17**

TIP, order separately

0710

16*

**15

**14

19

20

**18

2

4

3

1

8

12

10

13

TORQUE TO 20–25 ft–lb

(27–34 N.m)

5

TORQUE TO
30–40 in–lb
(3.4–4.5 N.m)

PARTS LIST

Model 218–132, Series C
Includes items 1 to 26

REF
NO. PART NO.

DESCRIPTION

QTY

REF
NO. PART NO.

DESCRIPTION

QTY

1

203–953

SCREW, lock

1

2

160–217

PIN, pivot

1

3

103–219

PLUG, screw

1

4

218–642

GUN BODY ASSEMBLY
includes item 5

1

5

107–257

. SCREW, thread forming,

1/4–20 x 1/2”

2

6

172–479

TAG, instruction (not shown)

1

7

180–044

TAG, WARNING (not shown)

1

8

218–139

GUARD, hose

1

10

169–550

TRIGGER, 2 finger (standard)

1

170–668

TRIGGER, 4 finger
(optional, order separately)

1

12

102–207

SETSCREW, soc hd cup pt; 
1/4–20 x 1/4”

1

13

169–797

ADAPTER

1

14

156–766**

GASKET, copper

1

15

214–967**

DIFFUSER/SEAT

1

16

220–222*

TIP GUARD

1

17

166–969**

GASKET

1

18

218–129**

NEEDLE, fluid

1

19

179–974

HOUSING, fluid

1

20

101–804

PIN, spring, straight

1

26

222–385

CARD, warning (not shown)

1

Extra warning tags and cards available at no charge.

*Recommended parts to keep on hand to reduce down
time.

**Also supplied in Repair Kit 218–143. Keep a kit on
hand to reduce down time.

Summary of Contents for FLEX 218-13

Page 1: ...size SwitchTip Has two finger trigger Model 218 132 Series C Includes standard tip guard and flat tip Has two finger trigger A four finger trigger is available See page 11 TABLE OF CONTENTS Warnings 2...

Page 2: ...e tip is not installed Check the diffuser opera tion regularly Follow the PRESSURE RELIEF PROCEDURE below then remove the spray tip Aim the gun into a metal pail holding the gun firmly to the pail Usi...

Page 3: ...e a tag on it which specifies the maximum electrical resistance con tact the hose supplier or manufacturer for the maximum resis tance limits Use a resistance meter in the appropriate range for your h...

Page 4: ...in the displacement pump hose and gun triggering the gun to relieve pressure may not be sufficient WARNING 1 Guide a grounded fluid hose A through the hose guard 8 and connect the hose to the gun inl...

Page 5: ...spray pattern try another tip size Relieve pressure com pletely before changing tips 3 For maximum seat and needle life Use a full open full close trigger action Hold the gun about 14 in 350 mm from a...

Page 6: ...ste container This should force the ob struction from the tip Engage the trigger safety latch and return the SwitchTip to the normal spraying posi tion If you are using a flat tip and tip guard shut o...

Page 7: ...4 and setscrew 12 Pull the housing 19 off the gun body 5 Gently tap the needle 18 from the rear of the hous ing 19 to push it out the front Reassembly 1 Lubricate the o ring D and backup ring E of the...

Page 8: ...urn the needle clockwise until it does 2 With light pressure hold the trigger against the latch Turn the needle counterclockwise until there is enough tension for you to feel and see the trigger raise...

Page 9: ...GUARD hose 1 10 169 550 TRIGGER 2 finger standard 1 170 668 TRIGGER 4 finger optional order separately 1 12 102 207 SETSCREW soc hd cup pt 1 4 20 x 1 4 1 13 169 797 ADAPTER 1 14 156 766 GASKET copper...

Page 10: ...172 479 TAG instruction not shown 1 7 180 044 TAG WARNING not shown 1 8 218 139 GUARD hose 1 10 169 550 TRIGGER 2 finger standard 1 170 668 TRIGGER 4 finger optional order separately 1 12 102 207 SETS...

Page 11: ...as indicated on pages 8 and 9 4 FINGER TRIGGER KIT 170 668 Replaces standard 2 finger trigger NYLON BRUSHES 101 891 3 8 9 mm dia 101 892 5 8 16 mm dia WRENCH 171 147 Fits all hexes on the gun SERVICE...

Page 12: ...ion of the claim If the claimed defect is verified Graco will re pair or replace free of charge any defective parts The equipment will be returned to the original pur chaser transportation prepaid If...

Reviews: