6
307–633
OPERATION
Cleaning and clearing the spray tip
To reduce the risk of a fluid injection or splashing in
the eyes or on the skin, DO NOT hold your hand,
body, or a rag in front of the spray tip when cleaning
or checking a clogged tip. Always point the gun to-
ward the ground or into a waste container when
checking to see if the spray tip is cleared.
DO NOT try to “blow back” paint; this is NOT an air
spray gun.
DO NOT wipe fluid buildup off the gun or spray tip
until pressure is relieved. See the Pressure Relief
Procedure on page 2.
WARNING
1.
Clean off the front of the tip frequently during the
day’s operation and at the end of each work day. Re-
lieve pressure first. Then use a solvent-soaked brush
to clean the spray tip and to keep fluid buildup from
drying on and clogging the spray tip.
2.
If the spray tip clogs while spraying, release gun trig-
ger and engage the trigger safety latch.
If you are using a Reverse-A-Clean
r
IV DripLess
t
Tip Guard and SwitchTip
t
, rotate the SwitchTip
180
_
. Disengage the trigger safety latch. Trigger the
gun into a waste container. This should force the ob-
struction from the tip. Engage the trigger safety latch
and return the SwitchTip to the normal spraying posi-
tion.
If you are using a flat tip and tip guard, shut off the
power to the pump or sprayer. Open the pressure
drain valve. Without holding your hand over the tip,
very slowly loosen the tip guard retaining nut and re-
lieve pressure gradually. Remove the tip guard and
tip. Soak the tip in a compatible solvent, and then tap-
ping the back of the tip on a flat surface to remove the
clog. Do not use sharp instruments which can dam-
age the tip. Reinstall the tip and tip guard.
CAUTION
NEVER soak the entire gun in solvent. Prolonged
exposure to solvent can ruin the packings.
Flush the gun
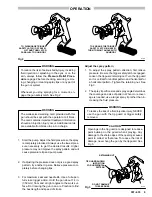
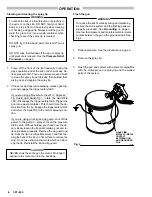
To reduce the risk of static sparking and splashing,
be sure the entire system and the flushing pails are
properly grounded. See Grounding on page 3.
Use low fluid pressure and maintain metal-to-metal
contact between the gun a the grounded pail. See
Fig 4.
WARNING
1.
Relieve pressure. See the procedure on page 2.
2.
Remove the spray tip.
3.
Flush the gun and system with a solvent compatible
with the material you are spraying and the wetted
parts of the system.
Fig 4
MAKE FIRM
METAL-TO-METAL
CONTACT
BETWEEN GUN
AND GROUNDED
PAIL
0703


