Repair
333011D
33
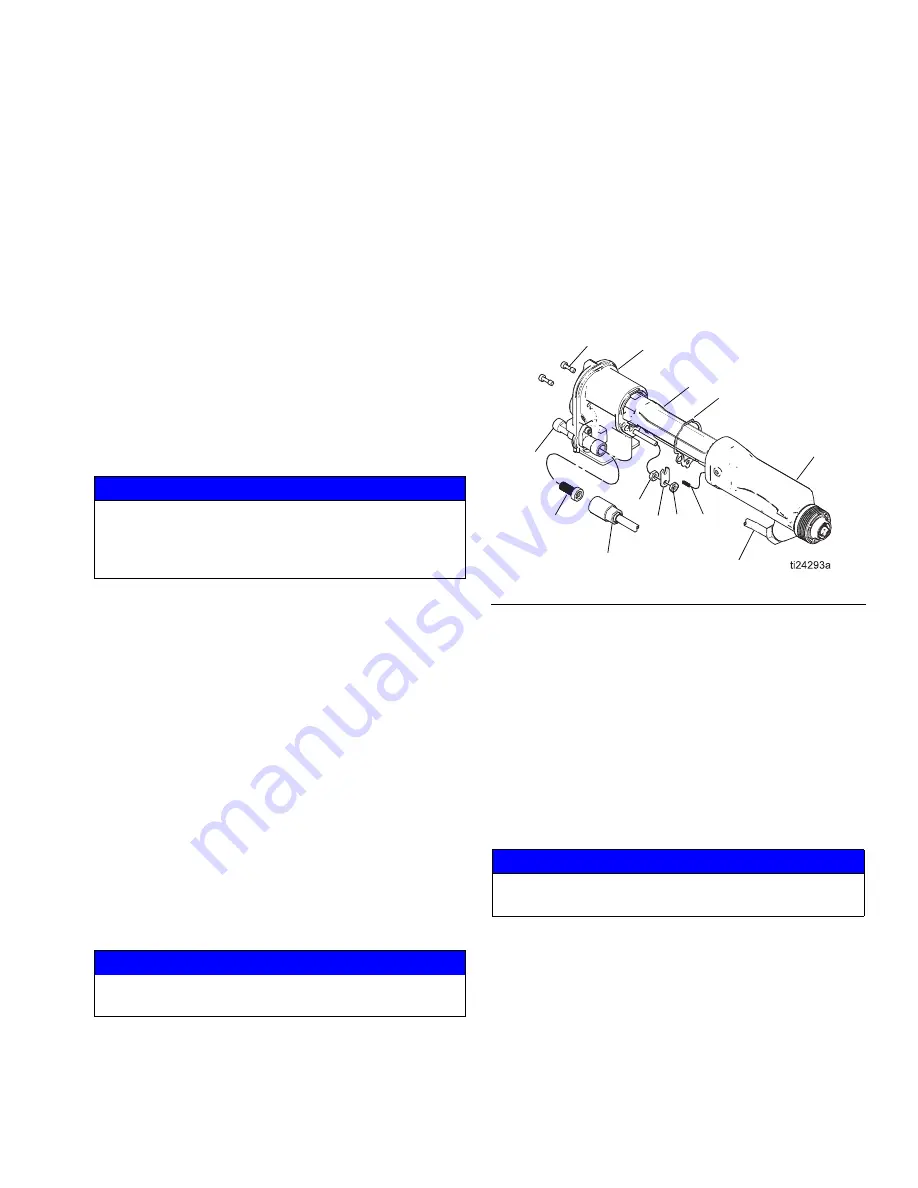
Barrel Removal
See F
IGURE
31
1. Prepare the gun for service and remove the mani-
fold, page 28.
2. Remove the air cap and tip, page 29. Remove the
gun shroud (26).
3. Carefully loosen the fluid fitting nut (C). Pull the tube
(35) out of the fitting (32). See F
IGURE
31.
NOTE:
Use two wrenches to remove the fluid tube fitting
(C).
4. Remove the adjustment nuts (16a, 16b) and actua-
tor arm (15). See F
IGURE
30.
5. Loosen the two screws (19). See F
IGURE
31.
6. Hold the gun body (10) with one hand and pull the
barrel (1) straight off the body. See F
IGURE
31.
Barrel Installation
See F
IGURE
31
1. Verify the gasket (9) and grounding spring (6) are in
place and the gasket air holes are aligned properly.
Replace the gasket if damaged.
2. Make sure the spring is in place on the tip of the
power supply (7). Liberally apply dielectric grease to
the tip of the power supply. Place the barrel (1) over
the power supply and onto the gun body (10).
3. Tighten the two barrel screws (19) oppositely and
evenly (about a half turn past snug or 20 in-lbs). Do
not over-tighten.
4. Make sure the fluid filter (34) is in place. Tighten the
bottom nut (C) onto the fitting (32) and torque to
20-30 in-lb (2.3-3.4 N•m). Make sure the top nut (D)
remains tight.
NOTE:
Use two wrenches to install the fluid tube fitting
(C).
5. Install and adjust the actuator arm (15), jam nut
(16a), and adjustment nut (16b). See page 32.
6. Test gun resistance, page 22.
7. Install the gun shroud (26) and air cap, page 29.
8. Install the gun onto the manifold. See page 29.
Power Supply Removal and
Replacement
•
Inspect the gun handle power supply cavity for dirt
or moisture. Clean with a clean, dry rag.
•
Do not expose gasket (9) to solvents.
1. See
Prepare the Gun for Service
, page 28.
2. See
Barrel Removal
, page 33.
3. Grasp the power supply (7) with your hand. With a
gentle side to side motion, free the power sup-
ply/turbine assembly from the gun body (10), then
carefully pull it straight out.
Smart models only:
disconnect the flexible circuit
(30) from the socket at the top of the gun body.
4. Inspect the power supply and turbine for damage.
NOTICE
To avoid damaging the power supply, pull the gun bar-
rel (1) straight away from the gun body (10). If neces-
sary, gently move the gun barrel from side to side to
free it from the gun body.
NOTICE
To avoid damaging the gun barrel, do not over-tighten
the screws (19).
F
IG
. 31 . Barrel
NOTICE
Be careful when handling the power supply (7) to
avoid damaging it.
1
10
34
19
15
16a
16b
35
9
6
7
32
C


