


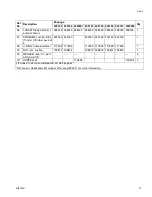

Repair
3A0732U
17
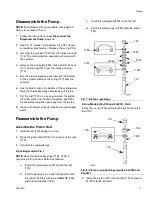
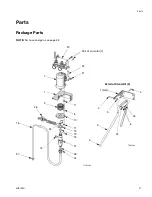
Disassemble the Pump
NOTE:
Pump Repair Kits are available. See page 42.
Parts are marked with an ‡.
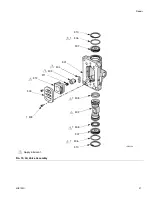
1. Follow the instructions under
2. See F
IG
. 12. Loosen the packing nut (103), using a
screwdriver and hammer. Remove the o-ring (104).
3. Unscrew the cylinder (105) from the intake housing
(110). The rod and piston assembly will come with
the cylinder.
4. Remove the ball guide (109), intake ball (116), seat
(117), and o-ring (111) from the intake housing
(110).
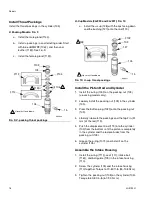
5. Drive the rod and piston assembly out the bottom
of the cylinder. Remove the o-ring (107) from the
cylinder.
6. Insert a plastic rod in the bottom of the cylinder and
drive the throat packings and glands out the top.
7. Put the rod (119) in a vise and unscrew the piston
(124). Be careful not to drop the piston ball (120).
Disassemble the piston packings from the piston.
8. Clean and inspect all parts. Replace any damaged
parts.
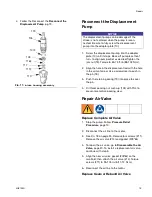
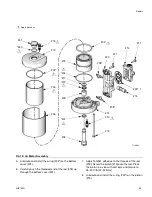
Reassemble the Pump
Assemble the Piston Rod
1. Hold the rod (119) upright in a vice.
2. Place the piston ball (120‡) in the cavity of the rod.
(119).
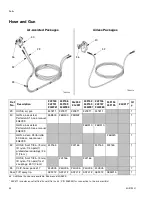
3. Install piston rod packings.
V-packing models: F
NOTE:
Soak the leather packings (113‡, 125‡) in
hydraulic oil for one hour before installation.
a. Install the female gland (121‡) onto the rod
(119).
b. Install v-packings in an alternating order onto
the rod (119). Start with blue UHMWPE (126),
and then and leather (125).
c. Install the male gland (122‡) onto the rod.
d. Install the piston wiper (123‡) onto the piston
(124).
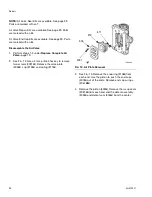
U-Cup Models (24J250 and 24J251): F
Install the u-cup (129) and the bushing (130) onto the
rod (119).
4. Install the piston (124) into the rod (119). Torque to
24-30 ft-lb (33-40 N•m).
F
IG
. 7: Piston v-packings
F
IG
. 8: Piston u-cup packings (models 24J250 and
24J251)
119
125‡
122‡
‡121
120‡
‡126
124
‡123
105
119
130
129
120‡


