Displacement Pump Repair
Intake valve repair
(See Fig. 16)
1.
Remove the suction hose. See Step 3, Removing
the pump.
2.
Unscrew the intake valve (118). Remove the
o-ring (119*), ball guide (120), stop pin (122*) and
ball (121*) from the valve.
3.
Clean and inspect the parts for wear or damage.
Replace parts as needed. Use a new o–ring
(119*). If no further service is needed, reassemble
the pump.
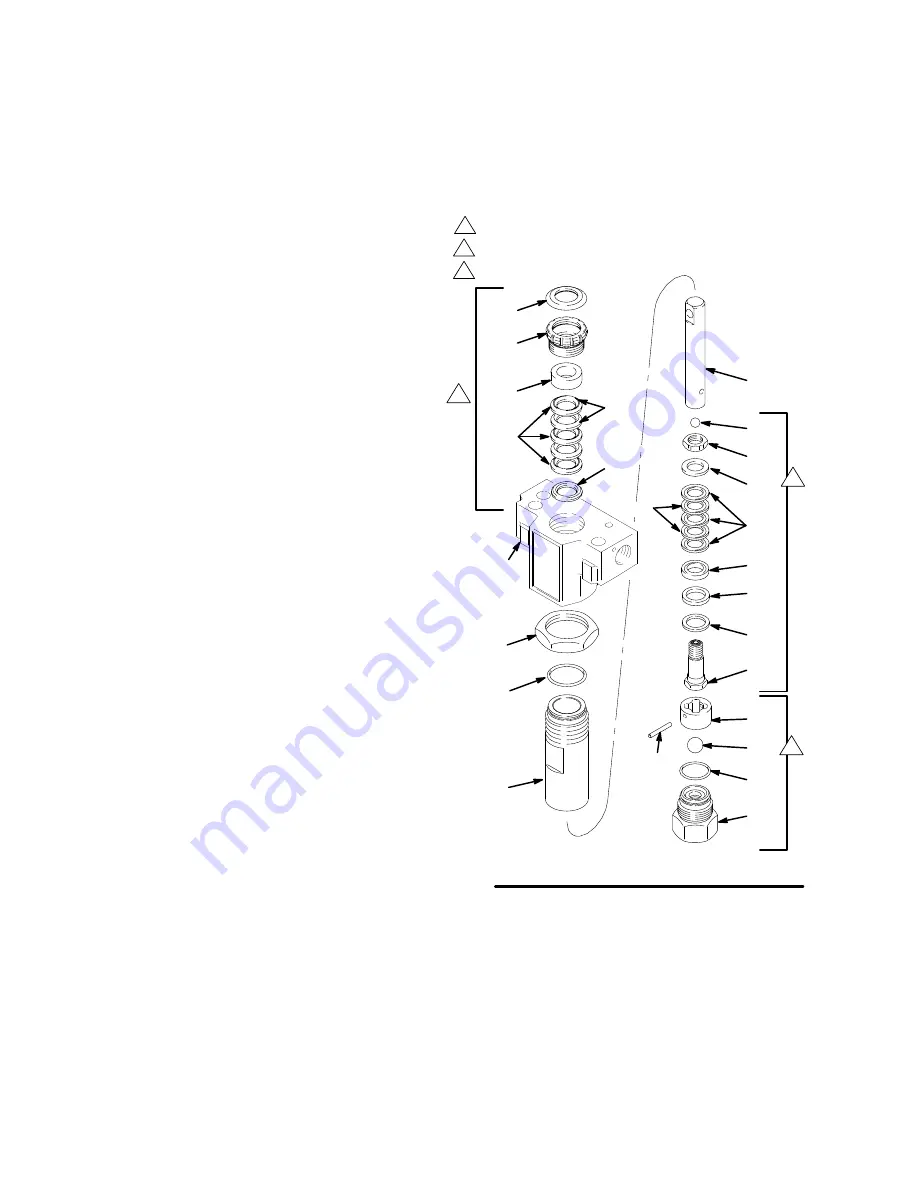
Disassembling the pump
(See Fig. 18.)
1.
Remove the intake valve (118).
2.
Loosen the packing nut (102) and plug (123).
3.
Use a plastic mallet to tap the piston rod (107)
down, and then pull the rod out through the bottom
of the cylinder.
4.
Remove the packing nut (102) and throat pack-
ings.
5.
Loosen the jam nut (117). Remove the cylinder
(115) and the o-ring (116*).
6.
Clamp the flats of the piston rod in a smooth jaw
vise. Use an open-end wrench to loosen the nut
(110) and then unscrew the piston valve (108).
7.
Remove all parts from the piston valve (108).
Reassembling the pump
NOTE: Alternate plastic and leather packings. See Fig.
18. The lips of the throat V-packings face down. The
lips of the piston V-packings face up. Incorrect installa-
tion damages the packings and causes pump leakage.
NOTE: Soak the leather packings in oil before reas-
sembling the pump.
1.
Check the outside of the piston rod (107) and the
inside of the cylinder (115) for wear. Replace worn
parts to ensure a good seal with the new packings.
2.
Stack these parts onto the piston valve (108) one
at a time: the backup washer (126*) and u-cup
(125*), the female gland (114*), alternately three
plastic (112*) with two leather packings (113*), and
the male gland (111*). See Fig. 18.
03148A
Fig. 18
107
109*
110
111
112*
114*
108
123
102
*103
*104
105*
106*
101
117
*116
115
118
*113
Throat packings
Piston packings
Intake valve
125*
126*
Lips down
Lips up
Lips down
119
121
120
122*


