Troubleshooting
36
309293J
9.
Flush the fluid hose and gun with enough air to dry
out the fluid passages.
10. Turn the ES ON/OFF valve to ON and trigger the
gun. Measure the voltage at the gun electrode with
a voltage probe and meter.
11. If the meter reading is 45-55 kV, the gun power sup-
ply is okay, and there is probably a dielectric break-
down somewhere in the fluid hose or gun. Continue
with step 12.
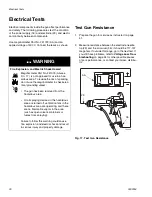
If the reading is below 45 kV, do the electrical tests
on page 30 to check the gun and power supply
resistance. If those tests show the gun and power
supply are okay, continue with step 12.
12. A dielectric breakdown is most likely in one of the
following three areas. Repair or replace the compo-
nent that is failing.
•
Fluid hose
Check for leakage or any bulges in the outer cover,
which may indicate a pin-hole leak through the
PTFE layer. Disconnect the fluid hose from the gun,
and look for signs of fluid contamination on the out-
side of the PTFE portion of the fluid tube.
Inspect the end of the hose connected to the volt-
age isolation system. Look for cuts or nicks.
Make sure the hose is properly stripped (see step 2
on page 12). Restrip or replace the hose.
•
Fluid packings
Remove the packing assembly from the gun as
instructed on page 44, and look for signs of fluid
leakage or any blackened areas, which would indi-
cate arcing is occurring along the packing rod.
•
Fluid hose connection joint to the spray gun
A breakdown at the fluid hose connection joint
would be caused by fluid leaking past the o-ring
seals on the end of the hose. Remove the hose at
the gun connection and look for signs of fluid leak-
age along the PTFE tube.
13. Before reassembling the gun, clean and dry the gun
fluid inlet tube. Repack the inner spacer of the fluid
packing rod with dielectric grease and reassemble
the gun.
14. Reconnect the fluid hose.
15. Check the gun voltage with the voltage probe and
meter before filling the gun with fluid.

