background image

Repair 

16

334599L

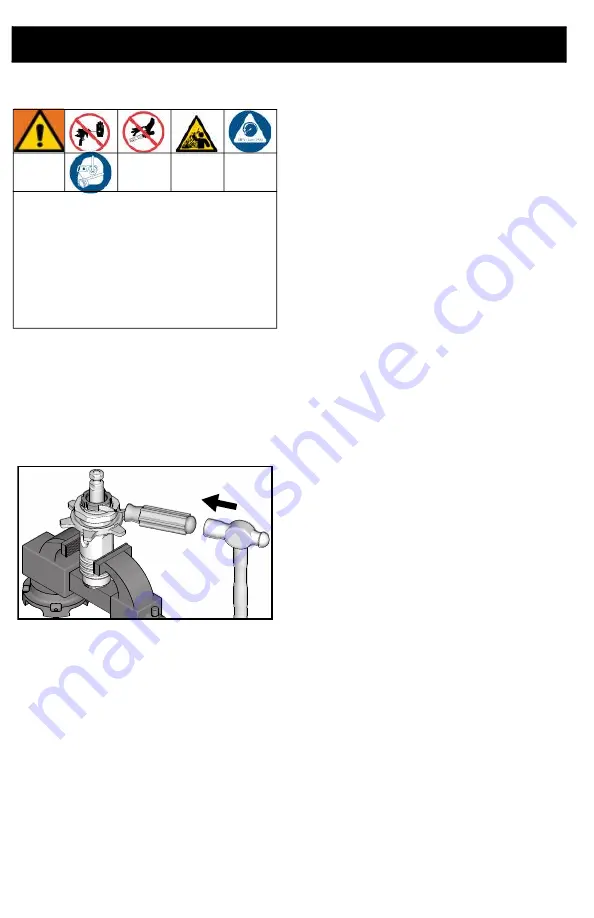
Throat Packing Adjustment

When  pump  packings  begin  to  leak  after

much  use,  perform 

Pressure  Relief

Procedure

, page 5 and tighten packing nut

down  until  leakage  stops  or  lessens.  This

allows  approximately  100  gallons  of

additional  operation  before  a  repacking  is

required.  Packing  nut  can  be  tightened

without o-ring removal.

This equipment stays pressurized until 

pressure is manually relieved. To help 

prevent serious injury from pressurized 

fluid, such as skin injection, splashed 

fluid and moving parts, follow the


Pressure Relief Procedure

 whenever 

sprayer is stopped and before sprayer is 

cleaned or checked, and before 

equipment is serviced.

ti24988a

Summary of Contents for ProConnect 19B732

Page 1: ...87 17C488 17C489 17C721 17M992 24Z731 19Y298 19B732 19D873 Important Safety Instructions Read all warnings and instructions in this manual and related manuals Be familiar with the controls and the proper usage of the equipment Save these instructions Use only genuine Graco replacement parts The use of non Graco replacement parts may void warranty ...

Page 2: ...5 Trigger Lock 5 Pressure Relief Procedure 5 Pump Removal 8 Repair 9 Disassemble Pump 9 Assemble Pump 11 Pump Installation 17 Parts 18 Parts List 19 Parts 20 Parts List 21 Technical Specifications 22 Graco Standard Warranty 23 Graco Information 24 ...

Page 3: ...o protect against static discharge and sparks Use Graco conductive or grounded high pressure airless paint sprayer hoses Verify that all containers and collection systems are grounded to prevent static discharge Do not use pail liners unless they are anti static or conductive Connect to a grounded outlet and use grounded extensions cords Do not use a 3 to 2 adapter Do not use a paint or a solvent ...

Page 4: ... before operating the unit Know how to stop the unit and bleed pressure quickly Be thoroughly familiar with the controls PRESSURIZED ALUMINUM PARTS HAZARD Use of fluids that are incompatible with aluminum in pressurized equipment can cause serious chemical reaction and equipment rupture Failure to follow this warning can result in death serious injury or property damage Do not use 1 1 1 trichloroe...

Page 5: ...ef Procedure 1 Engage the trigger lock ti24612a LineLazer ES 1000 This equipment stays pressurized until pressure is manually relieved To help prevent serious injury from pressurized fluid such as skin injection splashed fluid and moving parts follow the Pressure Relief Procedure whenever sprayer is stopped and before sprayer is cleaned or checked and before equipment is serviced ti24851a LineLaze...

Page 6: ...for power to dissi pate 3 Unplug power cord or shut engine off For LineLazer ES 1000 unplug power cord and disconnect battery 4 Engage the trigger lock 5 Remove tip guard 6 Turn pressure control to the lowest set ting Disengage trigger lock ti24852a ti24853a ti24854a LineLazer ES 1000 ...

Page 7: ...art of the gun firmly to a grounded metal pail Trigger the gun to relieve pressure 8 Engage the trigger lock 9 Open any fluid drain valves in system Leave drain valves open until ready to spray again ti24585a ti24855a LineLazer ES 1000 ti24608a ...

Page 8: ...nlet and outlet and removing the pump 1 Use a hammer to loosen pump retaining nut 2 Turn pump retaining nut to free pump rod cover 3 Swing pump rod cover open 4 Disconnect outlet hose and suction hose from pump 5 Slide pump out of the drive housing ti27248a ti27249a ti27250a ti27252a ...

Page 9: ...old separately 2 Unscrew cylinder from intake valve 3 Dissemble intake valve Clean and inspect O ring may require a pick for removal 4 Tap piston rod out of cylinder with a hammer or flip over and tap piston rod out against a bench NOTICE If using a pick to remove the O ring use care to avoid damage to the machined surfaces ti24875a ...

Page 10: ...n valve from piston rod 7 Clean and inspect parts The piston has a special thread locking sealing patch Apply thread sealant to the threads if needed Do not clean or wipe the piston valve threads Cleaning the piston valve threads could destroy the special sealing patch and cause the piston valve to come loose during operation causing a pump burst and possible serious bodily injury ti24876a ti24877...

Page 11: ...99L 11 8 Remove and discard throat packing and glands from the cylinder Assemble Pump 1 Soakleather packings inSAE 30W oil for one hour before assembly ti24880a Leather Packings ti24890a Leather Packings ti24893a ...

Page 12: ... ant is applied to piston valve threads ensure that none gets on the ball 3 Torque to 27 3 ft lb 37 4 N m 4 Assemble leather throat packings soaked earlier 5 Loosely install packing nut with o ring onto cylinder ti24891a ti24892a Leather Packings ti24893a ti24894 ...

Page 13: ...throat packings Gently guide displacement rod up through throat packings Tap bottom of piston valve as necessary with a leather or plastic hammer 8 For Model 19Y298 Only Slide piston assembly with force into bottom of sleeve 9 For Model 19Y298 Only Grease top inch or two of piston rod that will go through the cylinder throat packings ti24895a ti24896a ...

Page 14: ...ton rod assembly into bottom of cylinder Replace o ring 230 if desired 11 Grease o ring and place on outside diameter ring groove 12 Clean seat thoroughly Reassemble intake valve with a seat ball and new o ring Seat may be flipped over and used on other side 13 Torque to 135 7 ft lb 183 9 N m ti24897a ti24899a ...

Page 15: ...Repair 334599L 15 14 Install o ring onto packing nut Torque to 75 5 in lb 8 5 0 5 N m or addi tional 1 2 turn from hand tight 15 Storage ti24900a ti24901a ...

Page 16: ...of additional operation before a repacking is required Packing nut can be tightened without o ring removal This equipment stays pressurized until pressure is manually relieved To help prevent serious injury from pressurized fluid such as skin injection splashed fluid and moving parts follow the Pressure Relief Procedure whenever sprayer is stopped and before sprayer is cleaned or checked and befor...

Page 17: ...des into the connecting rod when the pump is slid into the drive housing 3 Slide pump all the way into drive hous ing 4 Close pump rod cover Make certain that it is flush against drive housing 5 Use both hands to tighten pump retain ing nut 6 Use a hammer to turn pump retaining nut an additional 1 8 to 1 6th turn or 45 to 60 7 Install suction hose ti24086a ti24085b ti25139a ti24087a ti24088a ti240...

Page 18: ...Parts 18 334599L Parts Models 17C487 17C488 17C489 17C721 17M992 24Z731 19D873 ...

Page 19: ...46429 KIT seat carbide includes 213 217 and 218 1 216 VALVE intake housing 1 15B611 Models 17C487 17C488 17C489 17C721 17M992 24Z731 19D287 Models 19D873 217 15B112 PACKING o ring 0 941 in OD 1 218 105445 BALL sst 0 5000 in 1 219 17V093 PACKING o ring 1 220 160516 O RING 1 221 176755 V PACKING leather throat 2 222 192710 V PACKING throat V MaxTM UHMWPE blue 3 223 176749 V PACKING leather piston 2 ...

Page 20: ...Parts 20 334599L Parts Model 19Y298 19B732 ...

Page 21: ...seat carbide includes 213 217 and 218 1 216 15C785 VALVE intake housing 1 217 107079 PACKING o ring 0 941 in OD 1 218 105445 BALL sst 0 5000 in 1 219 17V093 PACKING o ring 1 220 160516 O RING 1 221 176755 V PACKING leather throat 2 222 192710 V PACKING throat V MaxTM UHMWPE blue 3 223 176749 V PACKING leather piston 2 224 192712 V PACKING piston V MaxTM UHMWPE blue 3 225 17C231 FITTING pump QD 1 4...

Page 22: ... fluid working pressure 3300 psi 228 bar 22 8 MPa Inlet Outlet Sizes Fluid inlet size 1 0 in diameter Fluid outlet size 1 4 in Wetted materials on all models stainless steel PTFE leather nylon zinc plated and nickel plated carbon steel tungsten carbide chrome plating UHMWPE acetal polyethylene nylon ...

Page 23: ...s of parts labor and transportation THIS WARRANTY IS EXCLUSIVE AND IS IN LIEU OF ANY OTHER WARRANTIES EXPRESS OR IMPLIED INCLUDING BUT NOT LIMITED TO WARRANTY OF MERCHANTABILITY OR WARRANTY OF FITNESS FOR A PARTICULAR PURPOSE Graco s sole obligation and buyer s sole remedy for any breach of warranty shall be as set forth above The buyer agrees that no other remedy including but not limited to inci...

Page 24: ...lis International Offices Belgium China Japan Korea GRACO INC AND SUBSIDIARIES P O BOX 1441 MINNEAPOLIS MN 55440 1441 USA Copyright 2014 Graco Inc All Graco manufacturing locations are registered to ISO 9001 www graco com Revision L September 2022 Graco Information For the latest information about Graco products visit www graco com For patent information see www graco com patents TO PLACE AN ORDER...

Reviews: