background image

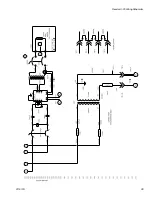
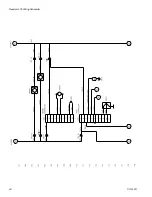
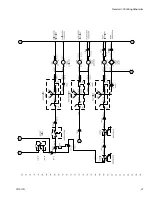
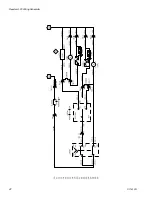
Reactor A-20 Wiring Schematic 

42

311512A

Summary of Contents for Reactor A-20

Page 1: ...ot for use in explosive atmospheres 253831 Air operated electrically heated plural component proportioner This model is field configurable to the following supply voltages 230 V 1 Phase 230 V 3 Phase 380 V 3 Phase 2 000 psi 14 MPa 140 bar Maximum Fluid Working Pressure 120 psi 0 84 MPa 8 4 bar Maximum Air Working Pressure Important Safety Instructions Read all warnings and instructions in this man...

Page 2: ...Auto Drain 16 Primary Heater 17 Heating Elements 18 Fluid Inlet Filter Screen 19 Isocyanate Pump Lubricant 19 Fluid Temperature Sensor FTS 20 Replacing Control Components 22 Hose Power Controller Circuit Breaker Relays 22 Air Motor Up Down Pressure Regulators Gauges 23 Control Panel Wiring 23 Accessories 24 Recommended Spare Parts 25 Parts 26 Reactor A 20 26 Electrical Control Panel 28 Relief Mani...

Page 3: ...oner Part No Description 311511 Reactor A 20 Proportioner Operation Man ual English Proportioning Pump Part No Description 309577 Proportioning Pump Repair Parts Manual English Feed Pump Kit Part No Description 309815 Instruction Parts Manual English Air Supply Kit Part No Description 309827 Instruction Parts Manual English for Feed Pump Air Supply Kit Circulation and Return Tube Kit Part No Descr...

Page 4: ...rdous fluid in approved containers and dispose of it according to applicable guidelines Always wear impervious gloves when spraying or cleaning equipment PERSONAL PROTECTIVE EQUIPMENT You must wear appropriate protective equipment when operating servicing or when in the operating area of the equipment to help protect you from serious injury including eye injury inhalation of toxic fumes burns and ...

Page 5: ...der the influence of drugs or alcohol Do not exceed the maximum working pressure or temperature rating of the lowest rated system component See Technical Data in all equipment manuals Use fluids and solvents that are compatible with equipment wetted parts See Technical Data in all equipment manuals Read fluid and solvent manufacturer s warnings For complete information about your material request ...

Page 6: ...ontainers closed when not in use Never use solvent on one side if it has been contam inated from the other side Always park pumps when you shutdown Always lubricate threaded parts with Part No 217374 ISO pump oil or grease when reassembling Keep Components A and B Separate Changing Materials When changing materials flush the equipment mul tiple times to ensure it is thoroughly clean Always clean t...

Page 7: ...c oil or a non water based non water absorbent fluid in system Do not use water Repairing this equipment requires access to parts that may cause electric shock or other serious injury if work is not performed properly Electrical trouble shooting must be done by a qualified electrician Be sure to shut off all power to equipment and lock out power at the source before repairing TI2409a TI2421a Flush...

Page 8: ... PROBLEM CAUSE SOLUTION Pump does not run up and down but green switch light is on PARK RUN switch in PARK position Turn PARK RUN switch to RUN No air supply Air supply line not connected Open inlet air ball valve Air pressure regulators set at 0 psi Turn up air pressure regulators Pump runs but no fluid pressure Fluid inlet ball valves closed Open fluid ball valves Fluid pressure low or dropping ...

Page 9: ...plugged on low pressure side Clean inlet filter screen Gun port or filter plugged on high pressure side Clean or replace see gun manual Pump inlet ball not seating or sticking Clean seating see pump manual Drum fluid outlet supply hose too small Use 3 4 in 1 9 cm ID hose with short length Low side feed pump not working Turn on or repair feed pump Pump does not reverse direction Obstruction of air ...

Page 10: ...7 C default setting Hose temperature display overshoots setpoint and or green switch light goes out Hose coiled up on itself too much sends overheated fluid to FTS Straighten out coiled hose Insulation peeled off of hose at FTS sensor inside hose causes the rest of hose to overheat Insulate hose up to FTS FTS must represent bulk of heated hose Hose heat too low Temperature setpoint too low Check s...

Page 11: ...ose from reaching 45 amps Running at full voltage Orange light only comes on when power controller is at 45 amp current limit PROBLEM CAUSE SOLUTION Primary heat temperature controller green switch light goes out Primary heater 230 F 110 C over temperature switch tripped Reset heater switch to START after cooling Solid state relay failed closed Replace solid state relay 165 SSR Primary heat displa...

Page 12: ... Removal 1 Shut off Primary Heater Switch and Hose Heater Switch 2 Perform Pressure Relief Procedure see page 7 3 Perform Flushing Procedure see page 7 4 Turn Main Disconnect Switch OFF H and discon nect power supply Unless otherwise noted all repair procedures must be completed with incoming power switched OFF and locked out at the source Any electrical repair or trou bleshooting required beyond ...

Page 13: ...12 8 Disconnect fittings at inlet Q and outlet M Also disconnect steel outlet tube P from heater inlet 9 Disconnect tubes N from Iso Lube Pump on A side only 10 Push retaining wire clip R up Push retaining pin out 11 Loosen locknut S by hitting firmly with a non sparking hammer 12 Unscrew pump out of pump mounting plate T F G ti8448a P Q M ti8454a M N ti8481a S R T ti8456a ...

Page 14: ...link hole Push retaining pin 436 in Pull retaining wire down to cover pin ends 3 Reconnect fluid inlet Q and outlet M 4 Tighten locknut 431 by hitting firmly with a non sparking hammer 5 For Iso A pump only reconnect two tubing lines N from ISO Pump Lube reservoir Flush and refill res ervoir with TSL 206995 6 Refill Resin B pump wet cup with TSL 206995 7 Reconnect fan wires if they were disconnect...

Page 15: ...us ings 402 Leave fan connected 2 Raise retaining spring 444 and knock retaining pins 436 out of pump rod slots Leave yoke 415 and link 414 in place 3 Press in tube fitting ferrules and pull out tubing to disconnect air lines 4 Remove four bolts 408 to remove entire air motor assembly 5 Remove lock nut 434 from piston rod 437 and remove pump yoke 415 6 Remove four lock nuts 409 washers 407 and tie...

Page 16: ...e electronic plug 3 Remove three screws 424 on air control solenoid valve 4 Replace fittings 425 426 428 and muffler 427 onto new valve 5 Reattach mounting screws and plug retaining screws 6 Reconnect all tubing lines Air Inlet Filter Water Separator Auto Drain Air Filter Element Removal See Air Inlet page 30 1 Close air inlet valve 302 on filter 301 2 Hold in metal spring clip and twist black cov...

Page 17: ...rature control and disconnect See Wiring on page 35 4 Disconnect over pressure switches a Loosen retaining screw b Unplug connector front and back 5 Disconnect two main power leads from wire harness at heater assembly terminal blocks 6 Disconnect two wires from over temperature switch 7 Remove back screw holding wiring bracket to heater shelf Retain screw 8 Remove four screws underneath heater Ret...

Page 18: ...hms reading should be 8 5 If ohm reading is above 10 ohms see step 5 5 Check each fuse in fuse holder Swing open fuse holder by pulling on tab Test each fuse for electrical continuity from end to end Replace if open resis tance is measured If fuses are good see step 6 6 Measure resistance of two heating elements wired in parallel with fuse holders open Resistance between 1A and 2A to be 17 ohms Re...

Page 19: ...er of plug and screw securely back into strainer 8 Reconnect transfer pump air supply and open mate rial inlet supply valve Ensure there are no leaks and wipe equipment clean Isocyanate Pump Lubricant Check pump lubricant daily Change lubricant before it becomes a gel or when its color darkens The time inter val between changes due to gel formation will depend on environmental conditions To change...

Page 20: ...tween pins of cable connector 4 If FTS fails test replace FTS An alternating hose controller display of SbEr and H0 00 indicates a loss of signal from the FTS Two conditions must be satisfied for proper FTS operation The sensor must be functional The signal must travel uninterrupted from the sensor to the control unit Pins Result 1 to 2 Approximately 35 ohms per 50 ft 15 2 m of hose plus approxima...

Page 21: ...in reverse order of removal Leave slack in cables as stress relief to prevent cable failure 4 Secure power connector NN with wire tie PP to prevent it from pulling apart 5 Secure hose and cable connection with tape and install protective covering FIG 1 Fluid Temperature Sensor and Heated Hoses CAUTION To prevent damage to probe do not kink or exces sively bend whip hose Do not coil hose tighter th...

Page 22: ...nut on back of knobs to remove Counter 1 Pry tabs of retaining clip away from top and bottom of counter body 2 Push counter out from back towards front Red Stop Switch 1 Remove yellow locking tab on back of switch 2 Rotate metal tab counterclockwise 3 Pull contact block straight back and off 4 Unscrew round nut on back of knob to remove Checking Heated Hose Power Controller The controller next to ...

Page 23: ...t the hose The thermometer will read 10 20 F less than actual fluid temperature Repair the temperature sensor or cable as soon as possible to avoid damaging the heated hose Air Motor Up Down Pressure Regulators Gauges Regulators Unscrew block nut on front of panel Push regulator out to the back Gauges 1 Remove air fitting 2 Remove brass nut and clamp 3 Push gauge out to front Control Panel Wiring ...

Page 24: ...earing piston and cylinder o rings TSL Throat Seal Liquid 206995 1 qt 1 liter bottle 206996 1 gal 3 8 liter container Heated Hoses 50 ft 15 2 m and 25 ft 7 6 m lengths 1 4 in 6 mm 3 8 in 10 mm or 1 2 in 13 mm diameter 2000 psi 14 MPa 140 bar or 3500 psi 24 MPa 241 bar See 309572 Heated Whip Hoses 10 ft 3 m whip hose 1 4 in 6 mm or 3 8 in 10 mm diameter 2000 psi 14 MPa 140 bar or 3500 psi 24 MPa 24...

Page 25: ...SO A side 15C851 ISO A Pump Repair Kit for 246831 pump 246963 Wet Cup Kit for 246831 pump 206995 TSL bottle 1 qt 1 liter 101078 Y Strainer includes 180199 element 180199 Element Y Strainer 20 mesh 114228 Element air filter 5 micron 255057 Kit Air Motor Seal 108636 Muffler qty 2 239914 Valve recirc spray includes seat and gasket 120624 Fuse heating element qty 4 260938 Heating element qty 4 116225 ...

Page 26: ...ts Reactor A 20 FIG 2 Reactor A 20 Apply threadlock to screw threads 1 ti8494b ti8494b ti8730a 9 8 11 10 5 55 56 51 52 27 3 36 1 40 2 43 54 45 6 67 65 53 4 61 7 33 26 25 29 31 30 32 89 See page 30 24 39 37 37 1 37 37 22 37 ...

Page 27: ...rator 1 32 120580 SWITCH fourth pole 1 33 120387 CONTROL hose power 240V 1 35 114128 FITTING elbow male swivel 4 36 C19837 SCREW cap socket hd 3 8 16 x 1 4 37 108296 SCREW hex washer hd 1 4 20 20 39 15J224 WIRE high current to hose 1 40 112125 PLUG tube 2 41 114151 FITTING elbow male swivel 4 42 100451 COUPLING 2 43 117623 NUT cap 3 8 16 4 45 114269 GROMMET rubber 1 46 113505 NUT keps hex hd 10 24...

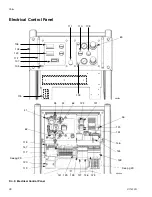
Page 28: ...rical Control Panel FIG 3 Electrical Control Panel 106 104 143 112 110 108 107 111 109 ti8452a 115 105 122 118 117 147 121 120 119 123 124 128 146 145 125 126 127 141 129 ti8483a 46 64 42 35 41 62 See pg 29 See pg 29 148 63 ...

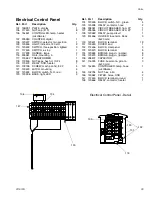
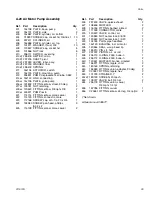
Page 29: ...switch N O red 4 123 120496 BASE light LED 3 124 120495 BLOCK switch N C green 4 125 120498 RELAY contactor hose 2 126 295351 CIRCUIT BREAKER 16A 2P 1 127 295355 CIRCUIT BREAKER 32A 2P 1 128 120489 RELAY pump circuit 1 129 514556 HOLDER fuse term block 5x20 mm 3 130 120491 BLOCK terminal 19 131 120490 COVER end 1 132 112446 BLOCK clamp end 3 133 120570 BLOCK terminal 5 134 120485 BRIDGE plug in ju...

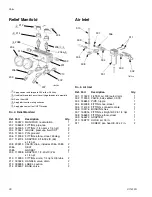
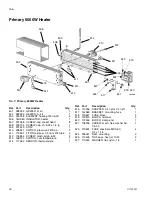
Page 30: ...5 LABEL caution 1 214 224807 BASE valve 2 201 204 209 213 212 214 206 202 210 208 205 203 Apply sealant and torque to 250 in lbs 28 N m 1 Use blue thread lock on valve cartridge threads into manifold 2 Part of item 208 3 Apply lubricant to mating surfaces 4 Apply pipe sealant to all NPT threads 5 4 2 ti8459a 4 1 207 208a 208b 3 3 Ref Part Description Qty 301 117629 FILTER air 3 8 auto drain 1 302 ...

Page 31: ...Parts 311512A 31 ...

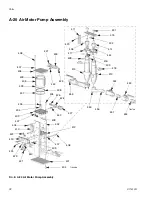
Page 32: ...r Pump Assembly 404 401 409 407 408 402 412 409 442 427 407 426 425 404 438 437 435 434 403 404 410 422 430 424 429 421 440 439 405 439 406 407 408 427 426 425 442 TI8479b TI8480b 431 415 432 414 416 444 411 423 436 417 418 419 428 413 455 450 456 452 451 453 454 433 ...

Page 33: ...421 114114 FITTING elbow male swivel 2 422 114129 FITTING connector male 2 423 112166 SCREW cap sch 1 4 20 x 3 4 1 424 15F980 SCREW pan head phillips 8 32 x 2 3 425 114128 FITTING elbow male swivel 2 426 297439 VALVE quick exhaust 2 427 108636 MUFFLER 2 428 116746 FITTING barbed plated 2 429 111328 CONNECTOR male 1 430 120522 VALVE control air 1 431 120553 NUT center lock 5 8 18 2 432 120552 NUT c...

Page 34: ... 1 4 lg 1 509 297529 STOP 1 510 296821 SWITCH pressure 2200 psi 2 511 119891 FITTING elbow 1 4 npt x 3 8 tube 4 512 103854 SCREW mach bdgh 6 32 2 513 15B137 SWITCH over temperature 1 514 117484 SENSOR thermocouple 1 515 113336 ADAPTER 1 4 nptm 1 4 nptf 1 517 15J583 BRACKET mounting fuse 1 518 120621 FUSE block 4 519 120570 BLOCK terminal 2 520 112446 BLOCK clamp end 1 521 108296 SCREW mach hex was...

Page 35: ...Parts 311512A 35 ...

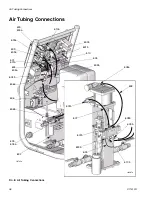
Page 36: ...6 311512A Air Tubing Connections FIG 8 Air Tubing Connections 610a 610 600b 601b 605b 606a 604b 604 604a 601 601a 609 609a 605a 600 600a 606 606b 603 603a 602 608a 608 608b 609b 610b 603 603b 607b 607 607a 605 ti8735a ti8487a ...

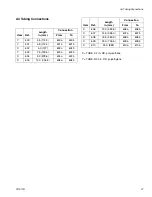
Page 37: ...nection From To Y 600 4 5 114 3 600a 600b Y 601 4 5 114 3 601a 601b X 602 5 0 127 602a 602b Y 603 7 5 190 5 603a 603b X 604 9 0 228 6 604a 604b X 605 12 0 304 8 605a 605b X 606 19 0 482 6 606a 606b X 607 14 5 368 3 607a 607b X 608 18 5 469 9 608a 608b X 609 29 0 736 6 609a 609b X 610 35 0 889 610a 610b Item Ref Length in mm Connection From To ...

Page 38: ...Reactor A 20 Wiring Schematic 38 311512A Reactor A 20 Wiring Schematic ...

Page 39: ...Reactor A 20 Wiring Schematic 311512A 39 ...

Page 40: ...Reactor A 20 Wiring Schematic 40 311512A ...

Page 41: ...Reactor A 20 Wiring Schematic 311512A 41 ...

Page 42: ...Reactor A 20 Wiring Schematic 42 311512A ...

Page 43: ...Wiring Diagrams 311512A 43 Wiring Diagrams Heater Circuit ...

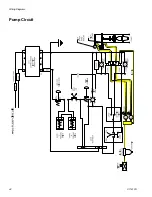
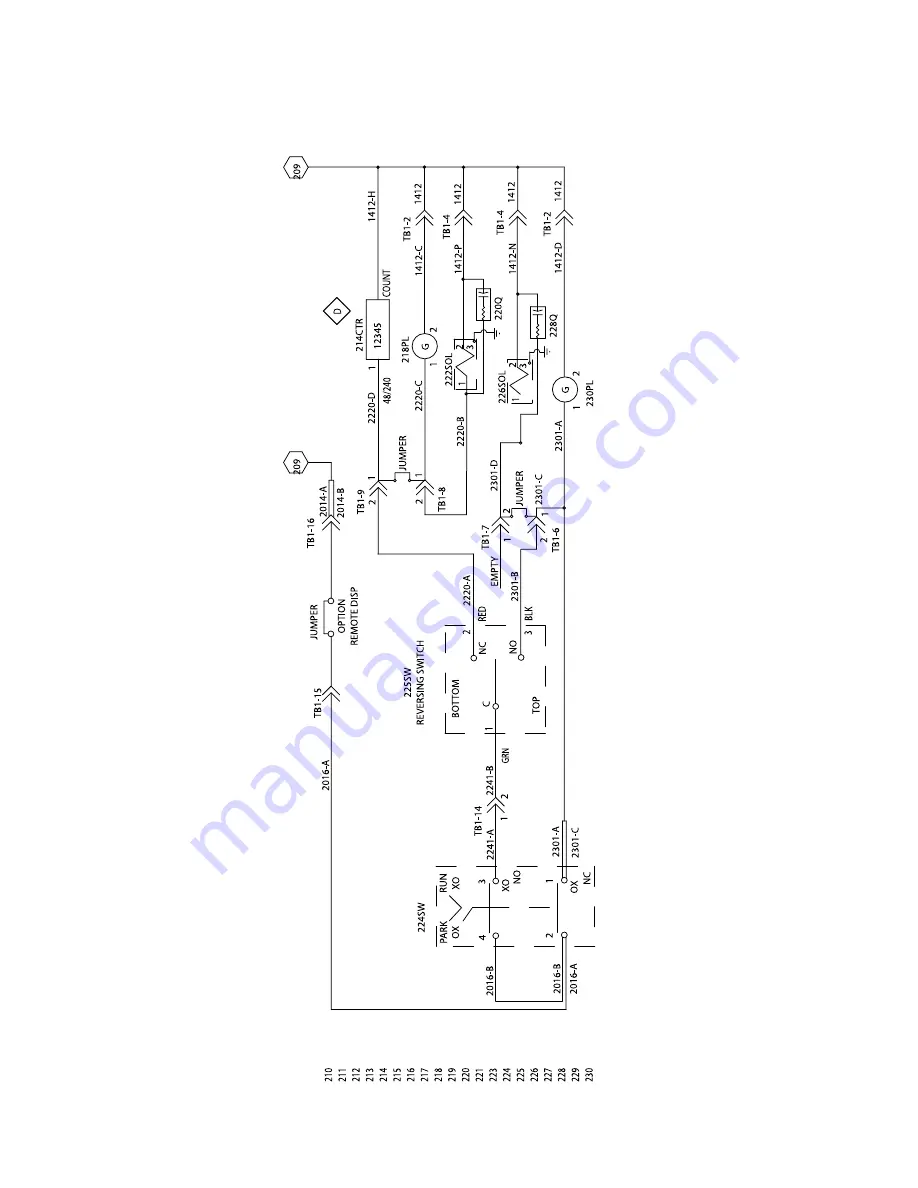
Page 44: ...Wiring Diagrams 44 311512A Pump Circuit ...

Page 45: ...Wiring Diagrams 311512A 45 Hose Circuit ...

Page 46: ...Wiring Diagrams 46 311512A ...

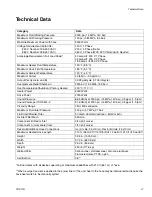
Page 47: ... 120 F 49 C Maximum Output 20 lb min 9 0 kg min Output Per Cycle A and B 0 028 gal cycle 0 105 ltr cycle Overpressure Relief Shutdown 2250 psi 15 5 MPa 155 bar Over Temperature Shutdown Primary Heater 230 F 110 C Heater Power 6000 Watts Hose Power 2790 Watts Sound Pressure 86 3 dB A at 2000 psi 14 MPa 140 bar 0 5 gpm 1 9 lpm Sound Power per ISO 9614 2 91 6 dB A at 2000 psi 14 MPa 140 bar 0 5 gpm 1...

Page 48: ... or workmanship repairs will be made at a reasonable charge which charges may include the costs of parts labor and transportation THIS WARRANTY IS EXCLUSIVE AND IS IN LIEU OF ANY OTHER WARRANTIES EXPRESS OR IMPLIED INCLUDING BUT NOT LIMITED TO WARRANTY OF MERCHANTABILITY OR WARRANTY OF FITNESS FOR A PARTICULAR PURPOSE Graco s sole obligation and buyer s sole remedy for any breach of warranty shall...

Reviews: